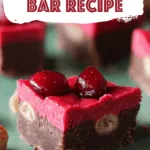
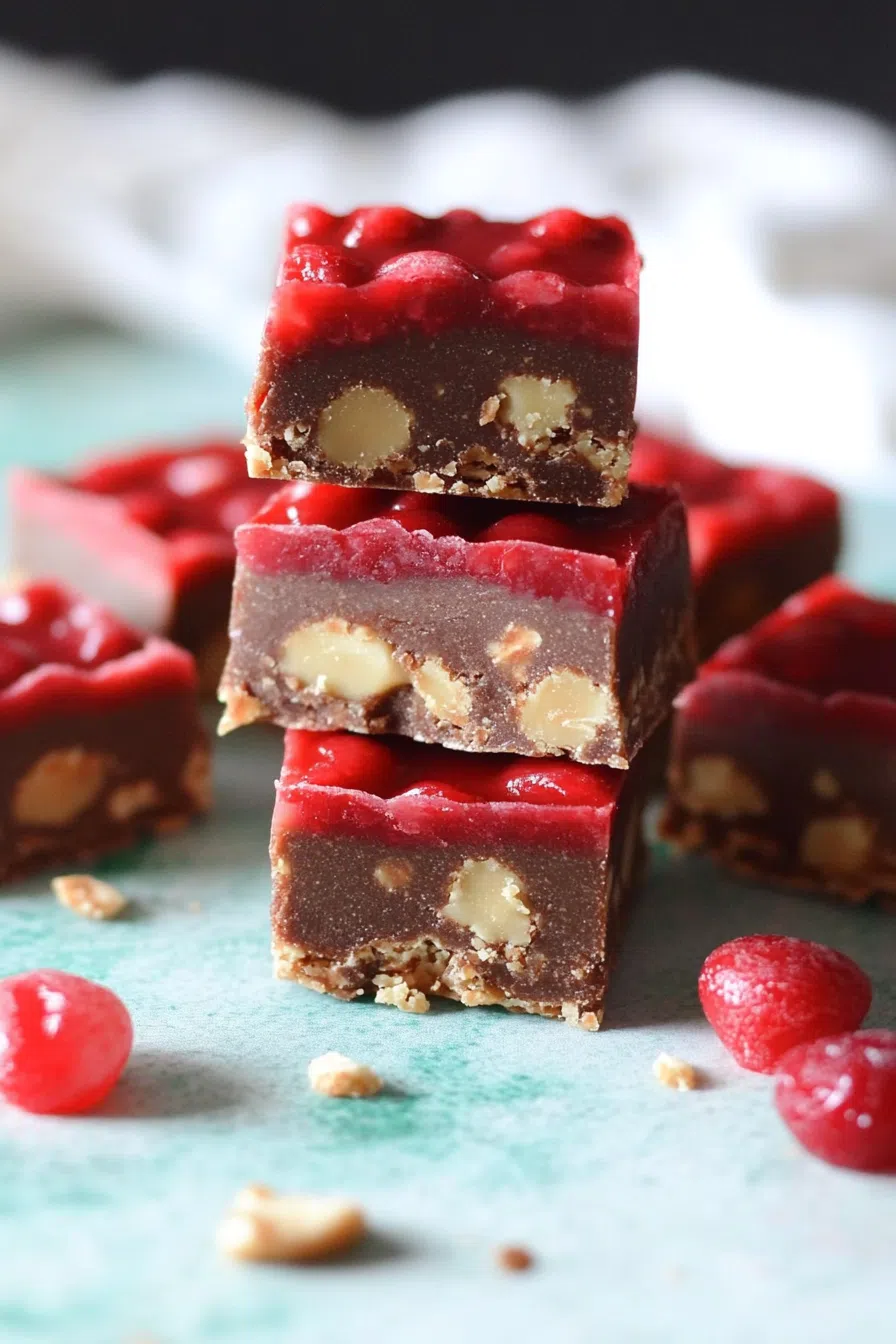
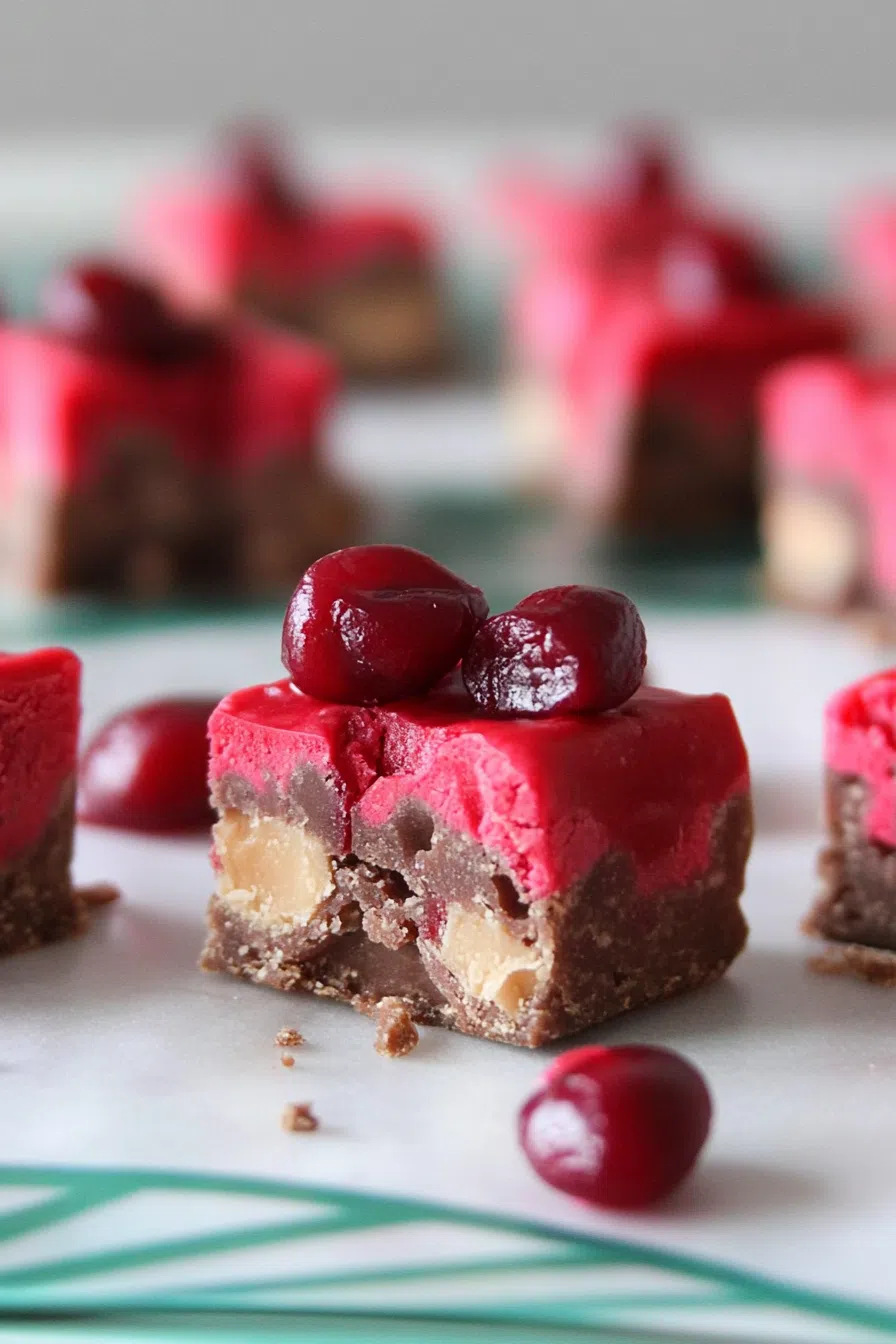
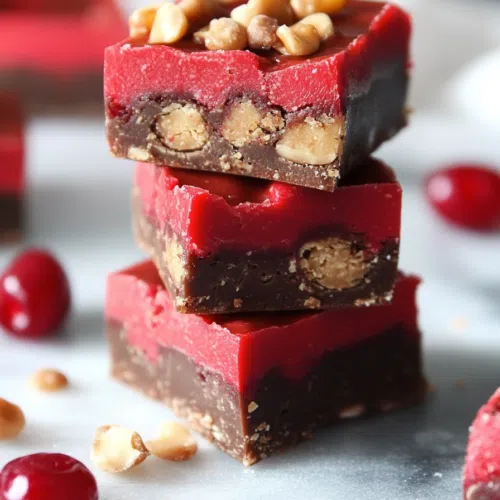
This Cherry Mash Bar Recipe is a homemade twist on the classic candy bar! Made with cherry chips, marshmallows, chocolate, and crunchy peanuts, it’s an easy and nostalgic treat.
There are certain flavors that instantly transport you back in time, and for me, Cherry Mash bars are one of them. If you grew up in the Midwest, you probably remember seeing those red-wrapped candy bars at gas stations or tucked away in grandma’s candy stash. That sweet cherry center, crunchy peanut-chocolate coating, and perfectly balanced flavors—they were an instant favorite.
Now, here’s the thing: store-bought Cherry Mash bars are great, but making them at home? WAY better.
The first time I made these, I’ll be honest—I wasn’t sure how they’d turn out. Cherry chips? Would they melt properly? Would the flavor be too strong? But after one bite, I knew I had just one-upped the original. The smooth, creamy cherry filling, the rich chocolate peanut topping, and that sweet-salty crunch? Absolute perfection.


And let’s talk about how stupidly easy these are to make. No candy thermometer, no complicated techniques—just melt, mix, layer, and chill. They look fancy, taste incredible, and require barely any effort. What’s not to love?
If you’re a fan of chocolate, cherries, and ridiculously good no-bake treats, you’re gonna love these.
Why You’ll Love This Cherry Mash Bar Recipe?
-
Nostalgic flavor, but even better homemade!
-
Super quick & easy—just mix, layer, and chill.
-
Sweet cherry filling + crunchy peanut topping = pure bliss.
-
Perfect for holiday trays, gifts, or just because.
-
Easy to customize—switch up the chocolate, nuts, or sweetness level!
Ingredient Notes:
This recipe is all about simple ingredients coming together for an irresistible bite. Here’s what each one does:
- Sugar – Sweetens and helps the cherry layer set up properly.
- Butter – Adds richness and keeps everything smooth.
- Half-and-Half (or Evaporated Milk) – Makes the cherry filling creamy and smooth.
- Mini Marshmallows – Gives the cherry layer a chewy, fluffy texture.
- Cherry Chips – The star of the show! These add that signature cherry flavor and color.
- Chocolate Chips – Because cherry and chocolate are soulmates.
- Peanut Butter – Makes the chocolate layer extra creamy and rich.
- Salted Peanuts – Adds crunch and a salty contrast to the sweetness.
Pro Tip: If you can’t find cherry chips, use white chocolate chips with a little cherry extract and pink food coloring. Works like a charm!
How To Make Cherry Mash Bar?
Step 1: Make the Cherry Layer
In a saucepan over medium-high heat, combine sugar, butter, salt, and half-and-half. Bring it to a rolling boil and let it cook for about 5 minutes, stirring occasionally.
Once it’s bubbling away, stir in the marshmallows and cherry chips until everything is smooth and fully melted.
Pour the cherry mixture into a parchment-lined 8×8 or 9×9-inch pan, spreading it evenly.
Pro Tip: Work fast! The cherry mixture sets up quickly, so spread it out before it thickens too much.
Step 2: Make the Chocolate-Peanut Topping
In a small pan over low heat, melt the chocolate chips and peanut butter, stirring constantly until smooth.
Once melted, stir in the salted peanuts and mix well.
Pour this chocolate-peanut mixture over the cherry layer, spreading it evenly to cover the top.
Want To Save This Recipe?
Pro Tip: If you love extra crunch, sprinkle additional chopped peanuts on top before it sets!
Step 3: Chill & Slice
Place the pan in the refrigerator for at least an hour to let everything firm up.
Once set, lift the bars out of the pan using the
Pro Tip: For clean, smooth slices, warm your knife under hot water, wipe it dry, and then cut.

Storage Options:
- Room Temperature: Store in an airtight container for up to 3 days.
- Fridge: Keep them in the fridge for up to 2 weeks—great for making ahead!
- Freezer: Wrap individual bars and freeze for up to 2 months. Just thaw at room temp before eating.
Pro Tip: If they’re too firm straight from the fridge, let them sit at room temp for 10 minutes before eating. The flavors pop more when they’re slightly softened!
Variations and Substitutions:
Want to experiment? Try these fun variations:
- Dark Chocolate Cherry Mash Bars – Swap milk chocolate for dark chocolate for a richer, slightly less sweet flavor.
- Cherry-Almond Mash Bars – Use chopped almonds instead of peanuts and add a dash of almond extract.
- Maraschino Cherry Mash Bars – Stir ½ cup finely chopped maraschino cherries into the cherry layer for an extra fruity punch!
- White Chocolate Cherry Bars – Use white chocolate instead of milk chocolate for a completely different but delicious version.

What to Serve with Cherry Mash Bar?
These bars are already amazing on their own, but if you want to get fancy, try pairing them with:
- A hot cup of coffee – Because cherry, chocolate, and coffee? Yes, please.
- A scoop of vanilla ice cream – It balances out the richness beautifully.
- A glass of red wine – If you’re feeling fancy, cherry and chocolate pair perfectly with a bold cabernet.
Frequently Asked Questions:
Can I use evaporated milk instead of half-and-half?
Yep! Both work great in this recipe, so use whatever you have on hand.
Can I make these nut-free?
Absolutely—just skip the peanuts or replace them with sunflower seeds for a little crunch.
Do I have to use cherry chips?
If you can’t find them, substitute white chocolate chips + cherry extract + a little red food coloring for a similar flavor and color!
These Are a MUST-MAKE!
If you love Cherry Mash candy bars, or just chocolate and cherry in general, these homemade Cherry Mash Bars are the treat to make.
They’re sweet, chewy, crunchy, and totally addicting—plus, they look impressive enough for the holidays but are easy enough for an everyday treat.

So, what do you think? Are you a chocolate-cherry fan, or do you have another nostalgic candy bar you love? Let’s chat in the comments!
Keep the Flavor Coming – Try These:
Cherry Mash Bar Recipe
Ingredients
For the Cherry Layer:
- 1 cup granulated sugar
- 2 tablespoons unsalted butter or margarine
- ¼ teaspoon salt
- ⅓ cup half-and-half or undiluted evaporated milk
- 1 cup miniature marshmallows
- 1 cup cherry chips
For the Chocolate-Peanut Topping:
- 1 cup chocolate chips milk or bittersweet
- ½ cup peanut butter
- 1 cup salted peanuts
Instructions
Prepare the Cherry Layer
- In a medium saucepan, combine the sugar, butter, salt, and half-and-half (or evaporated milk) over medium-high heat. Stir occasionally and bring the mixture to a rolling boil.
- Continue boiling for approximately 5 minutes, stirring periodically to prevent scorching.
- Reduce the heat to low and add the miniature marshmallows and cherry chips. Stir continuously until the mixture is fully melted and smooth.
- Line an 8x8-inch or 9x9-inch baking dish with parchment paper. Pour the cherry mixture into the prepared dish, spreading it evenly with a spatula.
- Allow the cherry layer to cool slightly while preparing the chocolate-peanut topping.
Prepare the Chocolate-Peanut Topping
- In a small saucepan, melt the chocolate chips and peanut butter over low heat, stirring frequently until smooth and glossy.
- Once melted, add the salted peanuts and stir to distribute evenly.
- Pour the chocolate-peanut mixture over the cherry layer, ensuring an even spread across the surface.
Chill and Slice
- Place the baking dish in the refrigerator for at least 1 hour to allow the bars to fully set.
- Once firm, remove from the dish by lifting the parchment paper and transferring to a cutting board.
- Using a sharp knife warmed under hot water, cut into small squares or desired portions.
- Store in an airtight container at room temperature for up to 3 days or in the refrigerator for up to 2 weeks.
Notes
I’m Bitty, owner of nodashofgluten.com, where I share simple, delicious recipes for all tastes, including gluten-free. Check out my “About Me” page for more info!