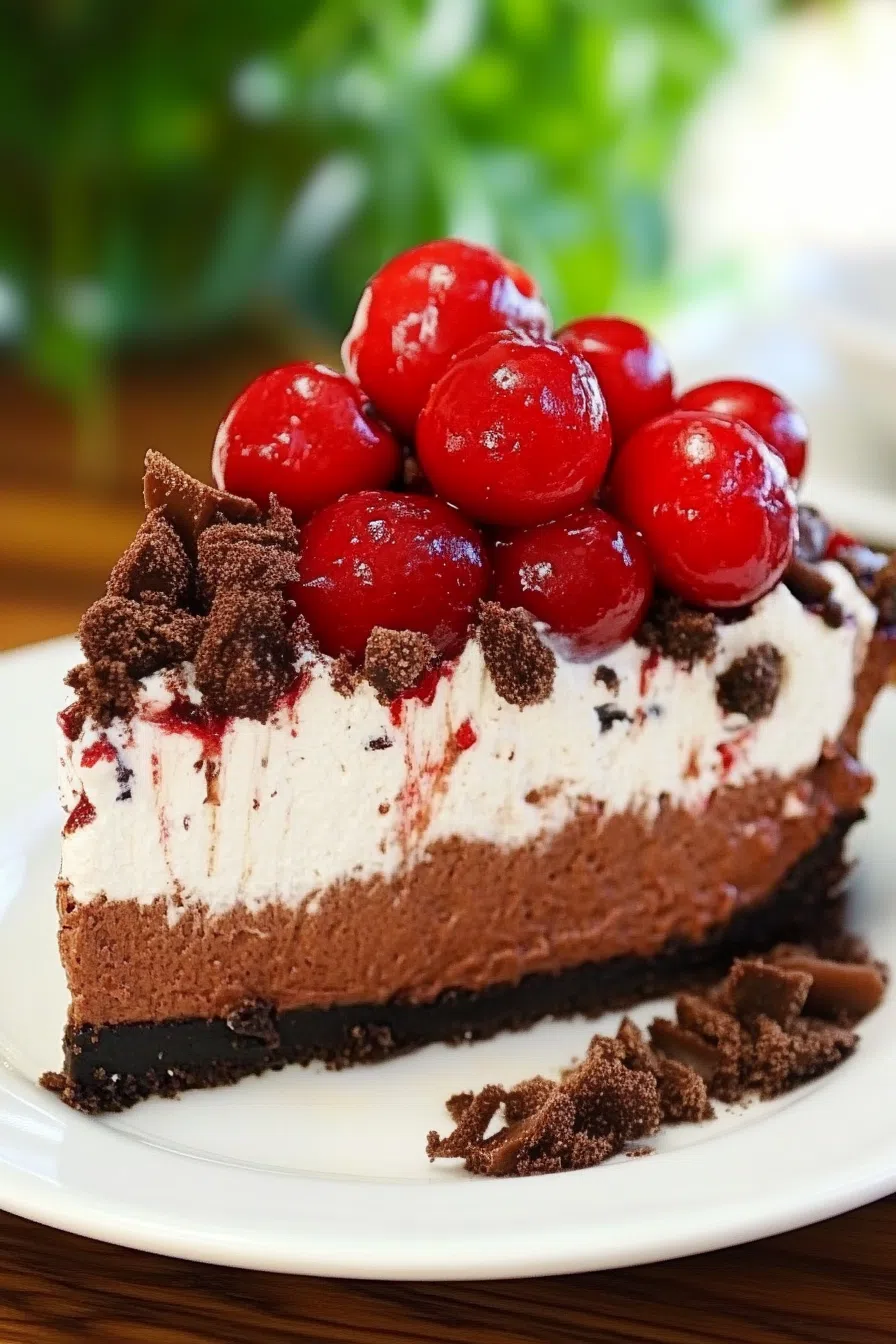
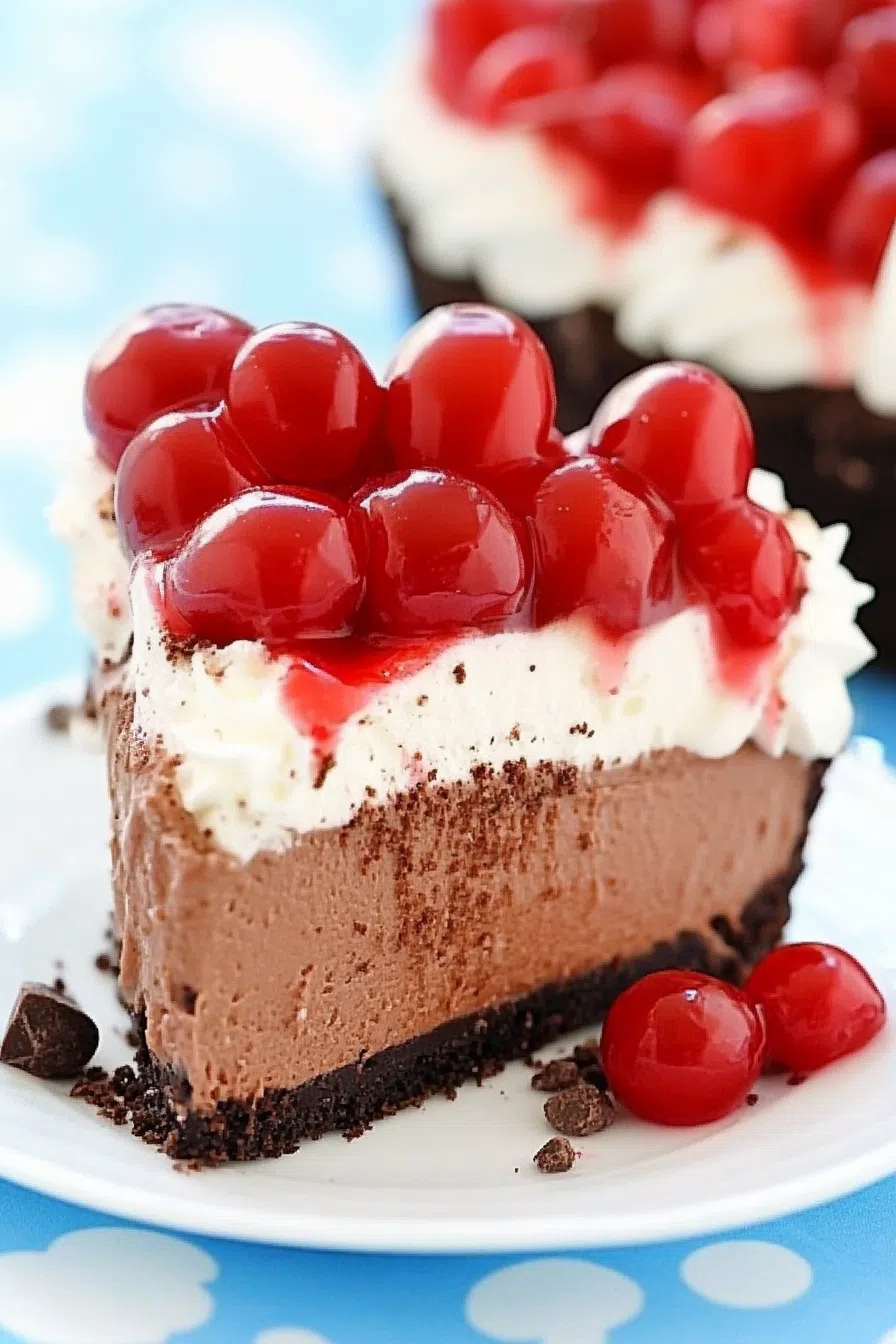
Cream cheese, chocolate, Oreo crust, cherries, whipped cream—this Instant Pot Black Forest Cheesecake is decadent, easy, and impossible to forget.
You ever have one of those “I’ve got this!” moments turn into “oh no I absolutely do not got this”? That was me. It was a rainy Saturday (because of course it was), and I had promised dessert for a family dinner. Not just any dessert—a rich, decadent, cherry-topped chocolate cheesecake. Bold, right?
The plan was to bake it the night before. But I forgot. Totally forgot. I remembered the second I opened the fridge and saw the cream cheese blocks still sitting there, silently judging me.
I panicked. My oven takes forever to preheat, and I didn’t have time for the whole water bath ritual. Honestly, even if I did, I didn’t want to mess with it. So I grabbed my Instant Pot. I had read somewhere, in passing, that it could make cheesecake. At the time, I thought: who does that? Well—me. Apparently.


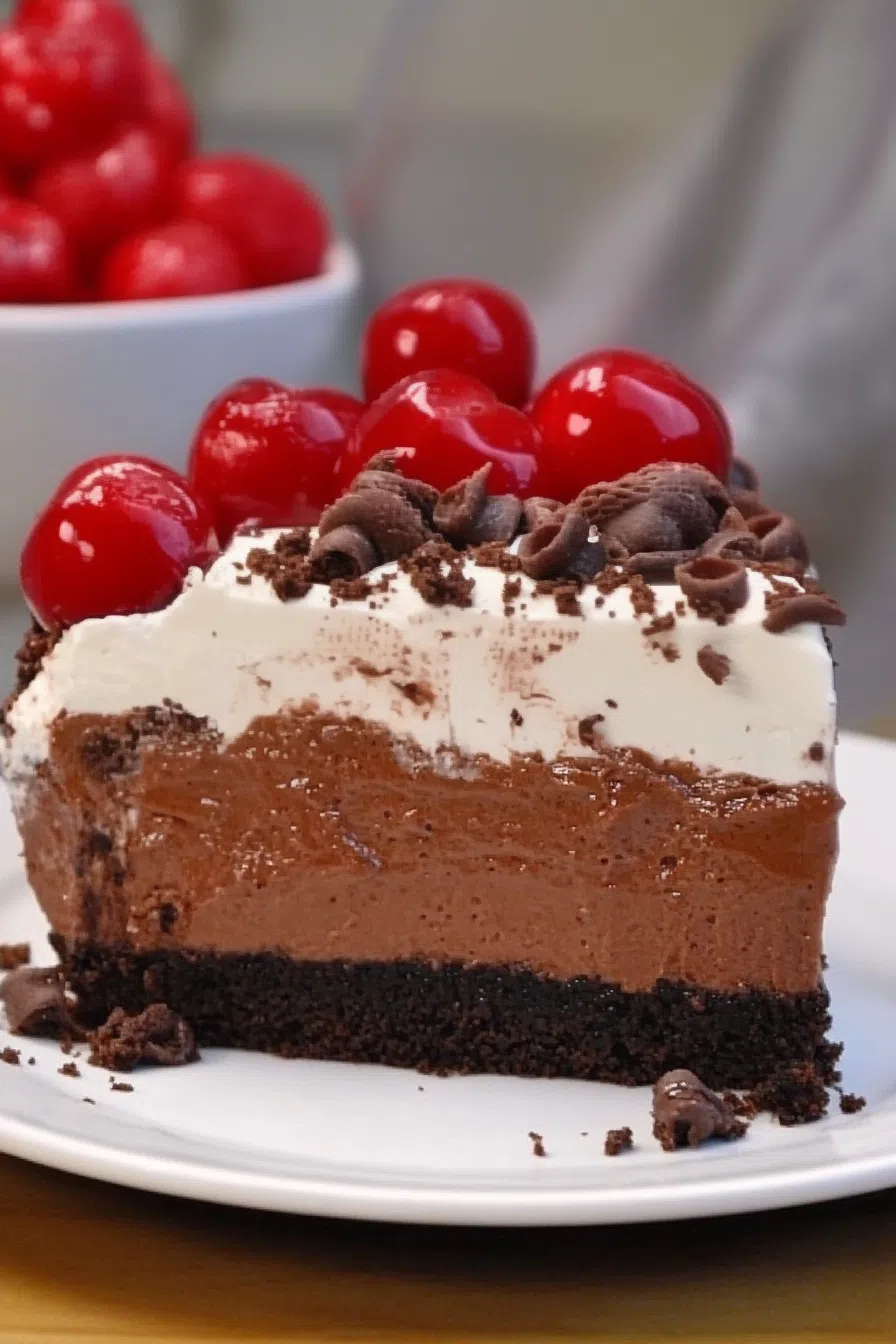
Fast-forward a chaotic 90 minutes later, I was walking into dinner with this Instant Pot Black Forest Cheesecake, not knowing if it had even set. But it looked good. It smelled incredible. And the moment I cut into it and saw that perfect creamy slice with cherries tumbling down the sides—I felt like I had pulled off a culinary heist.
Not gonna lie… I’ve been making it ever since. Sometimes for parties. Sometimes just for us. Once, for no reason other than “Tuesday felt long.”
Why You’ll Love This Instant Pot Black Forest Cheesecake Recipe?
There’s something kind of wild about making a cheesecake in a pressure cooker, right? I mean, it doesn’t sound like it should work. But it does. It really does. It’s like this weird little cheat code for rich, creamy desserts without the fuss. No cracks. No babysitting a water bath. No oven politics.
And flavor-wise? You’re getting that lush, slightly tangy chocolate cheesecake, an Oreo crust that’s just a bit fudgy, and a juicy cherry topping that feels like 1970s dessert glamour in the best way. Cool Whip swirls? Optional. But also… not really.
Honestly, this Instant Pot Black Forest Cheesecake gives you bakery-level dessert without all the overthinking. I don’t want to say it changed my life, but… okay yeah, it kind of did.
Ingredient Notes:
You don’t need a huge shopping list. Just a few key players and you’re golden.
For the crust:
-
Oreos (about 24): Yes, with the filling. It’s part of the magic.
-
Unsalted Butter (¼ cup): Melted, obviously. This holds the crumbs together and adds that buttery richness.
For the cheesecake filling:
-
Cream Cheese (2 blocks): Room temp, or you’ll be cursing your mixer later. Trust me.
-
Sour Cream (½ cup): Adds that classic tang and keeps it from tasting flat.
-
Sugar (⅓ cup): You don’t need much, since the chocolate and cherries do most of the heavy lifting.
-
Cocoa Powder (2 tablespoons): Deepens the flavor. Makes it feel fancy.
-
Melted Semi-Sweet Chocolate Chips (½ cup): For richness. And yes, lick the spoon. No shame.
-
Vanilla Extract (1 teaspoon): It’s the supporting actor that ties the whole thing together.
-
Eggs (2 large): One at a time, slow and steady. This isn’t a race.
For the topping:
-
Cherry Pie Filling (12 oz): Store-bought works perfectly. Don’t overthink it.
-
Cool Whip (8 oz): Light, fluffy, easy. And yeah, it’s nostalgic.
-
Chocolate Sprinkles: Optional, but why not?
How To Make Instant Pot Black Forest Cheesecake?
Step 1. Start with the crust
Grab a 6-inch springform pan. Line the bottom with parchment and spray the sides with nonstick spray—because fighting with crust stuck to the pan is a special kind of heartbreak.
Crush the Oreos in a food processor. Don’t have one? A zip-top bag and a rolling pin work too (plus, very therapeutic). Mix in the melted butter. Press it firmly into the pan—think “firm but not aggressive.” Pop it in the freezer so it sets while you make the filling.
Step 2. Mix the cheesecake filling
In a big bowl, beat the cream cheese, sugar, and sour cream until it’s smooth and creamy. You want it to feel like frosting—no lumps. Add the cocoa, melted chocolate, and vanilla. Then beat in the eggs, one at a time. Be gentle. This isn’t whipped cream. Overmixing = air bubbles = cracks. Don’t stress it though. That’s what Cool Whip is for.
Want To Save This Recipe?
Pour the batter into your chilled crust. Smooth the top. Feel powerful.
Step 3. Time to pressure cook
Cover the pan tightly with foil. Pour 1 cup of water into your Instant Pot and place the trivet inside. Gently place the cheesecake on top of the trivet. Close the lid, set to Sealing, and cook on High Pressure for 35 minutes. When it’s done, let it naturally release for 20 minutes. That part’s important—don’t skip it.
Remove the lid, carefully blot any condensation from the foil (paper towels to the rescue), and lift the pan out. Let it cool on a wire rack. Then refrigerate it overnight. I know, that part’s hard. But the flavor gets better, the texture sets, and you wake up knowing cheesecake is in the fridge.
Step 4. Decorate & serve
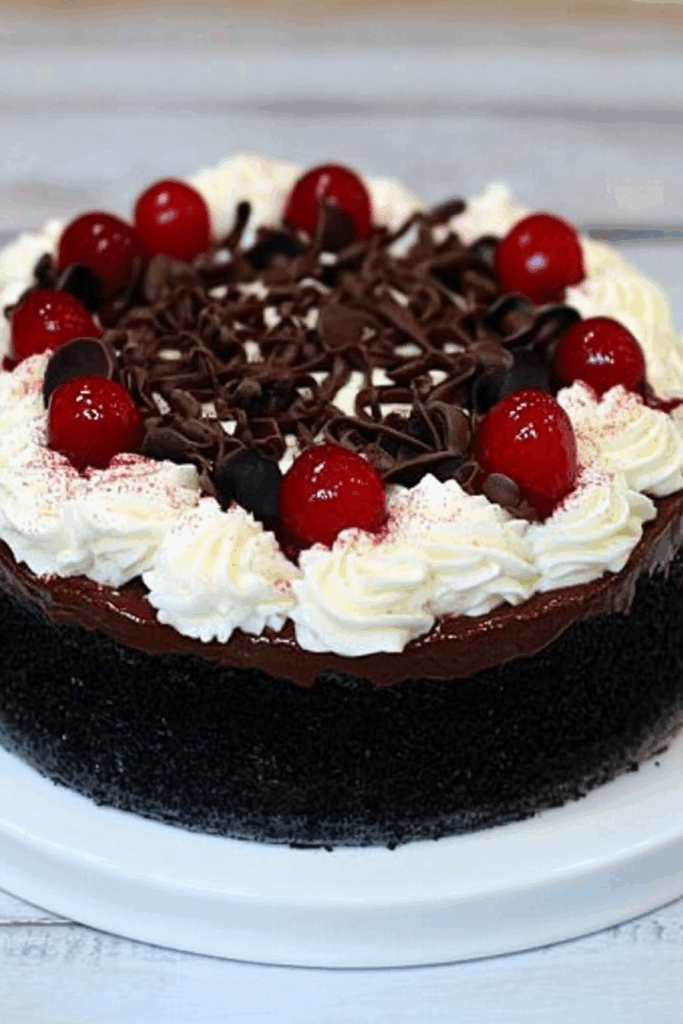
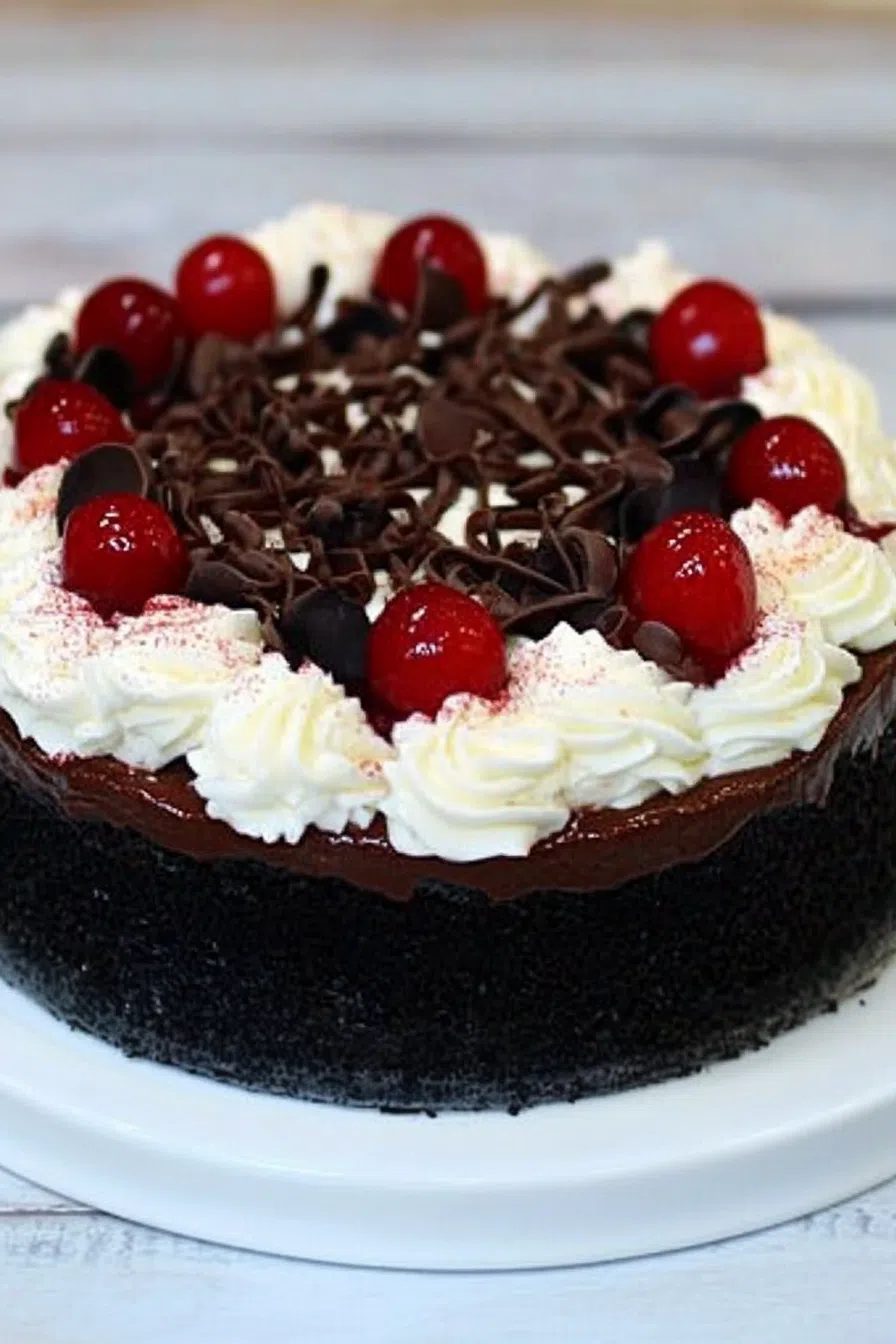
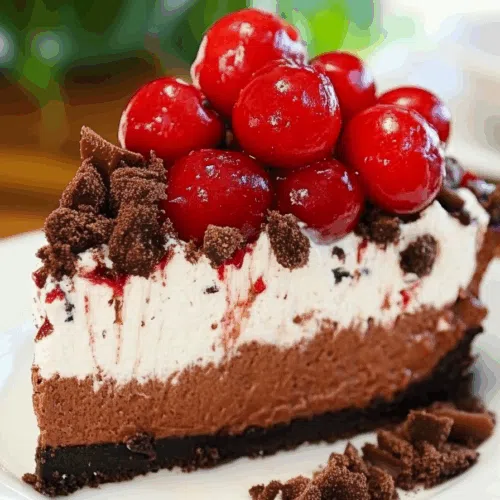
Run a knife around the edge to release the crust. Remove the pan. Transfer your masterpiece to a plate. Pipe (or spoon, or artfully dollop) Cool Whip around the edges. Fill the center with cherry pie filling. Sprinkle with chocolate sprinkles. Admire your work.
Then slice. And eat. And maybe don’t share the last piece. I won’t tell.
Storage Options:
Store any leftovers (if there are any) in the fridge, covered tightly. It’ll last 4–5 days. You can also freeze slices—wrap them in plastic and foil and freeze for up to a month. Thaw overnight in the fridge. Or don’t. Frozen cheesecake has a moment too.
Variations and Substitutions:
-
Out of Oreos? Use chocolate graham crackers or even pretzels. Wild, but delicious.
-
Not a cherry fan? Try raspberry or strawberry pie filling.
-
Want more drama? Drizzle chocolate ganache on top before adding the cherries.
-
Feeling brave? Stir a little espresso powder into the filling for mocha vibes.
-
Need it gluten-free? Use GF sandwich cookies for the crust—easy fix.
What to Serve with Instant Pot Black Forest Cheesecake?
Honestly? Nothing. It’s a full experience. But if you’re feeling generous:
-
Hot coffee or espresso – balances the sweetness
-
A glass of red wine – like you’re really doing dessert right
-
More cherries – because when is that ever a bad idea?
Frequently Asked Questions:
Can I make this ahead?
Yes, yes, YES. It’s actually better the next day. So make it the night before, chill overnight, and relax.
Can I use real whipped cream?
Totally. I usually go with Cool Whip because it’s quick, but homemade whipped cream? Always welcome.
Do I have to use a springform pan?
For this? Yeah. You want easy release and clean slices. A regular cake pan’s gonna make things awkward.
This Instant Pot Black Forest Cheesecake isn’t about perfection. It’s about showing up with dessert, even when life’s a little messy. It’s rich and creamy and nostalgic and just the tiniest bit over-the-top—in the best way.
And whether you make it for a birthday, a holiday, or just a regular ol’ Tuesday that needed a pick-me-up, I hope it brings you the same weird joy it brings me.
Try it. Tweak it. Top it with whatever makes you smile. And if you do make it, let me know how it goes—especially if something hilarious happens. I love a good baking story.
Now go grab that Instant Pot. Dessert’s calling.
Keep the Flavor Coming – Try These:
Instant Pot Black Forest Cheesecake
Ingredients
For the Crust:
- 2 cups crushed Oreo cookies
- ¼ cup unsalted butter melted
For the Chocolate Cheesecake Filling:
- 16 oz two 8 oz blocks cream cheese, softened
- ½ cup sour cream
- ⅓ cup granulated sugar
- 2 tablespoons unsweetened cocoa powder
- 2 large eggs
- ½ cup semi-sweet chocolate chips melted
- 1 teaspoon vanilla extract
For the Topping:
- 12 oz cherry pie filling
- 8 oz whipped topping e.g., Cool Whip
- Chocolate sprinkles for garnish (optional)
Instructions
Prepare the Crust:
- Line the bottom of a 6-inch springform pan with parchment paper and lightly spray the sides with baking spray.
- Using a food processor, finely crush the Oreo cookies. In a medium bowl, combine the crushed cookies with the melted butter until evenly moistened.
- Press the mixture firmly into the base of the prepared springform pan to form a compact crust.
- Place the pan in the freezer while preparing the cheesecake filling.
Prepare the Cheesecake Filling:
- In a large mixing bowl, beat together the softened cream cheese, sour cream, and sugar until smooth and well combined.
- Add the cocoa powder, melted chocolate, and vanilla extract. Mix until incorporated.
- Add the eggs one at a time, beating gently after each addition until just combined. Avoid overmixing to prevent excess air in the batter.
- Pour the cheesecake batter over the prepared crust and smooth the top with a spatula.
- Cover the top of the springform pan securely with aluminum foil.
Pressure Cook the Cheesecake:
- Pour 1 cup of water into the base of the Instant Pot. Insert the trivet.
- Carefully place the foil-covered springform pan onto the trivet inside the pot.
- Seal the lid and ensure the valve is set to “Sealing.” Select the Manual (or Pressure Cook) setting on High Pressure for 35 minutes.
- Once the cooking time is complete, allow the pressure to naturally release for 20 minutes before opening the lid.
- Remove the pan from the Instant Pot and gently dab the foil with a paper towel to absorb any condensation.
- Allow the cheesecake to cool completely on a wire rack. Then refrigerate, covered, for at least 8 hours or overnight.
Decorate and Serve:
- Once chilled, run a sharp knife around the edge of the cheesecake to loosen it from the pan. Release and remove the springform.
- Transfer the cheesecake to a serving plate.
- Pipe or spoon the whipped topping around the edge of the cheesecake.
- Spoon the cherry pie filling into the center.
- Sprinkle with chocolate sprinkles if desired. Slice and serve.
Notes
- Oreo Substitution: Use certified gluten-free chocolate sandwich cookies in place of traditional Oreos.
- Ensure Gluten-Free Ingredients: While the other ingredients are generally gluten-free, always double-check labels on items such as pie filling, chocolate chips, and whipped topping to confirm they do not contain gluten or cross-contaminants.
With these simple adjustments, the recipe can be made suitable for a gluten-free diet without compromising taste or texture.
I’m Bitty, owner of nodashofgluten.com, where I share simple, delicious recipes for all tastes, including gluten-free. Check out my “About Me” page for more info!