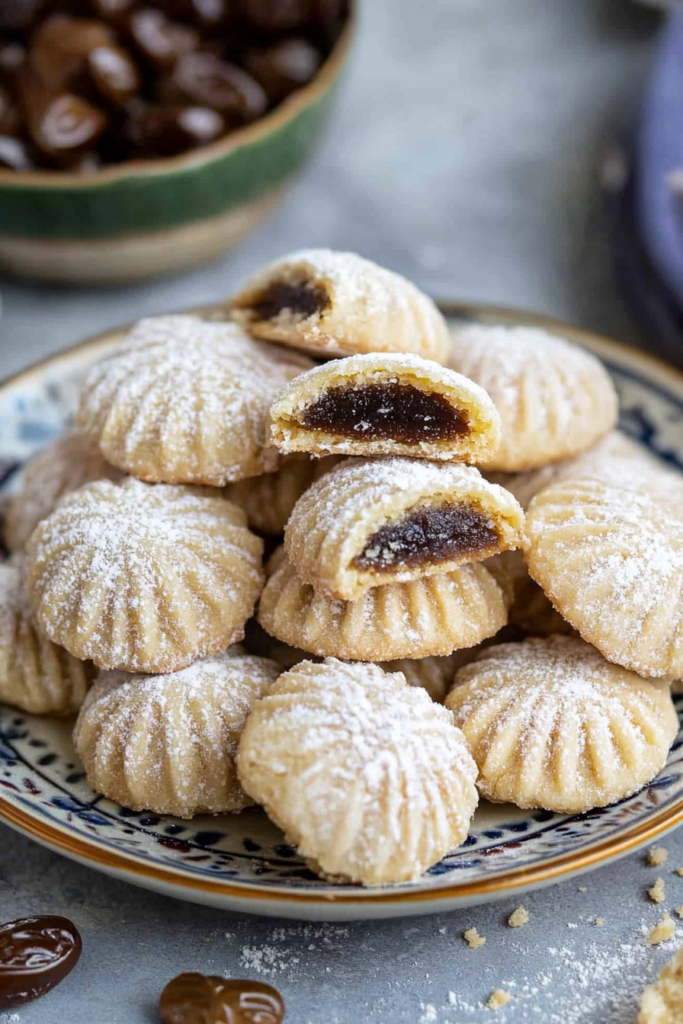
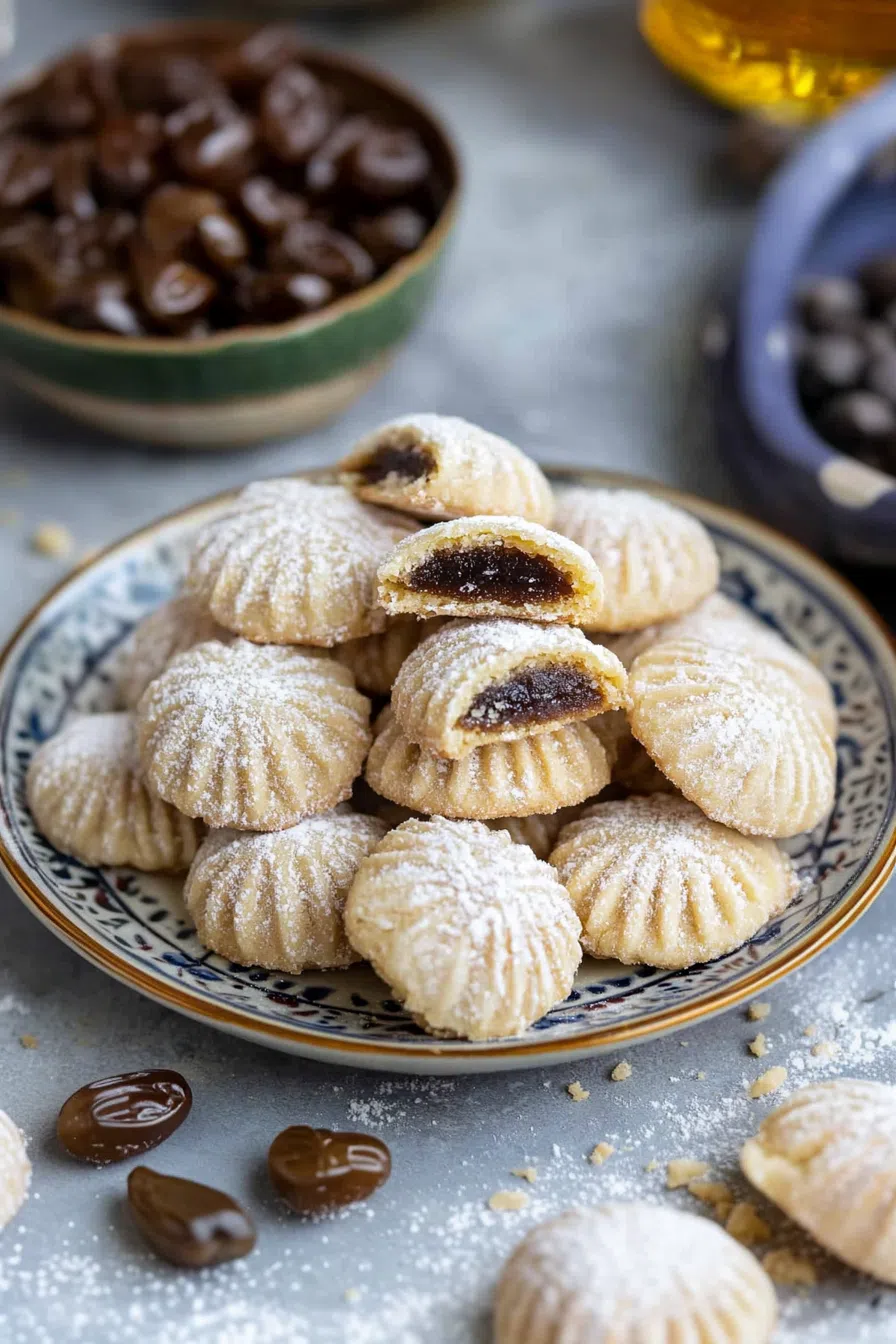
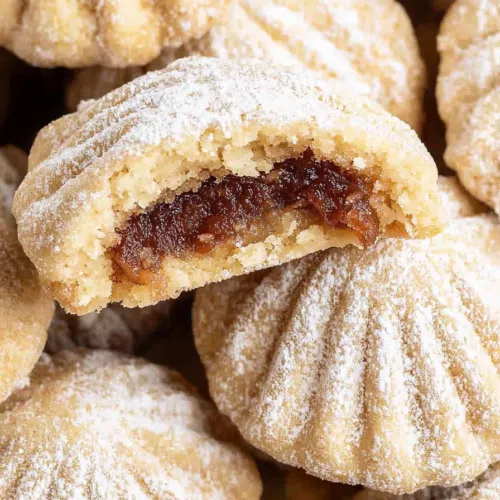
Buttery, chewy cookies packed with a rich, jammy date filling. A classic homemade treat that’s sweet, comforting, and totally worth the effort!
Alright, confession time—I didn’t always appreciate date-filled cookies. As a kid, I was firmly in the chocolate chip or nothing camp. Dates? That was something my grandma liked, along with hard butterscotch candies and those weird strawberry-wrapped sweets that just appeared in purses.


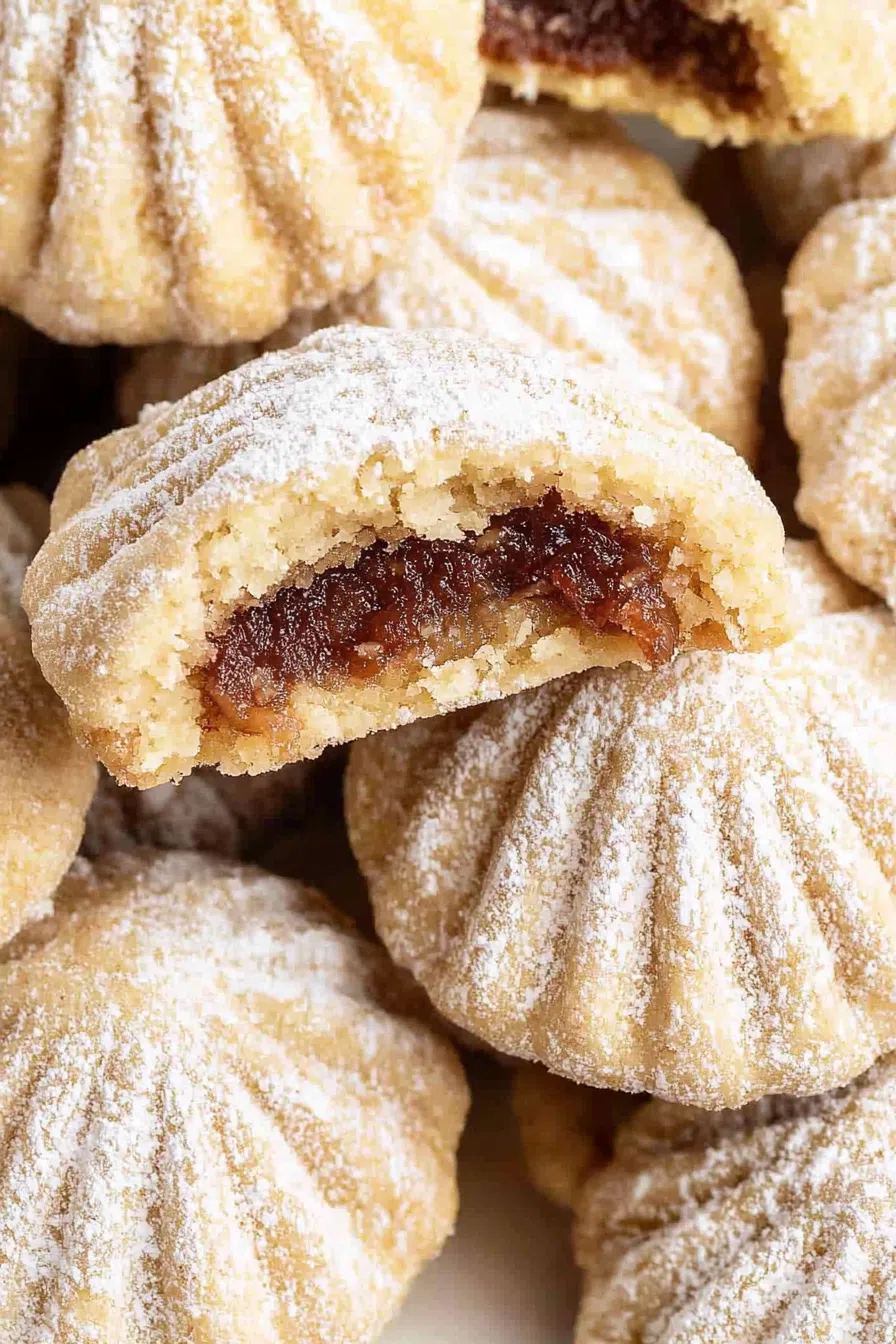
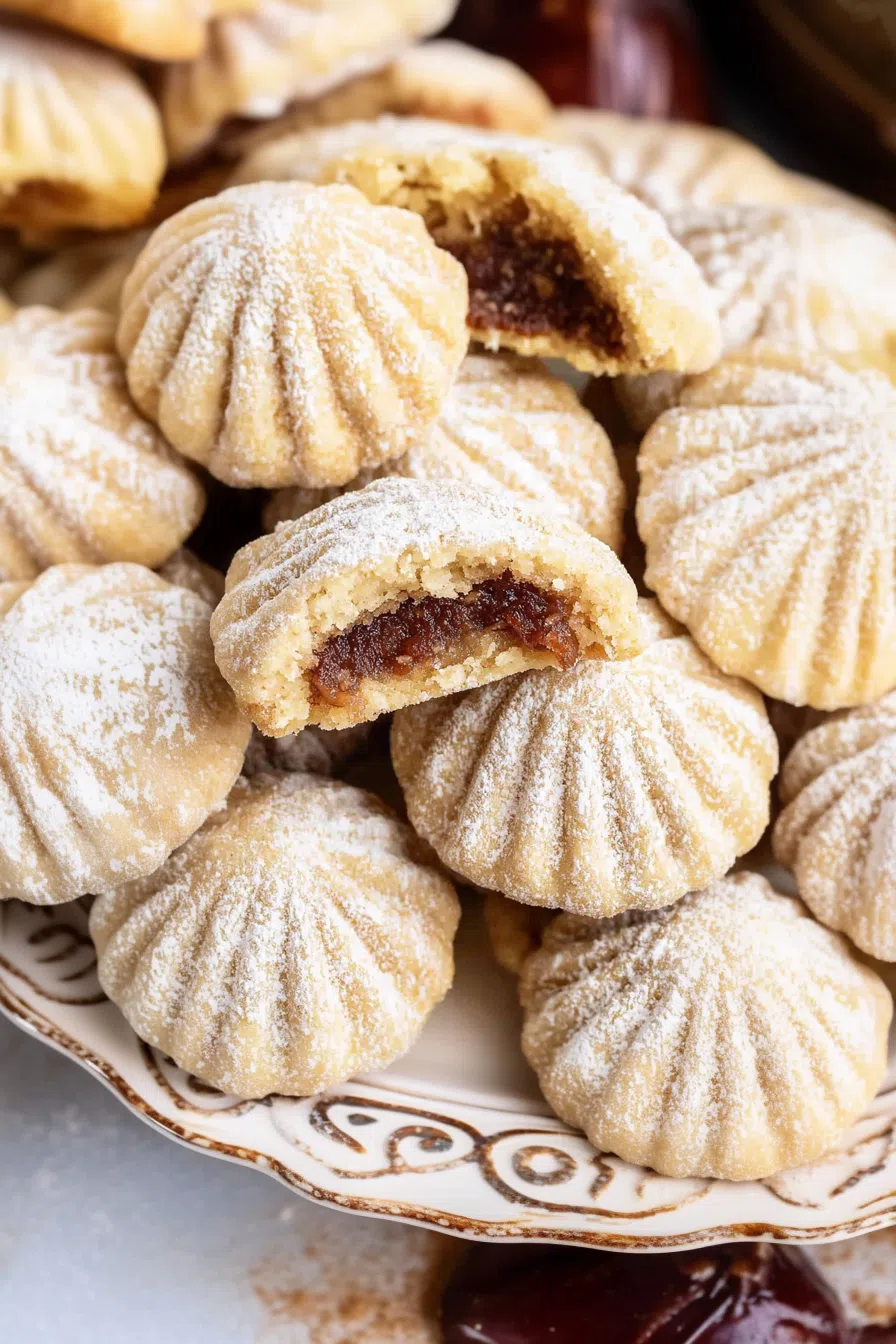
But one year, I gave in. She handed me a warm, homemade date-filled cookie, and before I could protest, I took a bite. And wow. The soft, buttery oatmeal cookie melted in my mouth, and the date filling? It was like caramel, but deeper, richer—almost like a secret ingredient no one talks about.
Now, every time I make these, I get a little emotional. They remind me of simpler times, of sneaking extra cookies when Grandma wasn’t looking (though, let’s be real, she definitely knew), and of that warm, cozy feeling you only get from baking something really good. If you’ve never had a date-filled cookie before, trust me—this is the one to start with.
Why You’ll Love This Date Filled Cookie Recipe?
- They taste like home. You know, that comforting, nostalgic flavor that feels like a hug from your past? Yeah, that.
- Sweet, but not too sweet. The dates bring a natural, caramel-like sweetness without making your teeth hurt.
- Perfect texture. Buttery, chewy oat cookies with a soft, jammy center? Come on.
- Totally customizable. Swap in raisins, add nuts, or even sneak in some cinnamon—no rules here!
- Your kitchen will smell incredible. If that’s not reason enough to make these, I don’t know what is.

Ingredient Notes:
Not gonna lie, when I first saw “dates” in the title, I thought, Do I really need these? Turns out, yes. Yes, you do. Here’s why:
- Dates – The MVP. Naturally sweet, sticky, and caramel-like when cooked down. If you’re new to baking with dates, welcome to the club.
- White Sugar – Helps thicken the filling and balances the slight tanginess of the dates.
- Water – Sounds basic, but it’s the secret to making the dates break down into a spreadable, jammy goodness.
- Butter – Because butter makes everything better. It gives the cookies their rich, melt-in-your-mouth texture.
- Brown Sugar – Adds a deeper, almost molasses-like sweetness that pairs perfectly with the dates.
- Flour – The foundation. But don’t overmix, or you’ll end up with tough cookies instead of soft, chewy perfection.
- Salt – Just a pinch makes all the difference. Trust me.
- Baking Soda – A little lift so the cookies don’t bake up flat and sad.
- Rolled Oats – Adds texture and a slight nuttiness. Quick oats work too, but old-fashioned oats give the best bite!
- Extra Water – Just enough to bring the dough together without turning it into a sticky mess.
How To Make Date Filled Cookie?
Alright, let’s do this.
Step 1: Cook the Date Filling
In a small saucepan, combine the chopped dates, sugar, and water. Stir over low heat until it starts bubbling. Let it simmer for 15 minutes, stirring occasionally. It’ll go from chunky to smooth and spreadable. And yes, it’ll smell amazing. Try to resist eating it straight from the pan (no judgment if you fail).
Step 2: Make the Dough
In a mixing bowl, beat together the butter and brown sugar until creamy. This step matters—fluffy butter means soft cookies. Slowly mix in the flour, salt, and baking soda. Then, stir in the oats and just enough water to bring everything together. Don’t overdo it—if the dough feels like Play-Doh, you’re good.
Step 3: Chill the Dough
Wrap the dough and let it rest in the fridge for 15 minutes. It makes rolling so much easier and keeps the cookies from spreading too much.
Step 4: Roll & Cut the Dough
Flour your surface, roll out the dough to about 1/8 inch thick (thinner than you think!), and use a round cutter (or a glass) to cut out 2-inch circles.
Want To Save This Recipe?
Step 5: Assemble the Cookies
Spoon a little date filling onto half the circles, then top them with the remaining ones. Gently press the edges to seal—if you want to be fancy, crimp them with a fork.
Step 6: Bake & Enjoy
Pop them into a 350°F (175°C) oven and bake for 15 minutes, or until they’re lightly golden. Let them cool (or, let’s be honest, burn your mouth because you have zero patience).
Storage Options:
- Room Temp: Store in an airtight container for up to 5 days.
- Fridge: They’ll stay fresh for 2 weeks in a sealed container.
- Freezer: Freeze them for up to 3 months and thaw at room temp when the craving hits.
Variations and Substitutions:
- Raisin Swap – Not a date fan? Raisins work too!
- Go Nuts – Add chopped walnuts or pecans for some crunch.
- Cinnamon Kick – Sprinkle a little cinnamon into the dough for a cozy, spiced vibe.
- Mincemeat Version – Feeling fancy? Swap the date filling for mincemeat for a festive twist.
What to Serve with Date Filled Cookie?
You could totally eat them on their own, but why stop there?
- Coffee or Tea – The slight bitterness balances out the sweetness.
- Vanilla Ice Cream – Warm cookies + cold ice cream = heaven.
- A Dusting of Powdered Sugar – Makes them look bakery-perfect.
Frequently Asked Questions:
Can I make the dough ahead of time?
Yep! You can refrigerate it for up to 2 days. Just let it sit at room temp for a few minutes before rolling.
Can I use quick oats instead of rolled oats?
You can, but the texture will be softer. Rolled oats give a bit more bite.
Can I freeze these cookies?
Absolutely! Store them in an airtight container with parchment between layers and freeze for up to 3 months.
These cookies are straight-up cozy in cookie form. They’re a little old-school, a little underrated, and honestly? Way better than I ever expected them to be. Whether you’re baking for nostalgia, the holidays, or just because your kitchen feels empty without the smell of something sweet in the oven, these cookies are a must-try.
Now, tell me—what’s a cookie that takes you back to your childhood?
Keep the Flavor Coming – Try These:

Date Filled Cookie Recipe
Ingredients
For the Date Filling:
- 1 cup dates pitted and chopped
- ½ cup white sugar
- ½ cup water
For the Cookie Dough:
- ½ cup butter softened
- ½ cup packed brown sugar
- 1 ½ cups all-purpose flour
- ½ teaspoon salt
- ¼ teaspoon baking soda
- 1 ¼ cups rolled oats
- 2 tablespoons water or more as needed
Instructions
Prepare the Date Filling:
- In a small saucepan, combine the chopped dates, white sugar, and water. Place over low heat, stirring occasionally, and bring the mixture to a gentle boil. Allow it to cook for approximately 15 minutes, or until the dates soften and the mixture thickens into a spreadable consistency. Remove from heat and set aside to cool.
Prepare the Cookie Dough:
- In a mixing bowl, cream the softened butter and packed brown sugar together until the mixture is smooth and fluffy. Gradually add the all-purpose flour, salt, and baking soda, mixing until well incorporated. Stir in the rolled oats, ensuring they are evenly distributed throughout the dough. Slowly add 2 tablespoons of water, incorporating just enough to bring the dough together. If necessary, add additional water, one teaspoon at a time, until a cohesive dough forms.
Chill the Dough:
- Shape the dough into a ball, cover it with plastic wrap, and refrigerate for 15 minutes. This step allows the dough to firm up, making it easier to handle.
Roll and Cut the Dough:
- Lightly flour a clean work surface and roll the chilled dough out to approximately 1/8 inch thick. Using a round cookie cutter (approximately 2 inches in diameter), cut out an even number of dough rounds.
Assemble the Cookies:
- Arrange half of the dough rounds on a prepared baking sheet lined with parchment paper. Spoon a small amount of the cooled date filling into the center of each round, ensuring it does not spread to the edges. Carefully place the remaining dough rounds on top, gently pressing the edges together to seal.
Bake:
- Preheat the oven to 350°F (175°C). Bake the assembled cookies for approximately 15 minutes, or until they are lightly golden.
Cool and Serve:
- Remove the cookies from the oven and allow them to cool on the baking sheet for a few minutes before transferring them to a wire rack to cool completely. Serve once cooled, or store in an airtight container for later enjoyment.
Notes
I’m Bitty, owner of nodashofgluten.com, where I share simple, delicious recipes for all tastes, including gluten-free. Check out my “About Me” page for more info!