

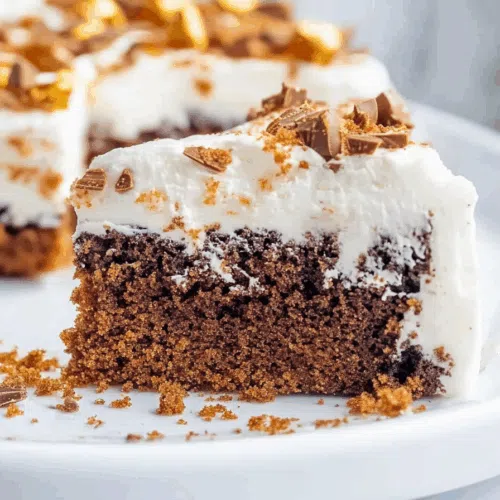
Butterfinger cake made with chocolate cake mix, caramel, condensed milk, whipped topping, and crushed Butterfingers—it’s wild and wonderful.
Okay, so… full confession: the first time I had Butterfinger cake, I was standing in the basement of a small-town church in Kansas. It was one of those potlucks where you’re supposed to be there for the community but really everyone’s just eyeing the dessert table and trying to casually get a second plate. You know the vibe.
I was maybe 15? I’d just argued with my mom in the car about my homecoming dress being too “aggressively sparkly” (her words), and I was still sulking when I saw this mystery dessert. It looked like chocolate cake had gone to war with a caramel sundae and lost gloriously. I took a slice out of boredom and—holy wow.


It was warm and cold at the same time. Gooey, crunchy, completely over-the-top sweet. I’m not saying it changed my teenage mood instantly, but… okay, yeah, I am. I literally asked the woman who brought it what it was, and she laughed and said, “Oh honey, it’s just Butterfinger cake. Starts with a box mix.”
I never forgot it. And now? It’s the one thing I make when I want people to gather around the table and stop pretending they don’t like dessert.
Why You’ll Love This Butterfinger Cake Recipe?
This isn’t a delicate, whisper-of-sugar kind of dessert. This is the cake equivalent of yelling “YOLO” and diving into a kiddie pool of caramel. It’s messy. It’s sweet. It’s so many textures all at once—soft cake, cold whipped topping, crispy bits of Butterfinger that stick to your teeth in the most nostalgic way. It’s not subtle. And that’s what makes it unforgettable.
Also, let’s just say it: it’s easy. Like, dangerously easy. You start with a cake mix. You poke holes in it. You drown it in condensed milk and caramel like you’ve just given up on adulthood for the day. And then you top it with whipped cream and crushed candy and call it good.
But somehow it ends up tasting like you worked way harder than you actually did. It’s magic, really. Lazy magic.
Ingredient Notes:
Here’s the deal with ingredients: I’ve made this cake with the “good stuff” and with whatever I had on hand from the back of the pantry. Both versions slapped. Here’s what’s essential—and what’s flexible.
-
1 box chocolate cake mix – I use devil’s food because it feels more dramatic. Use what you love (or what’s on sale).
-
1 cup whole milk – Swapping it in for water makes a difference. But if you only have 2%, go for it. I’ve used almond milk once out of desperation. It was… fine.
-
½ cup canola oil – Or vegetable oil. Just don’t use olive oil. That got weird.
-
3 large eggs – Room temp if you remember. Straight from the fridge if you forgot.
The toppings? Oh, they’re the fun part:
-
1 can sweetened condensed milk – This is the golden syrup of your cake dreams.
-
1 jar caramel sauce – I’ve used fancy jars from Trader Joe’s and also the stuff in a squeeze bottle from the grocery store aisle near the ice cream cones. They both do the job.
-
1 tub whipped topping (thawed) – Cool Whip is classic. You can make homemade if you want to show off. I rarely do.
-
2 Butterfinger bars, crushed – Smashing them in a zip-top bag is one of life’s underrated joys.
How To Make Butterfinger Cake?
- Start by making the cake. Mix the cake mix, milk, oil, and eggs in a big bowl. I usually use a hand mixer but have absolutely done this with a fork and a strong wrist when I didn’t want to wash extra dishes. Pour it into a greased 9×13 pan and bake it as directed. Mine usually takes about 30 minutes, but ovens are weird—trust your nose and the toothpick test.
- Now here’s where it gets a little dramatic—in the best way. While the cake’s still hot (like just out of the oven hot), use the handle of a wooden spoon and poke holes all over. Don’t be shy. The more holes, the better the sauce soaks in.
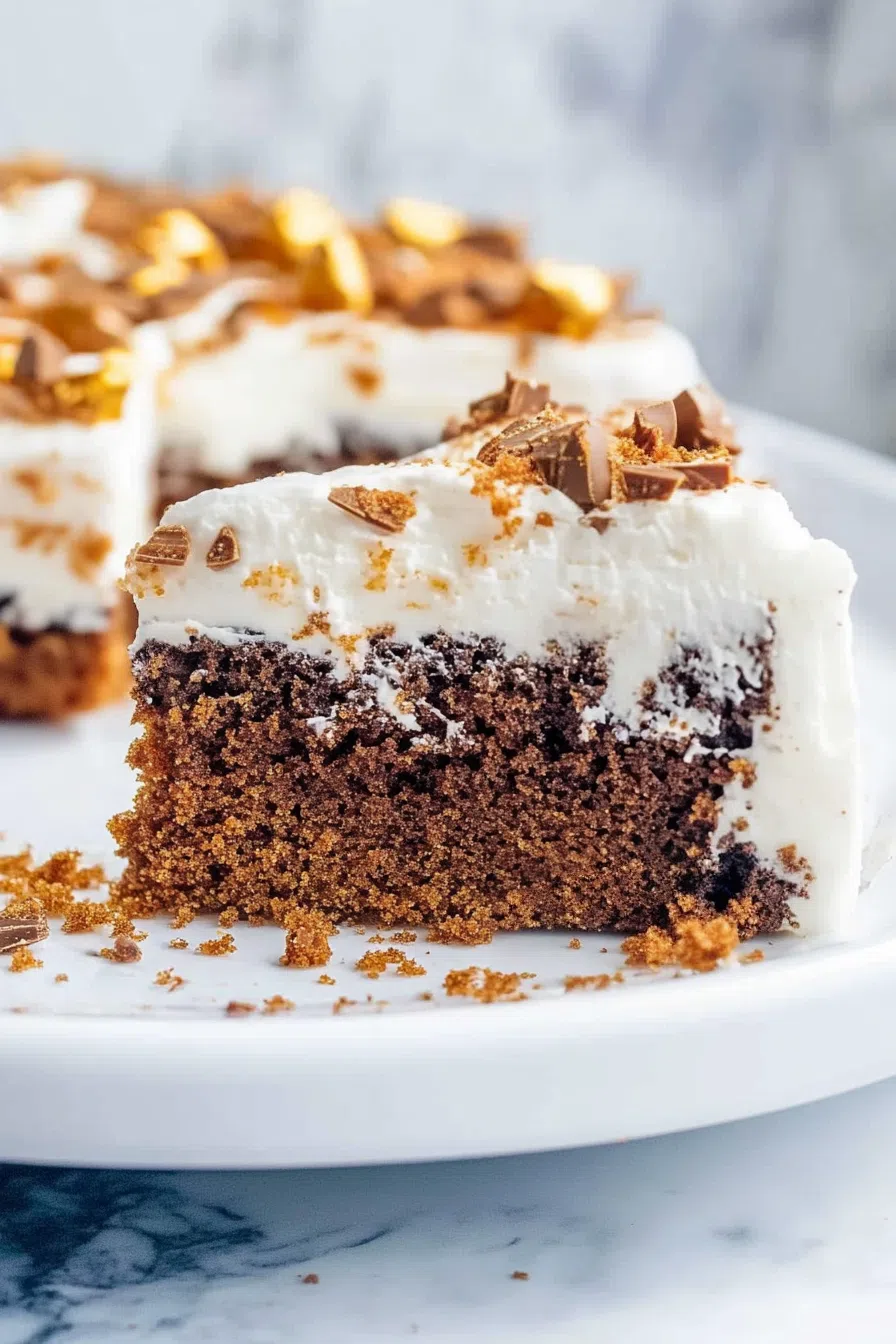
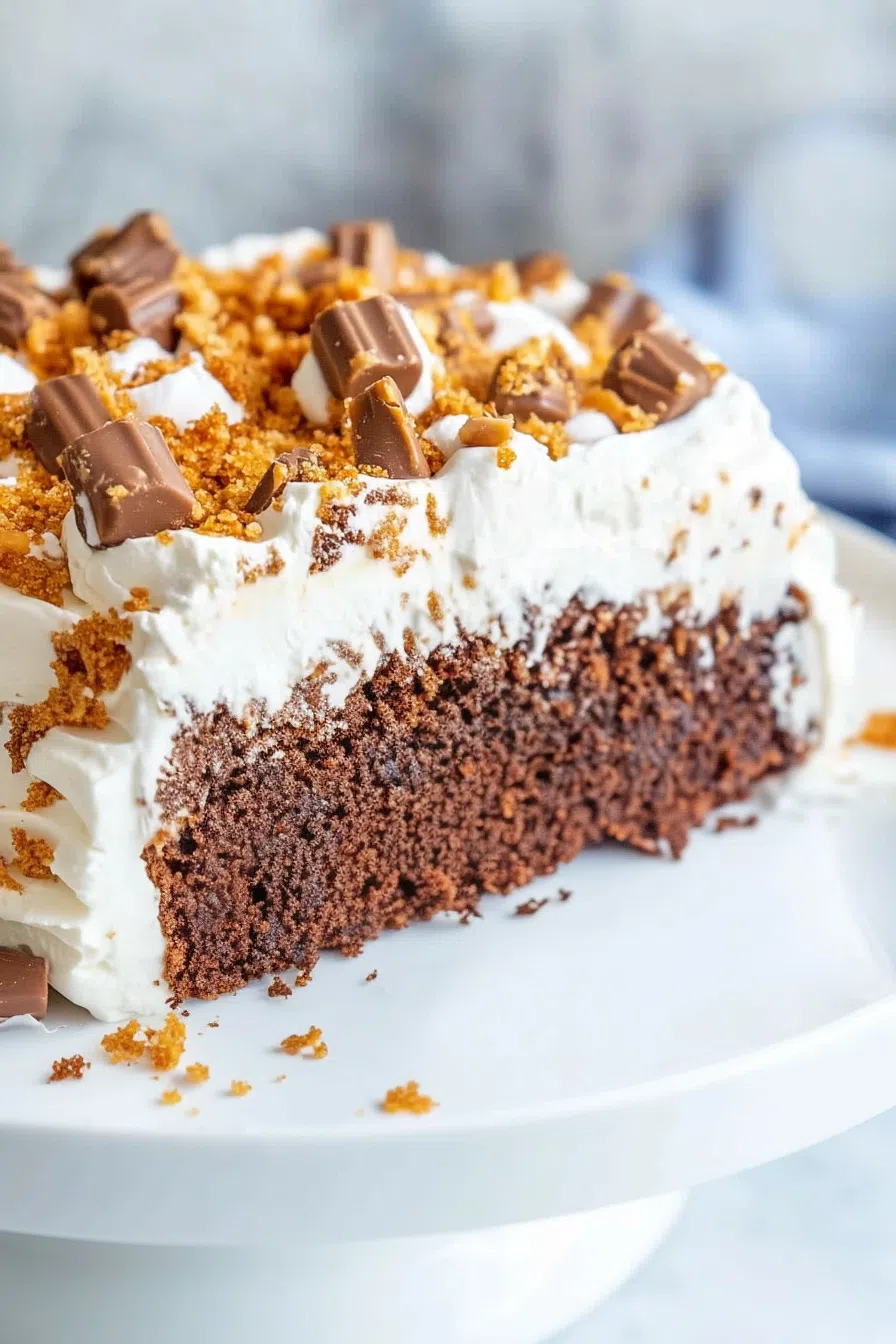
- Then pour the mixture of condensed milk and caramel right on top. Watch it disappear into the cake like some kind of sweet black hole. It’s a little terrifying and beautiful at the same time. Let the cake cool completely. Not warm. Not kind of cool. Completely. I’ve rushed this step before and ended up with melted Cool Whip soup. Still good, but not the look I was going for.
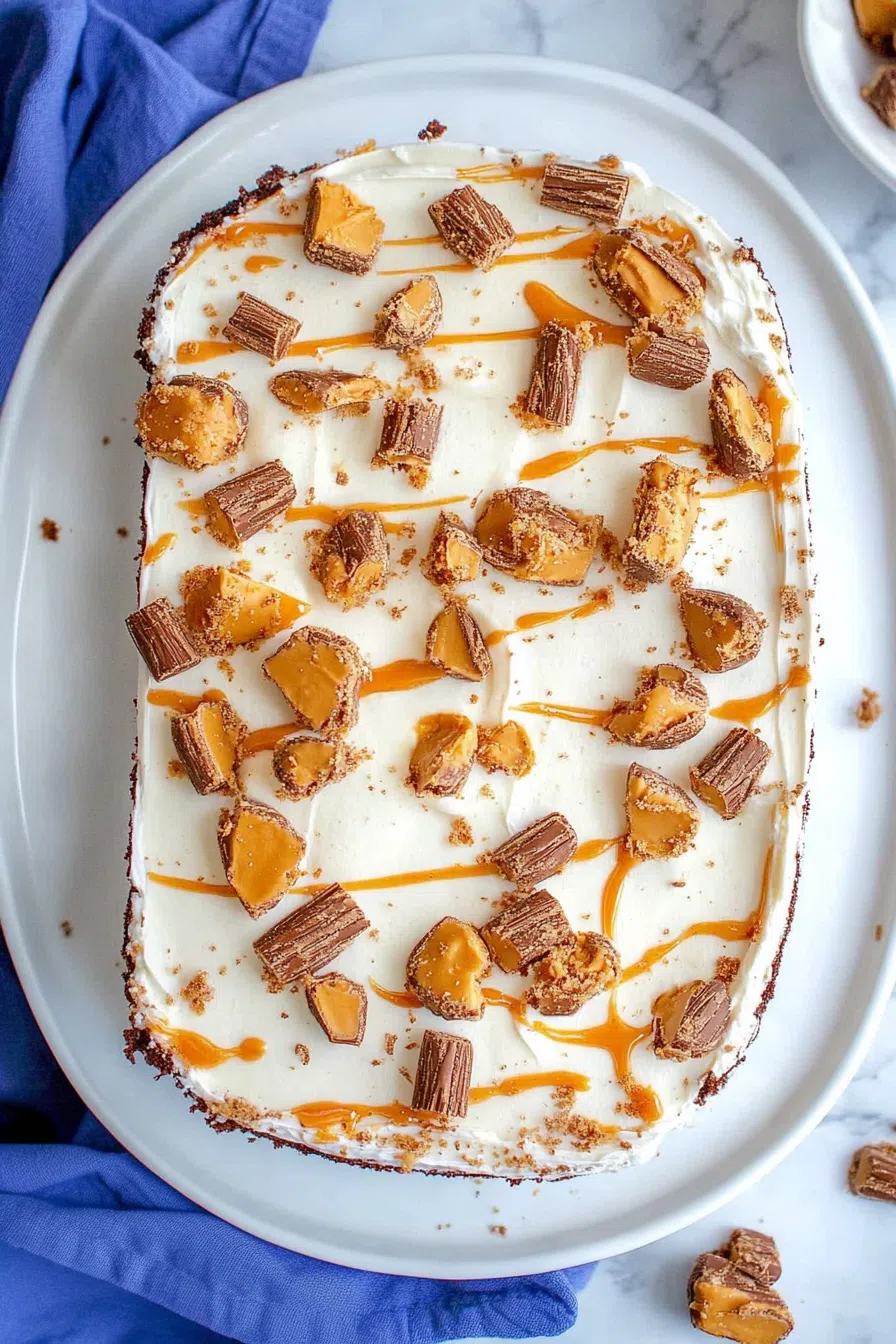
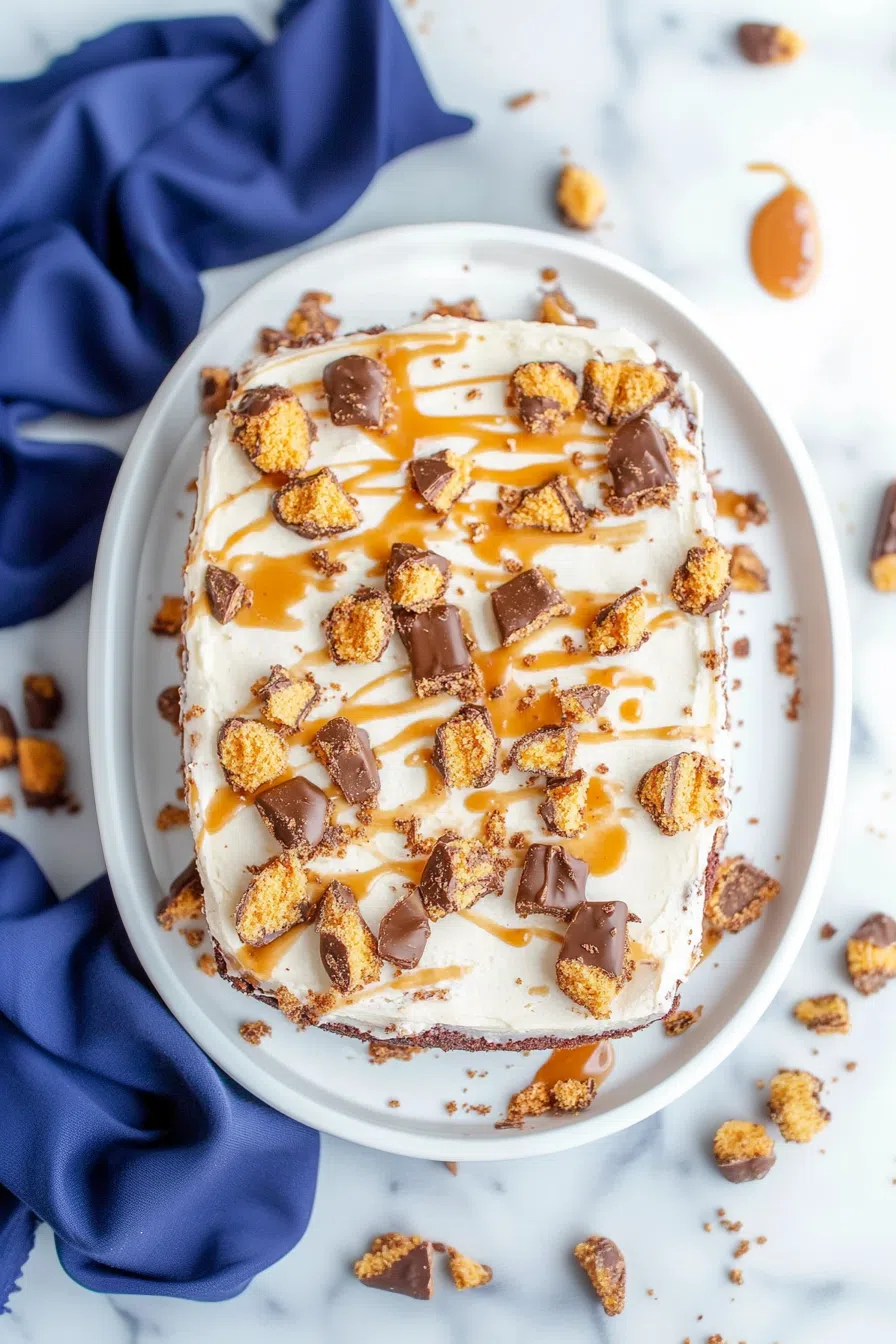
- Once it’s cool, spread that whipped topping across the top like frosting a cloud. Then—my favorite part—scatter those smashed Butterfingers all over. Sprinkle them, dump them, press them in. Whatever you need to do to get full candy coverage.
- Stick it in the fridge until you’re ready to serve—or sneak a bite right then and there. I’ve done both.
Storage Options:
Cover it with foil or cling wrap and store it in the fridge. It’ll keep for 3–4 days. And honestly? It gets better the next day. Everything soaks in deeper. It’s like leftover lasagna but dessert.
Now if you’re thinking about freezing it… eh. I wouldn’t. The texture of the whipped topping and candy bars gets funky. Unless you’re freezing the cake before topping it, I say just eat it fresh. Or invite someone over. Or don’t. I’m not your life coach.
Variations and Substitutions:
This is a cake you can totally riff on. Don’t have something? Substitute it. Want to get wild? Do it.
-
Use peanut butter cake mix for a full Reese’s vibe.
-
Swap the candy for chopped Snickers, Heath, or even Reese’s Pieces.
-
Add a layer of banana slices under the whipped topping. I did that once on a dare and now… I kind of crave it.
-
Make it gluten-free by using a GF chocolate cake mix. You won’t even miss the regular version.
-
Use homemade whipped cream if you’re trying to impress someone (or yourself).
Want To Save This Recipe?
You can’t really mess it up. It’s like the sweatpants of cake. Always forgiving.
What to Serve with Butterfinger Cake?
This cake doesn’t need anything, but if you want to make a moment out of it:
-
Strong coffee – Cuts through the sweetness.
-
Espresso martini – Because… why not?
-
Berries – For fake balance. Also, pretty.
-
Vanilla ice cream – Just do it.
-
More Butterfingers – On the side. On top. In your pocket. You do you.
Frequently Asked Questions:
Can I make it ahead of time?
Yes! Actually, you should. It’s one of those desserts that levels up overnight. Just don’t add the Butterfingers until you’re close to serving if you want that crunch.
Do I have to use Cool Whip?
Nah. Use homemade whipped cream if that’s your jam. I’m lazy and loyal to the tub.
Can I use the Butterfinger baking bits?
Yup. I’ve even used the snack-size Halloween candy before. It’s all fair game.
Butterfinger cake is what happens when dessert doesn’t care about being classy. And honestly? That’s what I love most about it. It’s sweet, chaotic, nostalgic, and never, ever boring.
Try it sometime. Even if it’s just a random Tuesday and you need something that feels like a win. And if you do? I wanna hear how it turned out—crunchy bits, sticky fingers, sugar rush and all.
Let’s chat cake.
Keep the Flavor Coming – Try These:


Butterfinger Cake
Ingredients
For the Cake:
- 1 box chocolate cake mix
- 1 cup whole milk
- ½ cup canola oil
- 3 large eggs
For the Toppings:
- 1 can 14 oz sweetened condensed milk
- 1 jar approximately 12 oz caramel dessert topping
- 1 container 8 oz frozen whipped topping, thawed
- 2 Butterfinger candy bars crushed
Instructions
Prepare the cake batter:
- In a large mixing bowl, combine the chocolate cake mix, whole milk, canola oil, and eggs. Mix thoroughly until a smooth batter forms, using either a hand mixer or a whisk.
Bake the cake:
- Pour the prepared batter into a greased 9×13-inch baking dish. Bake according to the package instructions, typically for 28 to 32 minutes, or until a toothpick inserted in the center comes out clean.
Prepare the caramel mixture:
- While the cake is baking, in a medium bowl, stir together the sweetened condensed milk and caramel dessert topping until fully combined. Set aside.
Poke and soak the cake:
- Once the cake is finished baking, remove it from the oven. While still hot, use the handle of a wooden spoon to poke evenly spaced holes across the top of the cake, approximately 1 inch apart. Carefully pour the caramel and condensed milk mixture over the entire surface, allowing it to soak into the holes. Let the cake cool completely to room temperature.
Top and garnish the cake:
- Once the cake has cooled, spread the thawed whipped topping evenly over the surface. Sprinkle the crushed Butterfinger candy bars generously on top. For additional flavor, a light drizzle of extra caramel sauce may be added if desired.
Serve or chill:
- The cake may be served immediately or chilled in the refrigerator for a firmer texture and enhanced flavor. Store any leftovers covered in the refrigerator for up to 4 days.
Notes
I’m Bitty, owner of nodashofgluten.com, where I share simple, delicious recipes for all tastes, including gluten-free. Check out my “About Me” page for more info!

