
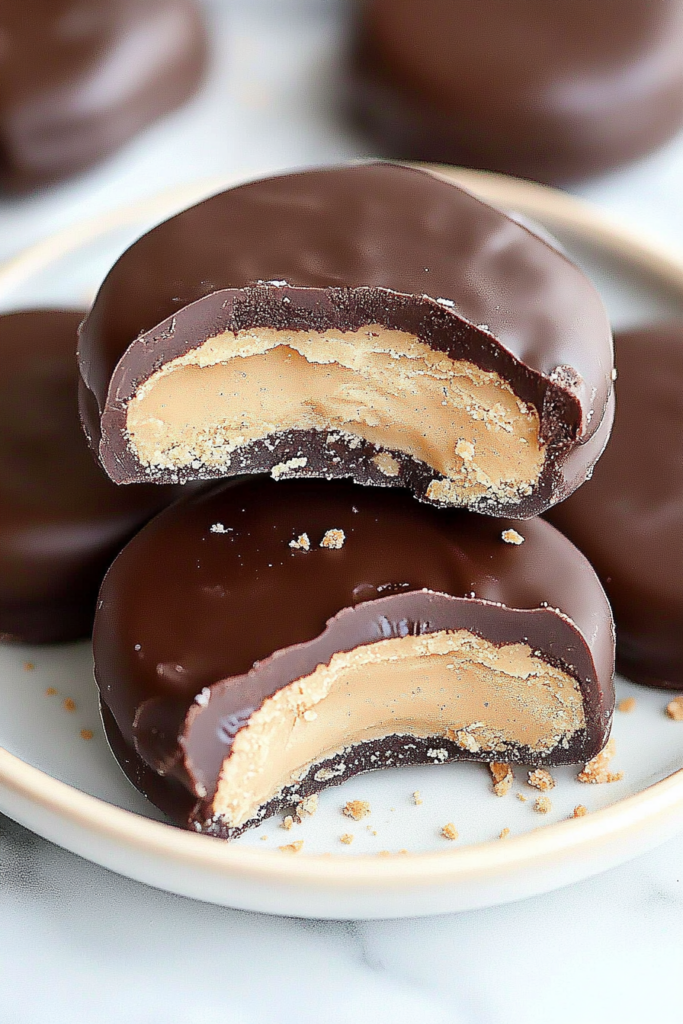
No more waiting for Girl Scout season! Make these Homemade Tagalong Cookies anytime you want with butter, sugar, peanut butter, and chocolate.
Alright, confession time. I’m a sucker for Girl Scout cookies. Especially Tagalongs. I mean, that crunchy shortbread, creamy peanut butter, and chocolate combo? It’s basically cookie royalty. But you know the worst part about Tagalongs? They disappear faster than my kids at bedtime. And then—bam! You’re left staring at the empty box like, “Why didn’t I ration these better?”
So, last winter, during one of those endless, bleak February afternoons, I was craving Tagalongs like crazy. But of course, it wasn’t cookie season. So, naturally, I went down the rabbit hole of recipe blogs, determined to make my own. And after a few fails (too dry, not enough peanut butter, and one batch that mysteriously just disappeared…totally not my fault), I finally nailed it.


Honestly? I might love these Homemade Tagalong Cookies even more than the real thing. And my husband, who usually leaves the baking stuff to me, tried one and immediately asked me to hide the batch before the kids got home. That’s when I knew I was onto something.
So, if you’re like me and can’t stand waiting for the Girl Scouts to come around—trust me, this recipe is your new best friend.
Why You’ll Love This Homemade Tagalong Cookies Recipe?
What makes these Homemade Tagalong Cookies such a hit? Let me break it down:
-
They’re Ridiculously Satisfying: That combo of buttery shortbread, peanut butter, and chocolate is just chef’s kiss.
-
Year-Round Availability: No more waiting for cookie season. You can whip these up whenever the craving strikes.
-
Endless Customization: Prefer dark chocolate? Go for it. Want almond butter instead of peanut butter? Knock yourself out.
-
Easy To Make: You don’t need any fancy equipment. Just a mixer, some basic ingredients, and maybe a little patience.
-
Perfect For Sharing (Or Not): They’re so good, you’ll want to keep them all to yourself. No judgment here.

Ingredient Notes:
Before you dive in, let’s chat about what you’re working with:
-
Butter: Make sure it’s softened. I once tried using it straight from the fridge and… let’s just say, lesson learned.
-
White Sugar & Powdered Sugar: A combo of both gives you structure and sweetness without being too sweet.
-
Salt: Just a pinch for balance. You could leave it out, but honestly, why would you?
-
Egg Yolks: They make the dough rich and give it a little chew.
-
Vanilla Extract: Adds warmth and depth. Feel free to get fancy with vanilla bean paste if you’re feeling it.
-
Flour: All-purpose works like a charm. But if you want to go gluten-free, I’ve got tips below.
-
Peanut Butter: Creamy works best, but if you’re a crunchy fan, I say go for it. Live your best life.
-
Heavy Cream: Adds smoothness to the peanut butter layer.
-
Chocolate & Candy Coating: Milk chocolate is classic, but I’ve tried dark chocolate and it’s incredible, too.

How To Make Homemade Tagalong Cookies?
This recipe is pretty straightforward, but here’s how to do it right:
Want To Save This Recipe?
-
Make the Dough:
Start by creaming the butter until it’s nice and smooth. Add the sugar and salt, then mix in the egg yolks and vanilla. Once combined, gradually add in your flour. The dough will be thick but don’t freak out—it’s supposed to be. Chill it for an hour. (Yeah, I know. But it helps everything hold its shape, so it’s worth it.) -
Cut & Bake:
Preheat the oven to 375°F (190°C). Roll out the dough on a floured surface to about 1/4-inch thickness. Cut out cookies with a 2-inch cutter. Line them up on an ungreased cookie sheet and bake for 7-8 minutes. You’re aiming for light golden edges. Cool completely before moving on. -
Peanut Butter Layer:
Mix together the powdered sugar, peanut butter, and heavy cream until smooth. It should be thick but spreadable. Spread about 2 teaspoons on each cookie, leaving a slight mound in the center. Don’t be shy—more peanut butter is never a bad idea. -
Chocolate Coating:
Melt your chocolate and candy coating over low heat. Spoon the melted chocolate over each cookie, letting the excess drip off. Let them set on a rack lined with wax paper. This part takes patience, but it’s worth it.

Storage Options:
Store these cookies in an airtight container at room temperature for up to 5 days. Ha! Like they’ll last that long. If you need them to hang around longer, freeze them—just separate the layers with parchment paper and pop them in a container. They’ll keep for a good 2-3 months.
Variations and Substitutions:
-
Chocolate Swaps: Try dark chocolate, white chocolate, or even mix them up for a marbled effect.
-
Nut Butter Alternatives: Almond butter, cashew butter, or even Nutella can work. The texture will be a little different, but hey, sometimes experimenting pays off.
-
Gluten-Free: Sub in a 1:1 gluten-free flour blend. Works like a charm.
-
Flavors: Add cinnamon or espresso powder to the peanut butter layer for a twist. I once tried a pinch of cayenne pepper and—wow.

What to Serve with Homemade Tagalong Cookies?
-
A big glass of milk. Classic, and honestly, the best combo.
-
Coffee or tea. Perfect for that mid-afternoon treat.
-
Crumbled over ice cream. Yep, it’s as good as it sounds.
Frequently Asked Questions:
Can I freeze these cookies after they’re coated in chocolate?
Totally! Just layer them with parchment paper and store them in an airtight container. They’ll be fine for up to 3 months.
Can I make these dairy-free?
Sure! Just swap out the butter and heavy cream for dairy-free alternatives. There’s always a way.
Can I use natural peanut butter?
You can, but it’s a bit trickier. The consistency won’t be as smooth, so you might need to add more powdered sugar to get it just right.

Alright, your turn! Give these Homemade Tagalong Cookies a try and let me know how they turn out. And if you come up with some wild variation, definitely share it. I love hearing your crazy, creative ideas. Happy baking!
Keep the Flavor Coming – Try These:


Homemade Tagalong Cookies
Ingredients
For the Shortbread Cookies:
- 1 cup 226 grams unsalted butter, softened
- ¾ cup 150 grams white sugar
- ½ teaspoon salt
- 2 large egg yolks
- 2 teaspoons vanilla extract
- 2 cups 250 grams all-purpose flour
For the Peanut Butter Filling:
- 1 cup 120 grams powdered sugar
- 1 cup 250 grams creamy peanut butter
- ½ cup 120 ml heavy cream
For the Chocolate Coating:
- 8 ounces 225 grams milk chocolate, chopped
- 8 ounces 225 grams chocolate-flavored candy coating, chopped
Instructions
Prepare the Dough:
- In a large mixing bowl, beat the softened butter using an electric mixer on medium speed for approximately 30 seconds, until creamy.
- Incorporate the sugar and salt, continuing to beat until well combined.
- Add the egg yolks and vanilla extract; beat until thoroughly mixed.
- Gradually add the flour and blend until a cohesive dough forms.
- Cover the dough and refrigerate for approximately 1 hour, or until it becomes firm enough to handle with ease.
Shape and Bake the Cookies:
- Preheat the oven to 375°F (190°C).
- On a lightly floured surface, roll out the dough to a thickness of 1/4 inch (0.6 cm).
- Utilize a 2-inch cookie cutter to cut out circles from the dough. Reroll scraps if necessary.
- Arrange the cutouts on an ungreased baking sheet, leaving 2 inches of space between each.
- Bake for 7 to 8 minutes, or until the edges of the cookies turn light brown.
- Transfer the cookies to a wire rack to cool completely before proceeding.
Prepare the Peanut Butter Filling:
- In a medium bowl, combine the powdered sugar, peanut butter, and heavy cream. Stir until a smooth, thick consistency is achieved.
- Spread approximately 2 teaspoons of the peanut butter mixture onto each cookie. Allow the filling to be slightly mounded at the center.
- Arrange the prepared cookies on wax paper for the next step.
Apply the Chocolate Coating:
- Place a wire rack over a sheet of wax paper to catch excess chocolate.
- Melt the milk chocolate and candy coating in a small saucepan over low heat, stirring consistently until smooth.
- Spoon the melted chocolate over each cookie, ensuring complete coverage. Allow any excess chocolate to drip off before placing the cookies back on the wire rack.
- Allow the cookies to set completely before serving.
Notes
I’m Bitty, owner of nodashofgluten.com, where I share simple, delicious recipes for all tastes, including gluten-free. Check out my “About Me” page for more info!

