
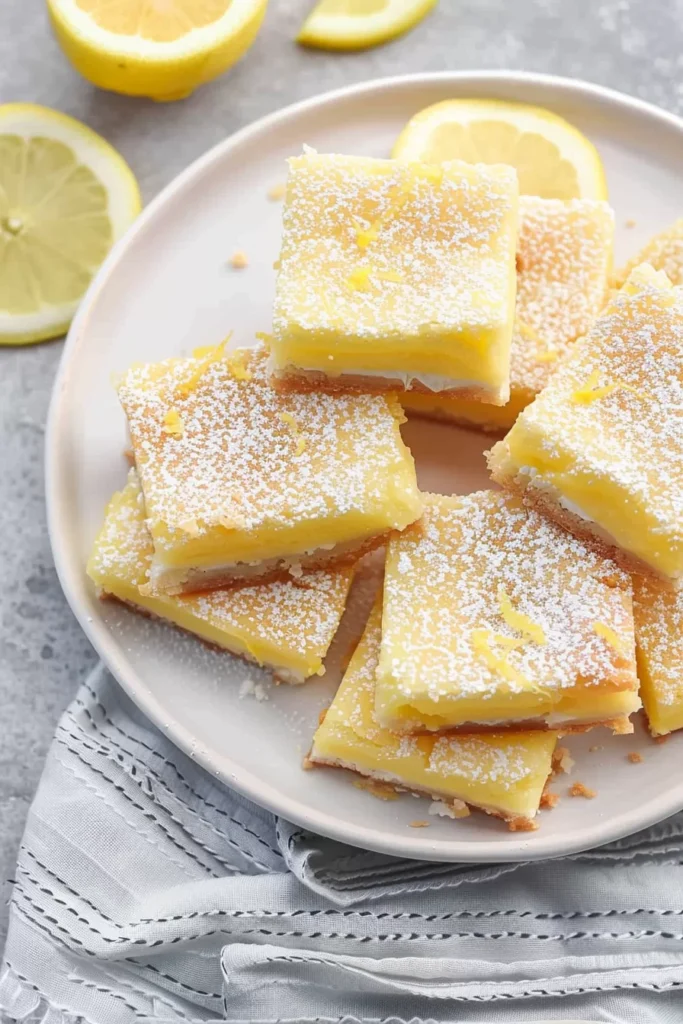
Cream cheese, fresh lemon juice, eggs, and butter come together in these Creamy Lemon Dream Bars—bright, tangy, and unapologetically rich.
I feel like every baker has that one recipe they fall back on when everything else is just… meh. You know? The kind of day when you’ve got dishes piling up, your socks are slightly damp for some mysterious reason, and your brain is just not cooperating. For me? That’s when the Creamy Lemon Dream Bars come out.


It started during a rainy spring afternoon when I was supposed to be cleaning but somehow ended up zesting lemons in my pajamas. Classic. I had this old recipe I’d bookmarked from who-knows-where, but it was basic—fine, not fabulous. So, I did what any sleep-deprived, citrus-obsessed human would do: I added cream cheese. Honestly? Game. Changer.
I remember tasting the first square while standing barefoot in my kitchen, watching it drizzle outside, and thinking, Okay… this helps. Sometimes, you don’t need a solution—you just need a really good lemon bar.
Why You’ll Love This Creamy Lemon Dream Bars Recipe?
You ever bite into something and just feel like, “Yep. This is what I needed”? That’s what these bars do. Here’s why I keep coming back to them (and why you might, too):
-
The crust is buttery, soft, and crumbly—like shortbread’s chill cousin.
-
That filling? It’s not just lemon. It’s lemon plus cream cheese, so it’s smooth, bright, and a little rich in the best way.
-
They’re not fussy. You don’t need a mixer. Or fancy lemons. You just need a little time and a fridge.
-
They look like sunshine on a plate. Seriously—try serving them with a dusting of sugar and a few berries. Gorgeous.
-
And maybe my favorite thing? They hold up. Like, you can slice them, stack them, freeze them, snack on them at 2 a.m.—they’re solid, dependable, comforting. Kinda like a good friend.

Ingredient Notes:
So here’s what you’ll need to whip up these Creamy Lemon Dream Bars. I’ve added a few real-life tips—because let’s be honest, we all cut corners sometimes (and that’s okay).
For the crust:
-
2 cups all-purpose flour: I’ve used unbleached and regular. No disasters either way.
-
½ cup granulated sugar: Sweet, but not overkill. The lemon needs backup.
-
½ tsp salt: Don’t skip this. It’s quiet, but it matters.
-
1 cup unsalted butter (cold & cubed): I sometimes cube it the night before and then forget why I did. Still works.
For the filling:
-
8 oz cream cheese (softened): Not optional. If it’s still cold, microwave it in short bursts. Or just wait a bit. Your call.
-
2 cups sugar: I know, it sounds like a lot. But the lemon is bold. You’ll get it once you taste it.
-
¼ cup flour: Helps it set. I once forgot this and ended up with… lemon soup? Still tasty, but not bars.
-
¾ cup lemon juice (fresh if possible): Bottle juice works in a pinch. I won’t judge.
-
⅓ cup powdered sugar: It’s not just for dusting. It makes the filling smooth.
-
6 large eggs: Yep, six. Think of it as lemon custard with benefits.
-
1 tbsp vanilla: Adds just the right hug of warmth. Don’t skip.

How To Make Creamy Lemon Dream Bars?
Let’s break it down, step by casual step.
Step 1: Oven on, pan lined.
Set your oven to 350°F. Line your 9×13″ baking pan with foil or parchment. Leave enough hanging over the edges so you can lift it out later. It’s like a cake hammock.
Want To Save This Recipe?
Step 2: Crust.
Mix flour, sugar, and salt in a bowl. Add your cold, cubed butter and blend until crumbly. No need for perfection—just aim for “looks like damp sand.” Press it into the pan like you’re smoothing out beach sand. Bake for 10 minutes. No, you don’t need to wait for it to cool afterward. I never do.
Step 3: Filling time.
Cream cheese and sugar go in a bowl. Mix until mostly smooth (a few tiny lumps won’t kill the vibe). Add flour and powdered sugar. Then slowly pour in lemon juice, eggs, and vanilla. Stir it gently—don’t go full workout mode here. It should be silky-ish, not frothy.
Step 4: Pour and bake.
Pour your filling over the hot crust. It might look too liquidy. Trust the process. Bake for 30 minutes or until the center jiggles just a little. Think: Jell-O confidence, not waterbed chaos.
Step 5: Cool… and chill.
Let the whole thing cool at room temp for 20–30 minutes. Then into the fridge it goes. Four hours minimum. Overnight? Even better. That’s when the real magic happens.
Step 6: Slice and savor.
Lift it out with that handy overhang, dust with more powdered sugar, and slice into squares. I cut the edges off sometimes for “presentation”—but really it’s just an excuse to snack early.

Storage Options:
-
Fridge: These bars live happily in the fridge for 3–4 days. Cover them, or they’ll start to absorb fridge weirdness.
-
Freezer: Wrap individually in parchment or wax paper, freeze in a zip bag. They thaw beautifully and might even be better a little cold.
Variations and Substitutions:
-
Add lemon zest to the crust or filling for an extra punch. Just don’t overdo it unless you want a face-puckering surprise.
-
Sub lime juice for lemon if you’re feeling tropical. Add coconut to the crust if you’re really going for it.
-
Berry swirl? Drop a spoonful of raspberry jam on top before baking and swirl it with a knife. Fancy and low effort.
-
Gluten-free crust: Use a 1:1 GF blend. I’ve tried it. Not bad at all.
-
Want to cut the sweetness? Try adding a little Greek yogurt to the filling with the cream cheese.

What to Serve with Creamy Lemon Dream Bars?
-
Hot tea: Something herbal, like mint or chamomile.
-
Iced coffee: Trust me. The lemon tang and cold brew balance each other like best frenemies.
-
A tiny dollop of whipped cream: Over the top? Sure. But isn’t that the point?
-
A playlist that makes you feel like spring cleaning might actually be fun. (You’ll need it after baking.)
Frequently Asked Questions:
Can I make these in advance?
Yes. And you should. They’re better the next day. It’s science (or magic—I dunno).
Do I really need six eggs?
Yes. Unless you like lemon soup. Then go for four and live on the edge.
Do I need a mixer?
Nope. Just a bowl and a spoon. And maybe a little patience.
These Creamy Lemon Dream Bars are a whole mood. They’re simple, bright, and just the right mix of comforting and cheerful. The kind of dessert that doesn’t need bells or whistles—it just works. Like your favorite hoodie. Or your grandma’s kitchen.
So yeah—make them. Mess them up a little. Make them again. Share them, hoard them, gift them to your neighbor who just mowed your lawn.
And if you do? Tell me how it went. What did you change? What went sideways? Did you cut the first piece before it was chilled? (I’ve done it too.) Drop a comment or shoot me a message—I’ll be here, licking powdered sugar off my counter.
Keep the Flavor Coming – Try These:


Creamy Lemon Dream Bars
Ingredients
For the crust:
- 2 c all-purpose flour
- ½ c granulated sugar
- ½ tsp salt
- 1 c 2 sticks unsalted butter, cold and cubed
For the filling:
- 8 oz cream cheese at room temperature
- 2 c granulated sugar
- ¼ c all-purpose flour
- ¾ c lemon juice freshly squeezed
- ⅓ c confectioners' sugar plus extra for dusting
- 6 large eggs
- 1 tbsp vanilla extract
Instructions
- Heat your oven to 350°F. Line a 9x13 inch baking pan with foil or parchment, leaving an overhang for easy removal.
- For the crust, blend 2 c flour, ½ c sugar, ½ tsp salt, and 1 c cold, cubed butter until it forms fine crumbs. Press this mixture into your pan and bake for 10 minutes.
- For the filling, mix 8 oz softened cream cheese with 2 c sugar until smooth. Add ¼ c flour, ⅓ c confectioners' sugar, ¾ c lemon juice, 6 eggs, and 1 tbsp vanilla. Mix until smooth.
- Pour the filling over the baked crust and bake for 30 more minutes.
- Let it cool for about 20 minutes, then chill in the fridge for 4 hours or overnight.
- Use the foil overhang to lift out the bars, cut into squares, dust with confectioners' sugar, and serve.
Notes
I’m Bitty, owner of nodashofgluten.com, where I share simple, delicious recipes for all tastes, including gluten-free. Check out my “About Me” page for more info!

