Flaky crust, sweet cherries, red wine, brown sugar, vanilla, and cinnamon make these Cherry Hand Pies impossible to resist.
Every time I start a batch of these Cherry Hand Pies, something kind of funny happens—I get this weird mix of excitement and nostalgia, like my brain can’t decide if I’m baking or time-traveling. I swear, the smell of simmering cherries brings me straight back to a family reunion where my aunt Terry tried to teach me how to roll out dough properly. She kept saying, “You gotta feel the dough, honey,” which honestly sounded like spiritual advice at the time. I was also 11 and mostly focused on sneaking cherries when she wasn’t looking. (I still do that, by the way. Some habits choose us.)


And maybe it’s silly, but every time I’m making this cherry hand pie recipe now, I think about that day. The sun was absurdly bright, someone was grilling something questionable in the backyard, and the radio kept playing Shania Twain like she was the only artist on Earth. You ever have those memories that feel like a collage instead of a movie? That’s what these little pies feel like to me—simple, warm, slightly chaotic in the best way.
So yeah, that’s my tiny emotional attachment to Cherry Hand Pies. I don’t know… maybe food is just good at holding all the stuff we forget we remember. Ever feel that way?
Why You’ll Love This Cherry Hand Pies Recipe?
What I love about this cherry hand pie recipe is that it doesn’t try too hard. It’s cute, it’s flaky, it’s sweet, and it’s a little dramatic thanks to the red wine. Honestly, the wine makes the filling taste like it has something to say. Not in a pretentious way—just in a “Hey, I’m here and I’m fabulous” way.
The thing is, these hand pies hit that sweet spot (pun intended) between homemade comfort food and “wow, did you buy these?” fancy. They’re kind of like that friend who shows up to brunch wearing jeans but somehow looks like they stepped out of a magazine. It’s a mystery.
And before you ask: yes, they’re freezer-friendly, portable, and fun to make. Are they life-changing? I mean… I don’t want to oversell, but also, maybe?? Depends on your day, your mood, and how much you like cherries.
Ingredient Notes:
I always think ingredients deserve a moment of appreciation. Like characters in a story, they all show up with their own quirks.
-
Fresh Cherries – If you can get them, do! They taste brighter. Frozen cherries are cool too, just thaw them or your filling turns into cherry soup. Been there, don’t recommend.
-
Red Wine – Nothing fancy. Just something you’d actually drink. (Please… don’t grab the dusty bottle that’s been sitting on top of your fridge since last Christmas.)
-
Brown Sugar – Adds that caramel hug. White sugar works but doesn’t give the same cozy flavor.
-
Cornstarch – The quiet hero. Keeps your Cherry Hand Pies from becoming, well… cherry puddles.
-
Vanilla + Cinnamon – These two are like the soundtrack to a cozy fall movie. Optional pinch of cloves if you’re feeling dramatic.
-
Pie Crust – Sour cream crust is my go-to. It’s flakey, forgiving, and tastes way fancier than it is.

How To Make Cherry Hand Pies?
Alright, let’s walk through this together. Imagine we’re both in the kitchen, flour on our shirts, cherries staining our fingertips, maybe a little music in the background. Something fun. Something with a beat you can roll dough to.
Step 1. Chill your dough.
Make it ahead—seriously. Cold dough = flaky crust. And flaky crust = happiness. If you make it the day before, you’ll feel like the most organized person on the planet.
Step 2. Make that filling.
Pit your cherries. (Or if you’re like me and get bored halfway through, put on a podcast.) Mix your cornstarch with a little red wine. Let the cherries simmer with wine, sugar, cinnamon, vanilla… the whole kitchen will smell like a holiday you wish you’d invented.
Step 3. Let the filling cool.
Warm filling melts dough and the pies will rebel. We don’t want rebellious pies.
Step 4. Roll out the dough.
Flour your counter. Roll, rotate, flip. I always roll one edge thinner than the other—no clue why—but honestly it doesn’t matter. Imperfect dough still bakes into perfect little Cherry Hand Pies.
Step 5. Cut your circles.
It’s like cookie cutters for grown-ups. Except you get dessert at the end.
Step 6. Fill and seal.
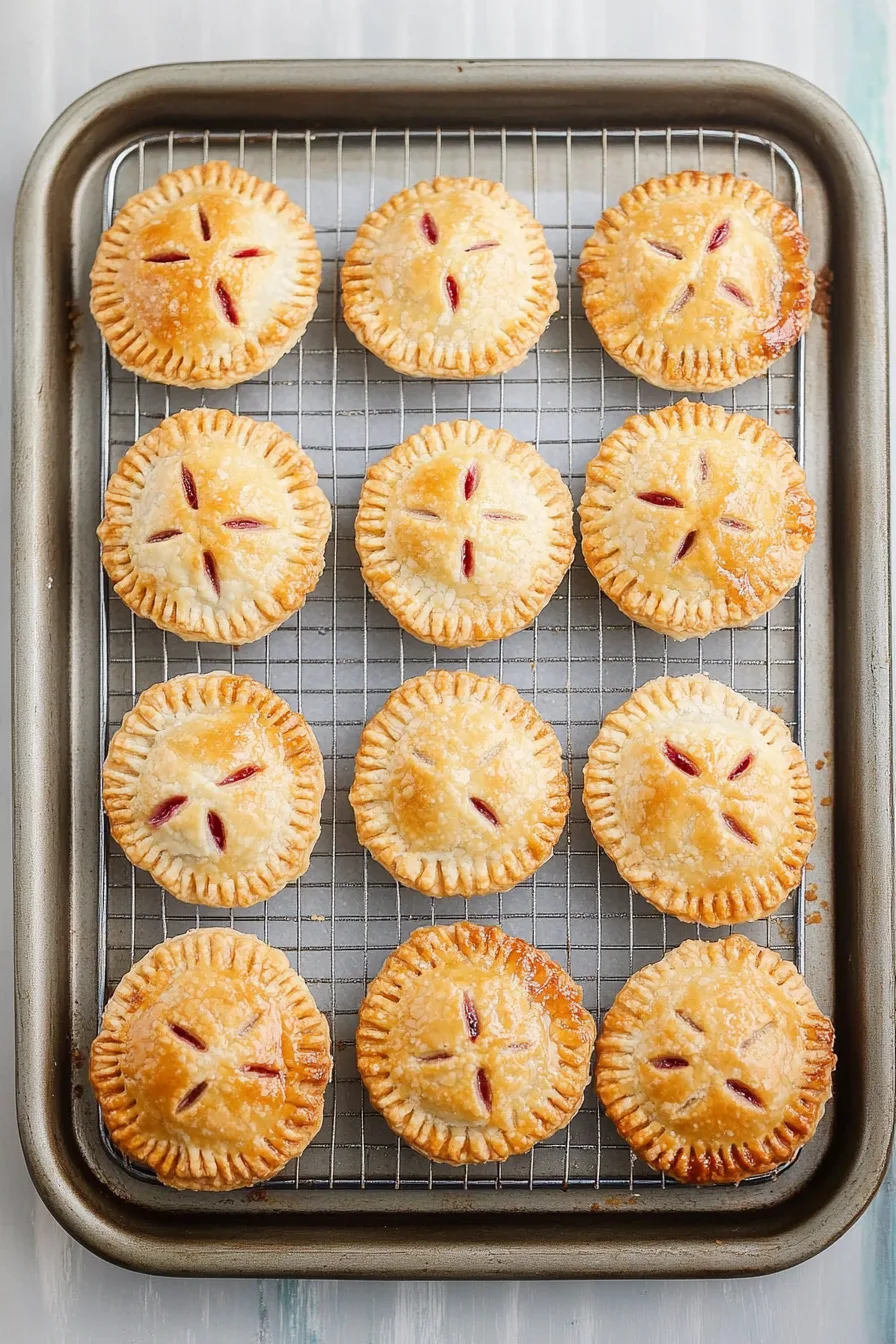
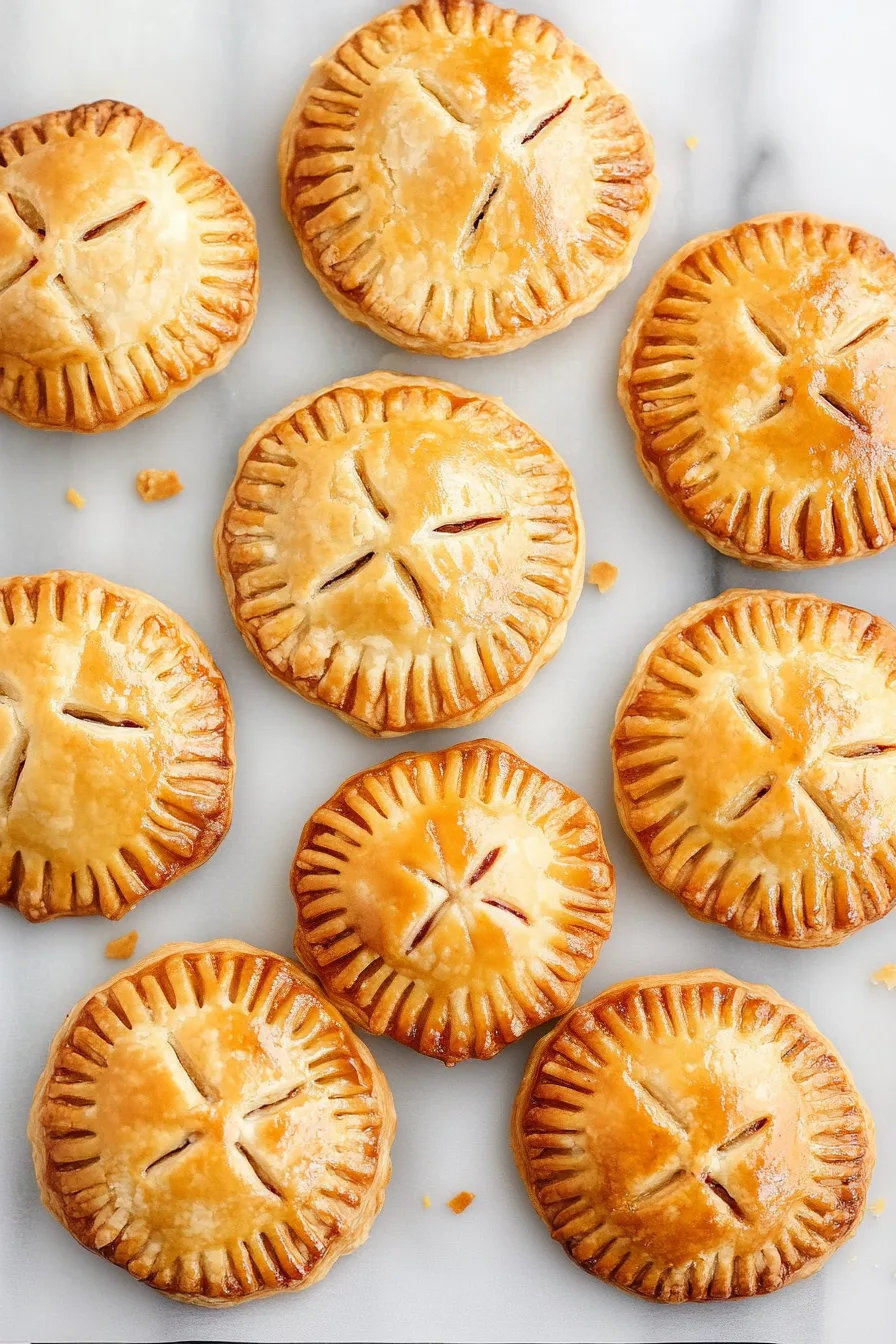
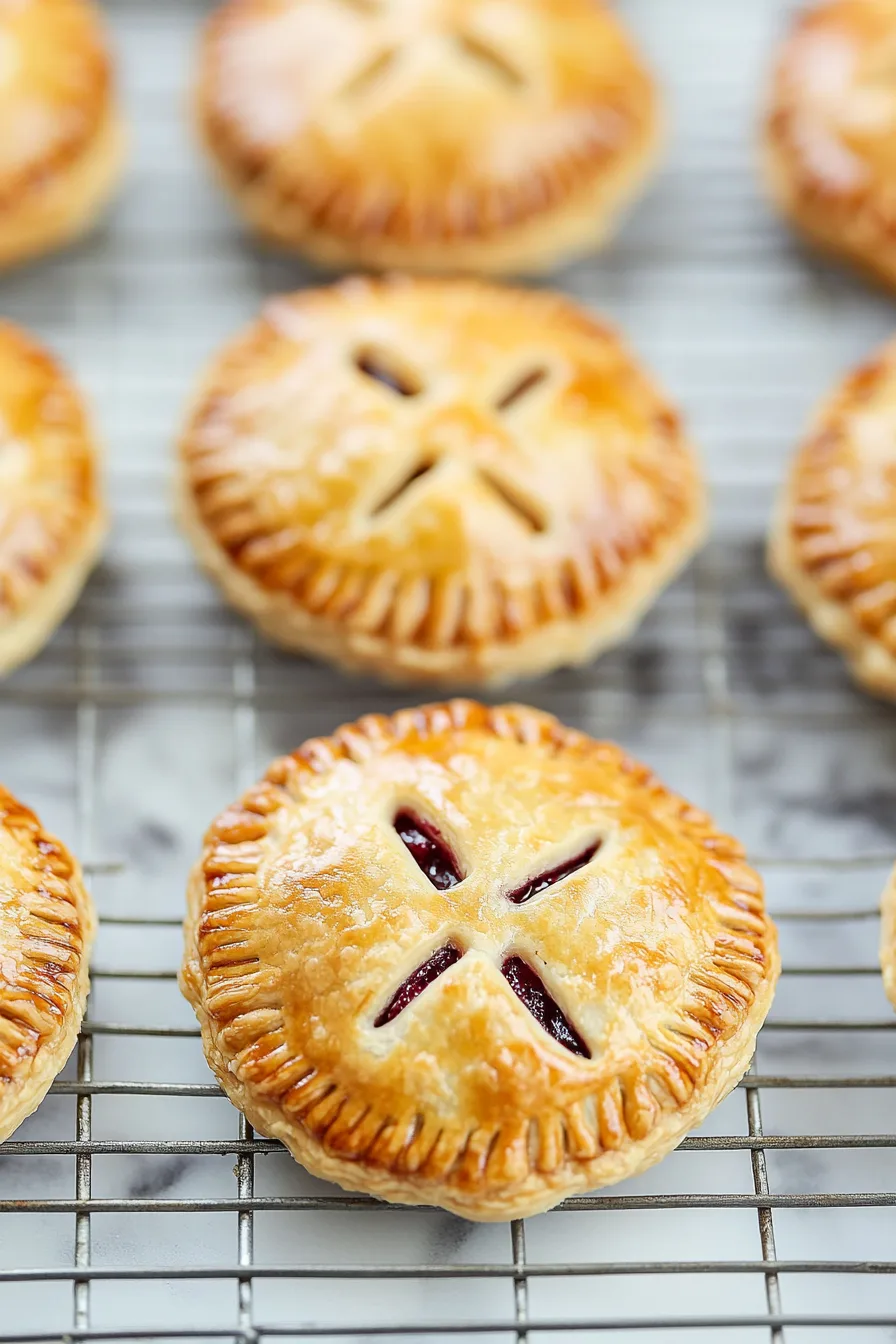
Scoop some filling in the middle and gently top it with another dough circle. Press the edges like you mean it. Fork seal. Cute little vent slit on top. Tiny cherry hand pie happiness.
Step 7. Freeze for 10–15 minutes.
I know this sounds extra but trust me—it’s the difference between flaky and FLAKY. Capitals matter.
Step 8. Bake and live your best life.
Golden crusts, bubbling filling, a moment of joy when you pull them out. Try not to burn your tongue—but no promises.
Want To Save This Recipe?
Storage Options:
If you actually have leftovers (??), I’m impressed. Store them in the fridge for 3–4 days, or reheat them in a toaster oven so they crisp up again. You can freeze unbaked ones too—like your own little stash for emergencies. And yes, dessert emergencies are real.
Variations and Substitutions:
Some days you’re in the mood for classic Cherry Hand Pies. Other days, you want to experiment. Here’s a little “choose your own adventure” list:
-
Mixed Berry Hand Pies – Blueberries + cherries = magical.
-
Bourbon Cherry Hand Pies – If you know, you know.
-
Cardamom Instead of Cinnamon – Slightly fancy, unexpectedly amazing.
-
Chocolate Cherry Hand Pies – Throw in mini chocolate chips. It makes people emotional.
-
Iced Hand Pies – Add a vanilla drizzle if you want bakery vibes.
What to Serve with Cherry Hand Pies?
These tiny pies are basically social butterflies. They go with everything.
-
Vanilla ice cream – Like, obviously.
-
Whipped cream – Light and fluffy.
-
Coffee or tea – Perfect for a cozy afternoon.
-
Sparkling wine – Sounds fancy but really elevates a dessert.
-
Lemon sorbet – Bright, refreshing, weirdly perfect with cherries.
Frequently Asked Questions:
Can I use canned cherry pie filling?
Yeah, you can. I won’t hunt you down. But homemade filling tastes deeper, less sweet, more… thoughtful? If you do use canned filling, use a little less so it doesn’t ooze everywhere.
Do I really need to freeze them before baking?
You don’t have to. But your Cherry Hand Pies will be way flakier if you do. I mean, if you’re already committing to homemade pie, what’s 10 minutes of freezing?
Can I make these ahead?
Totally. Make the dough a day early, or freeze the assembled pies and bake them whenever you need a pick-me-up (or when guests show up uninvited).
If you make these Cherry Hand Pies, I hope they bring you the same blend of nostalgia, chaos, and joy they bring me. And if you get cherry stains on your shirt, honestly—welcome to the club.
Let me know how yours turn out, okay?
Keep the Flavor Coming – Try These:
Cherry Hand Pies
Ingredients
- Double batch sour cream pie crust or preferred pie crust
- 4 cups approximately 560 g fresh cherries pitted and halved
- ¼ cup 30 g cornstarch
- ¾ cup 177 g red wine, divided
- ½ cup 100 g brown sugar
- 1 tablespoon 13 g pure vanilla extract
- 1 –1½ teaspoons 3–4 g ground cinnamon to taste
- Optional: a small pinch of cloves or allspice
- Optional for finishing: 1 egg whisked with 1 tablespoon milk or milk alone
- Optional: coarse sugar for sprinkling
Instructions
Prepare the Pie Crust
- Prepare the pie crust at least one hour in advance, or ideally the day before. Ensure the recipe is doubled. Combine all crust ingredients in one bowl if preferred, form into two discs, and chill thoroughly.
Prepare the Cherry Filling
- If using fresh cherries, wash, dry, remove stems, pit thoroughly, and cut the cherries in half. Whole cherries may be used if desired.
- In a small bowl, whisk together the cornstarch and ¼ cup (59 g) of the red wine until completely smooth. Set aside.
Cook the Cherry Mixture
- In a medium saucepan, combine the cherries, the remaining ½ cup (118 g) red wine, brown sugar, vanilla extract, cinnamon, and cloves (if using). Heat over medium until the mixture reaches a gentle simmer. Stir frequently until the sugar dissolves.
- Stir the cornstarch mixture once more, then slowly pour it into the simmering cherries while stirring continuously. Allow the mixture to cook for an additional 1–2 minutes, or until slightly thickened. Remove from heat and refrigerate for at least 15 minutes.
Preheat the Oven and Prepare Baking Sheets
- Preheat the oven to 400°F (205°C). Line two baking sheets with parchment paper or silicone baking mats.
Roll and Cut the Dough
- Place one disc of chilled pie dough on a lightly floured work surface. Lightly dust the top of the dough with flour. Roll the dough evenly to approximately ⅛ inch (⅓ cm) thickness, rotating as needed to maintain an even shape.
- Using a round cookie or biscuit cutter at least 3½ inches (9 cm) in diameter, cut out dough circles as closely together as possible. Transfer each circle to the prepared baking sheets. Gather the excess dough and set aside.
Repeat With Remaining Dough
- Repeat the rolling and cutting process with the second dough disc. Reserve these circles separately; they will serve as the top layers of the hand pies.
- Combine the excess dough from both discs, form into a disc once more, roll to the same thickness, and cut additional circles. Divide these circles evenly between the bottom layers (on the baking sheets) and the reserved top layers.
Fill and Assemble the Hand Pies
- Spoon approximately 1½ tablespoons of the chilled cherry filling into the center of each bottom dough circle. Begin with one test pie to ensure adequate sealing room.
- Cover each bottom circle with a corresponding top circle. Press gently around the edges to seal. If the dough does not adhere well, lightly moisten the edges with water.
- Crimp the edges with a fork to ensure complete sealing. Using a sharp knife, cut one or more small slits in the top of each pie to allow steam to escape.
Add Optional Finishing Touches
- If desired, brush each hand pie with the egg wash or with milk for a matte finish. Sprinkle coarse sugar on top if preferred.
Freeze Briefly Before Baking
- Transfer the assembled hand pies to the freezer for 10–15 minutes. This step promotes a flakier crust and helps maintain the structure during baking.
Bake the Hand Pies
- Bake for 15–20 minutes, or until the crusts are golden brown and the filling is visibly bubbling. If the edges brown too quickly, loosely tent the baking sheets with aluminum foil.
- Allow the Cherry Hand Pies to cool slightly before serving.
Notes
I’m Bitty, owner of nodashofgluten.com, where I share simple, delicious recipes for all tastes, including gluten-free. Check out my “About Me” page for more info!