This Vanilla Magic Cake combines milk, butter, eggs, and vanilla to create one easy batter that bakes into three heavenly layers.
You know that feeling when a recipe sounds way too good to be true? Yeah, that was me the first time I heard about Vanilla Magic Cake. One batter turning into three layers while baking — like, come on. I’ve been around enough kitchen “miracles” to know half of them end with me eating something that tastes like disappointment and regret.
But something about this one stuck. Maybe it was the word magic, or maybe it was because I was deep in one of those weeks where I just needed a win — even a small one, preferably dusted with powdered sugar. So, one quiet evening, I gave it a shot.


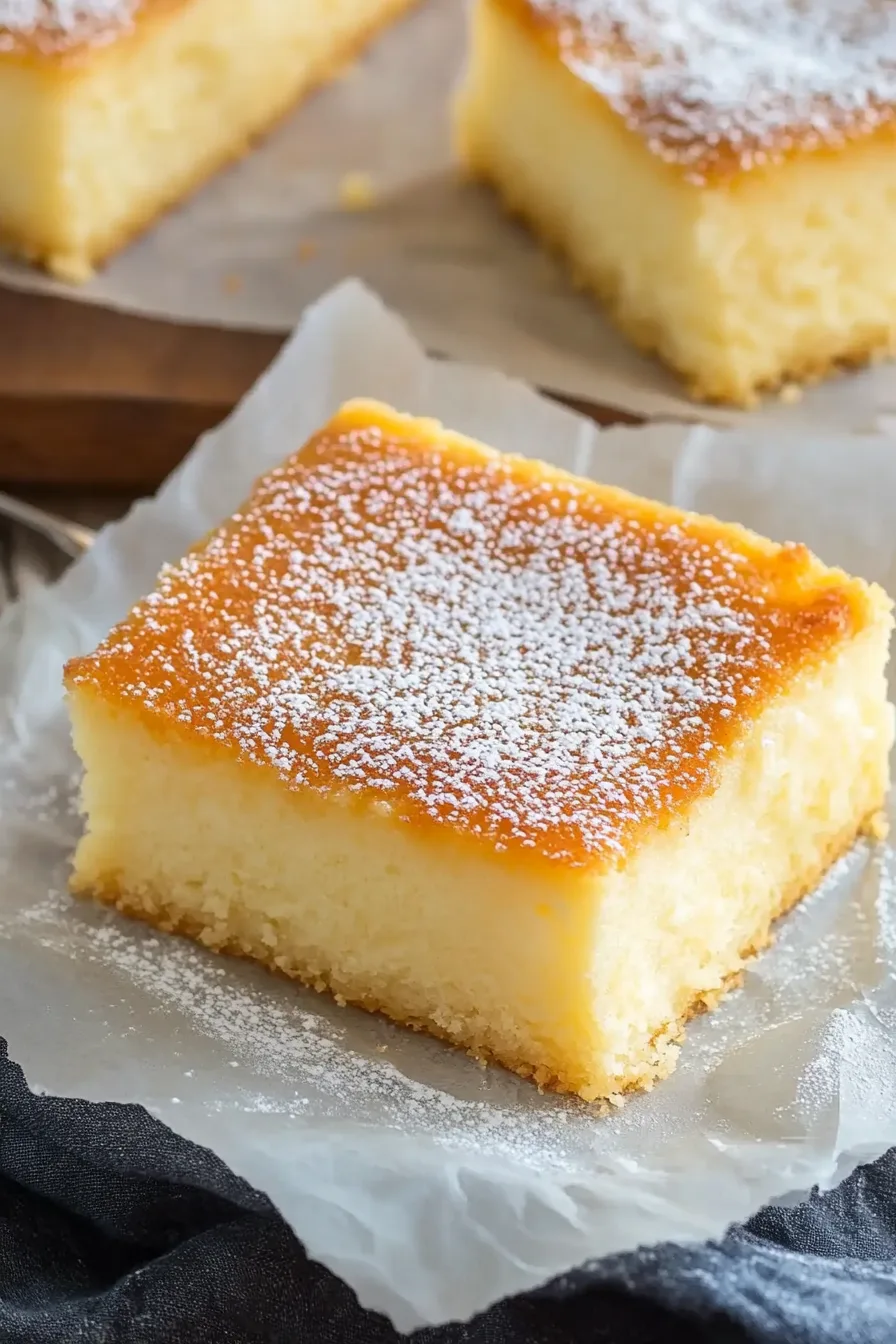
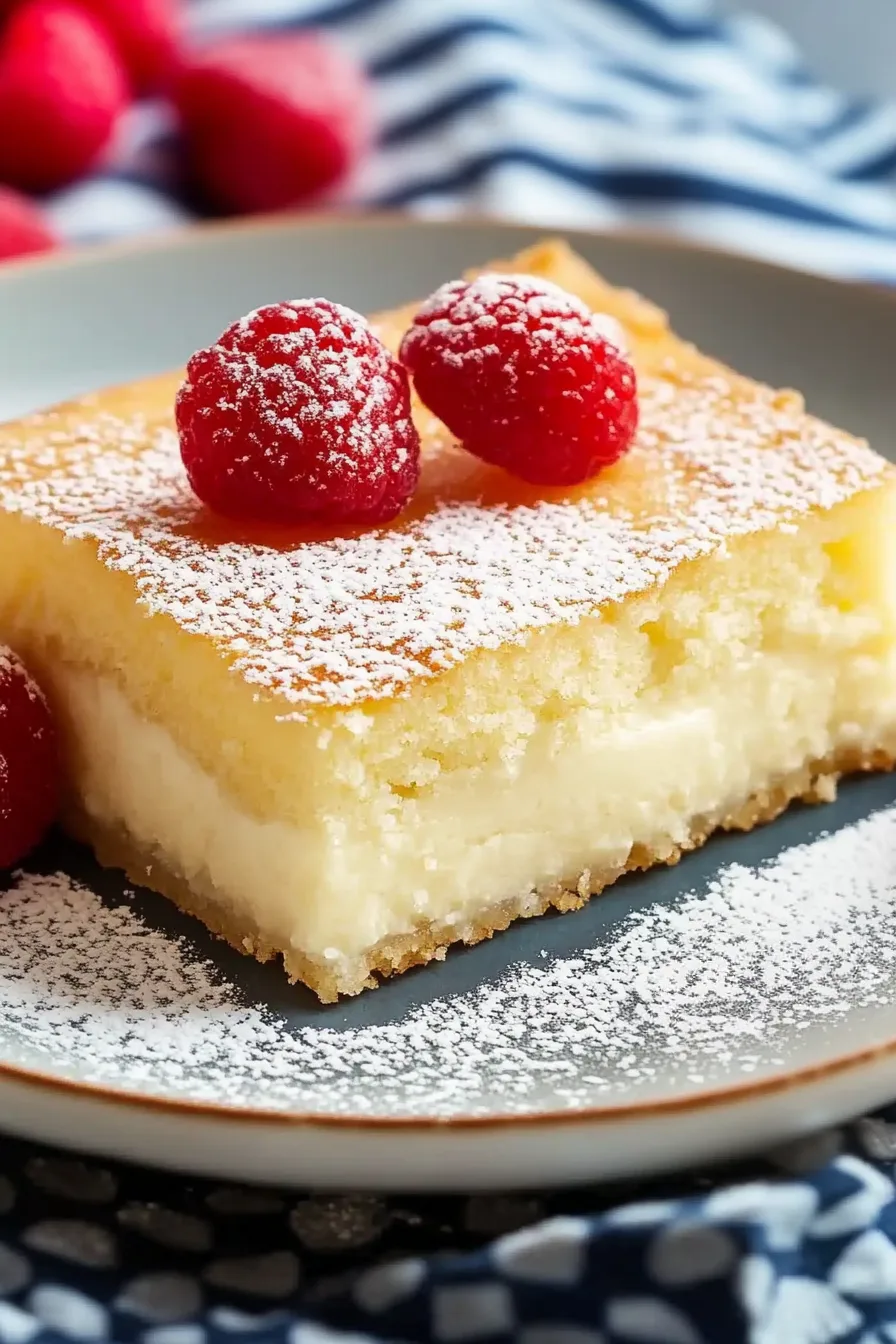
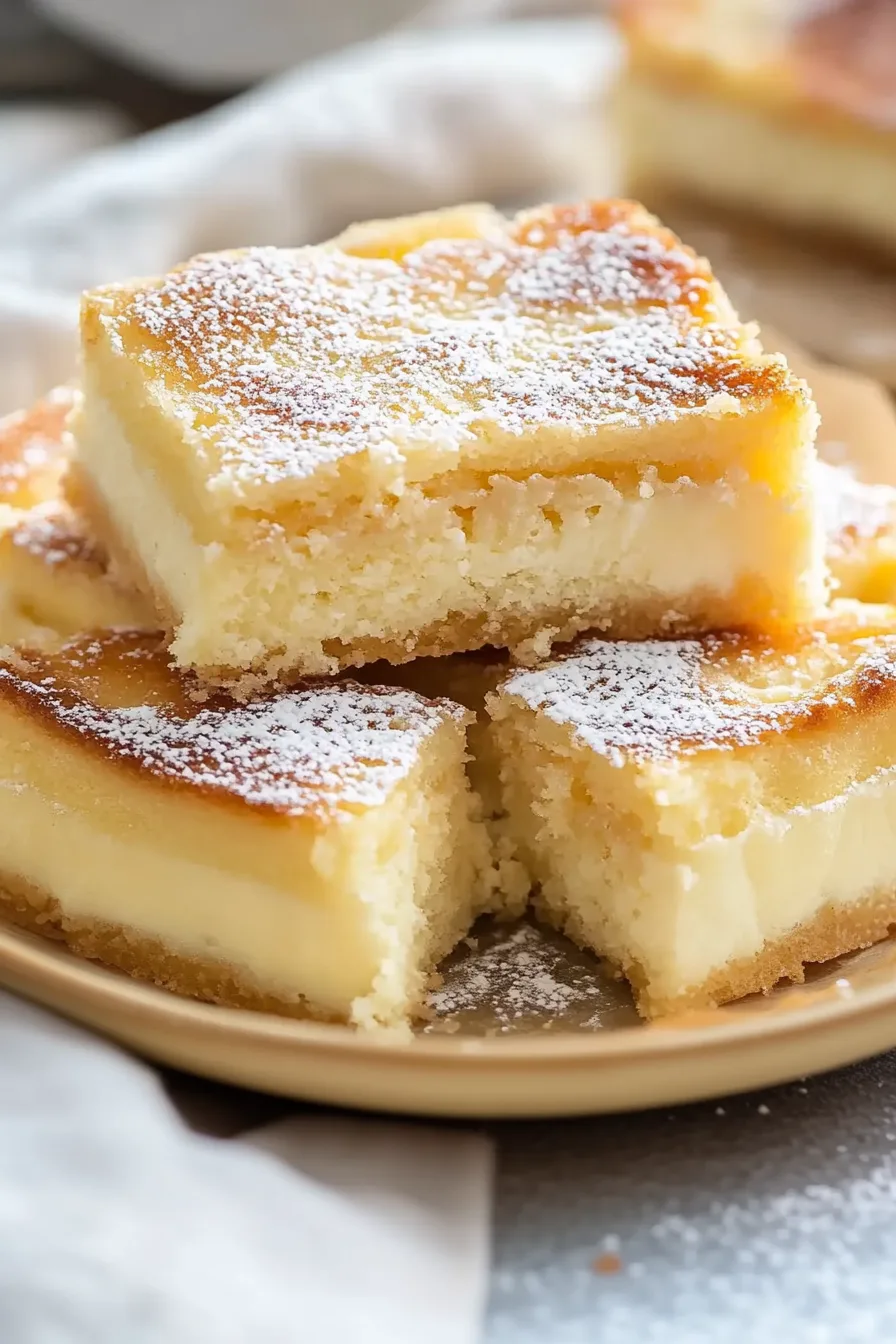
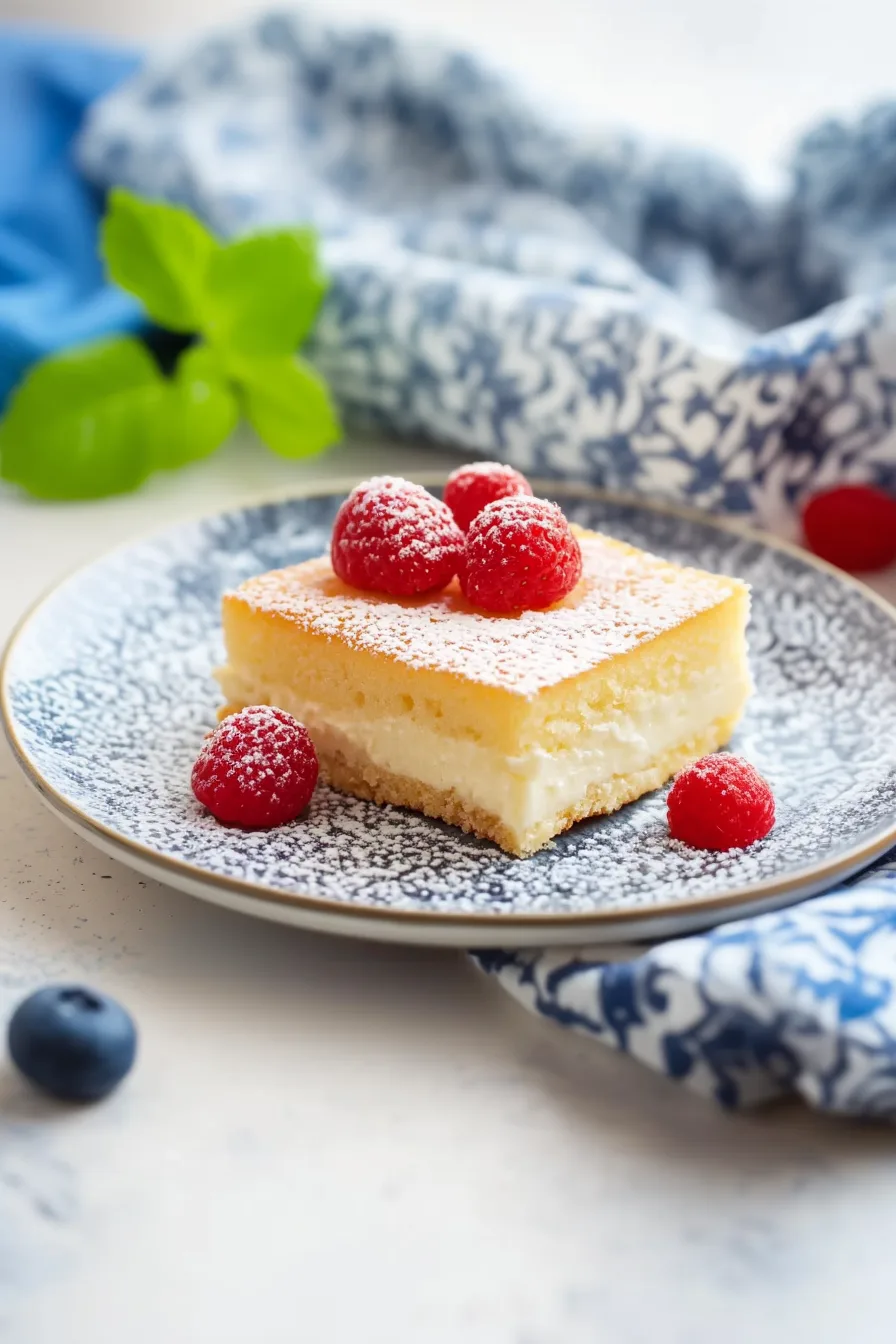
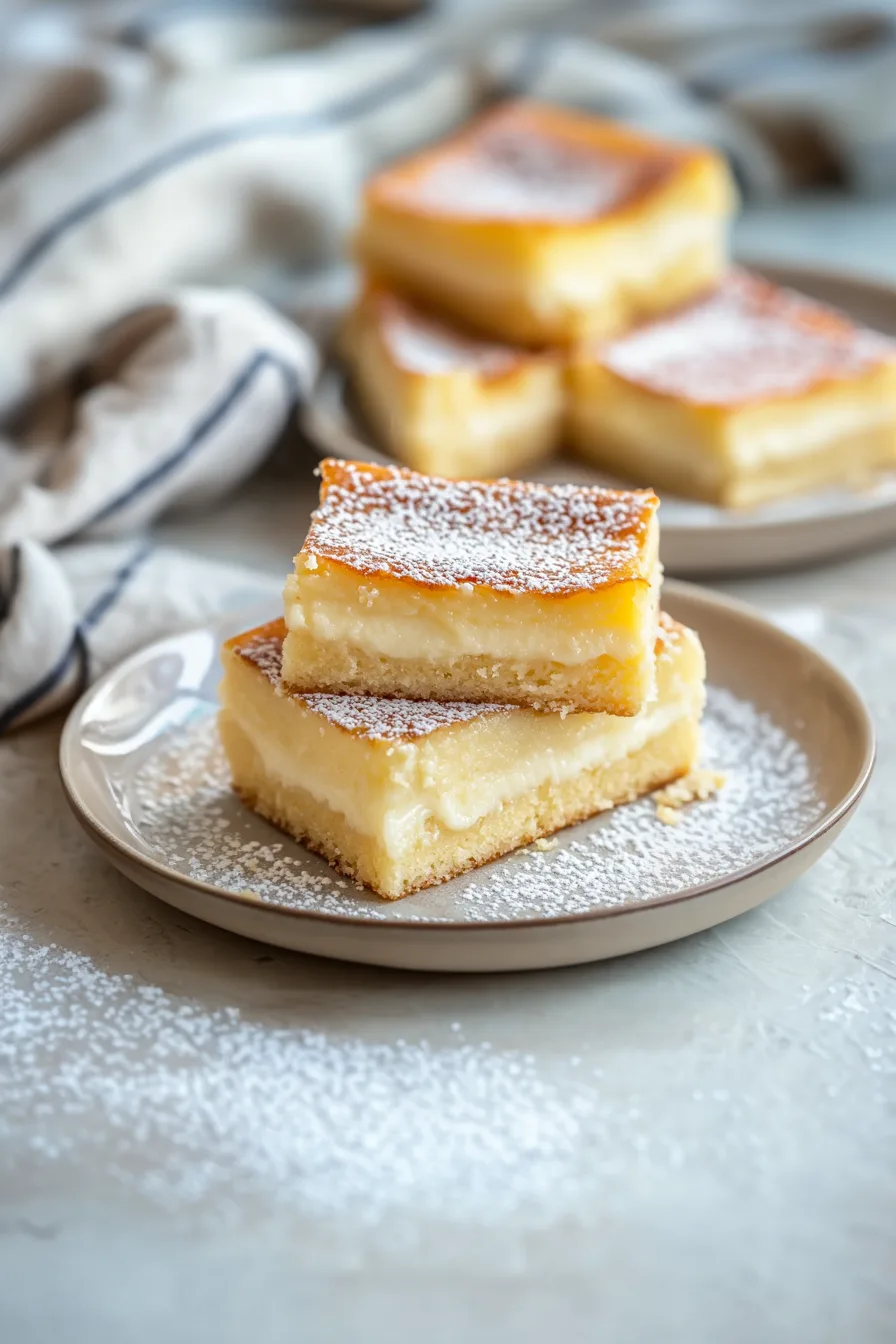
I still remember leaning against the counter, watching the oven light flicker, the faint smell of vanilla and butter filling the room. When I finally pulled it out, it looked simple — golden top, soft jiggle. Nothing dramatic. But when I sliced in… that’s when the magic hit. Three perfect layers: a spongey top, creamy custard center, and a dense, buttery base. I think I laughed out loud, like, “Wait. It actually worked?”
Since then, this Vanilla Magic Cake recipe has been one of my comfort bakes. It’s elegant but not fussy, nostalgic but not boring. The kind of dessert that reminds you why baking can still surprise you — even after all the messes and burnt edges.
Why You’ll Love This Vanilla Magic Cake Recipe?
There’s something beautifully deceptive about this cake. You whisk everything together thinking it’s just another vanilla sponge, but nope — it’s like the dessert version of a plot twist.
What makes this Vanilla Magic Cake Recipe so special isn’t just its taste (though trust me, it’s divine). It’s the experience. Watching it transform from one bowl of batter into three layers — it’s like watching your childhood belief in magic sneak back in for a moment.
The top is airy, the middle’s soft and custardy, and the bottom gives you that firm, almost pudding-like bite. It’s light but creamy, fancy but homey. It’s the cake that doesn’t need frosting, doesn’t beg for attention — it just is.
And maybe that’s why I adore it so much. It feels like a reminder that sometimes, you don’t need to overcomplicate things for them to be wonderful.
Ingredient Notes:
The ingredient list looks so ordinary that you might even underestimate it (don’t). These simple staples come together in the most quietly magical way.
-
Whole Milk: The heart of the custard layer. Don’t even think about swapping it for low-fat unless you like disappointment.
-
Unsalted Butter: Adds richness. Melt it gently — warm, not hot. I learned that the hard way when I scrambled my first batch of eggs.
-
Eggs: The reason this recipe works at all. The yolks build the creamy custard; the whites form that cloud-like top.
-
Sugar: Sweetens things up without making it cloying.
-
Vanilla Extract: The real hero. Go for the good stuff — it’s worth it.
-
Flour: All-purpose is fine. Don’t overmix or you’ll lose the lightness that gives the cake its layers.
-
Nutmeg (optional): A little warmth, a little nostalgia. Smells like holidays, feels like home.
Funny how these simple things — milk, eggs, butter — can pull off something that still makes me shake my head a little.
How To Make Vanilla Magic Cake?
You’ll laugh at how un-magical the process looks, but hang tight — it comes together beautifully in the oven.
Step 1: Preheat & Prep.
Set your oven to 325°F. Grease an 8-inch pan, line it with parchment (I always leave the sides long — trust me, it saves you from flipping disasters later), and give it another quick butter swipe.
Step 2: Warm the Milk & Butter.
Heat them on low just until the butter melts. Don’t let it bubble. It should feel cozy-warm, like the kind of milk you’d drink before bed.
Step 3: Whip Those Egg Whites.
Beat the whites until stiff peaks form. When they stand tall, they’re ready. Don’t rush this step — those fluffy whites are what make your top layer so light.
Step 4: Make the Batter.
Whisk the yolks, sugar, vanilla, salt, and nutmeg until pale and creamy. Add flour and mix until smooth. It’ll look thick — but that’s fine. The milk’s coming next.
Step 5: Combine the Warm Milk.
Pour the warm milk mixture in slowly while whisking. The batter should end up thin, almost like crepe batter. Don’t panic — that’s how it’s supposed to be.
Step 6: Fold in the Egg Whites.
Add them gently, in batches. You’ll have little bits of white floating around — don’t overmix. Those imperfect clumps are where the magic happens later.
Step 7: Bake & Believe.
Pour it into the pan, smooth it out, and bake for about 50 minutes. The top should be golden and barely jiggle when you shake it. I know it’s hard, but resist the urge to open the oven a hundred times. The magic needs peace.
Step 8: Cool & Chill.
Let it cool for half an hour, then chill it for at least one hour before slicing. This helps the layers settle and firm up. Dust it with powdered sugar, add some berries, or just grab a fork and eat it straight from the pan. No judgment here.
Want To Save This Recipe?
Storage Options:
Store this Vanilla Magic Cake in the fridge, covered, for up to three days. If you can make it last that long — mine rarely does.
Honestly, it’s even better the next day. The custard gets silkier, the flavors mellow, and it tastes like the dessert equivalent of a slow Sunday morning. But don’t freeze it — I tried once out of curiosity, and let’s just say it came back as a sweet, soggy ghost of its former self.
Variations and Substitutions:
Once you nail this version, you can play with flavors. It’s forgiving, adaptable — and honestly kind of fun to experiment with.
-
Chocolate Magic Cake: Add cocoa powder and reduce flour. It’s like a soft brownie’s elegant cousin.
-
Lemon Magic Cake: Add zest and swap the vanilla for lemon extract. Bright and summery.
-
Coffee Magic Cake: A tablespoon of espresso powder gives it café vibes.
-
Dairy-Free Twist: Use almond or oat milk and vegan butter. Different, but still good.
-
Spiced Version: Add a dash of cinnamon and cardamom for a cozy fall spin.
It’s the kind of recipe that welcomes creativity — or chaos, depending on how confident you’re feeling that day.
What to Serve with Vanilla Magic Cake?
This cake is so good it really doesn’t need anything, but if you’re feeling extra, here’s what I love pairing it with:
-
Fresh Strawberries or Raspberries — that little pop of tartness against the creamy vanilla? Perfection.
-
Whipped Cream — it’s practically non-negotiable at my house.
-
Coffee or Latte — the bitterness balances the sweetness beautifully.
-
Caramel Drizzle — because… caramel. Enough said.
-
Vanilla Ice Cream — over the top? Maybe. Worth it? Absolutely.
Frequently Asked Questions:
Can I make it ahead of time?
Oh yes, and you should! It’s one of those desserts that tastes even better after chilling overnight.
My cake didn’t form layers — what did I do wrong?
Probably overmixed your egg whites, or maybe your oven was too hot. Don’t beat yourself up — it’ll still taste amazing.
Can I use skim milk?
You can, but don’t. Whole milk gives you that dreamy custard texture.
Every time I make this Vanilla Magic Cake Recipe, I feel like a kid again — curious, slightly skeptical, and always pleasantly surprised. There’s something genuinely special about watching something ordinary turn extraordinary right in your own oven.
It’s not perfect — sometimes the layers are uneven, sometimes I get too impatient and slice it before it’s chilled — but that’s kind of the charm, isn’t it? Baking’s supposed to be fun, not flawless.
So go on — make it this weekend. Watch the magic happen, and when you slice into those three layers, take a second to smile. You made that. With milk, eggs, and a little bit of faith.
And hey, if you’re anything like me, you’ll probably eat the first slice standing by the fridge door, still in your pajamas. No shame.
Keep the Flavor Coming – Try These:
Vanilla Magic Cake
Ingredients
- 2 c 480ml whole milk
- ½ c 113g unsalted butter diced into small pieces
- 4 large eggs separated
- ⅔ c 135g granulated sugar
- 2 tsp pure vanilla extract
- ¼ tsp kosher salt
- ⅛ tsp ground nutmeg optional
- ¾ c 90g all-purpose flour
- Powdered sugar for dusting (optional)
Instructions
Prepare the oven and baking pan:
- Preheat the oven to 325°F (160°C). Grease an 8-inch square pan with butter or nonstick spray. Line the bottom and two sides with parchment paper, allowing a slight overhang for easy removal. Lightly grease the parchment as well.
Warm the milk and butter:
- In a small saucepan, heat the milk and butter over low heat until the butter melts completely. The mixture should be warm but not boiling (approximately 105–115°F). Remove from heat and set aside to cool slightly.
Whip the egg whites:
- In a clean bowl, using an electric mixer, beat the egg whites on medium-high speed until stiff peaks form, about 4 minutes. When lifted, the peaks should stand firm. Set aside.
Create the batter base:
- In a separate bowl, beat the egg yolks, sugar, vanilla extract, salt, and nutmeg (if using) on high speed until the mixture turns pale and creamy, about 2 minutes.
Add the flour:
- Reduce the mixer speed to low and gradually add the flour, mixing until incorporated. The batter will appear thick; this is expected.
Incorporate the milk mixture:
- While mixing slowly (or whisking by hand), add the warm milk and butter mixture gradually. Begin with small additions, then pour in the remaining milk once it starts blending smoothly. The resulting batter should be thin and fluid, resembling crepe batter.
Fold in the egg whites:
- Add the beaten egg whites to the batter in three portions. Fold gently after each addition using a whisk or spatula. The mixture should remain slightly uneven, with small foamy bits visible—this helps create the cake’s layered texture.
Bake the cake:
- Pour the batter into the prepared pan and smooth the surface gently. Bake for 50 minutes, or until the top is golden brown and the center jiggles slightly when moved. Do not overbake.
Cool and chill:
- Allow the cake to cool on a wire rack for 30 minutes, then refrigerate for at least 1 hour before serving. Dust with powdered sugar before slicing into squares.
Serve:
- Serve chilled or at room temperature with fresh fruit, whipped cream, or a drizzle of caramel sauce for an elevated presentation.
Notes
I’m Bitty, owner of nodashofgluten.com, where I share simple, delicious recipes for all tastes, including gluten-free. Check out my “About Me” page for more info!