
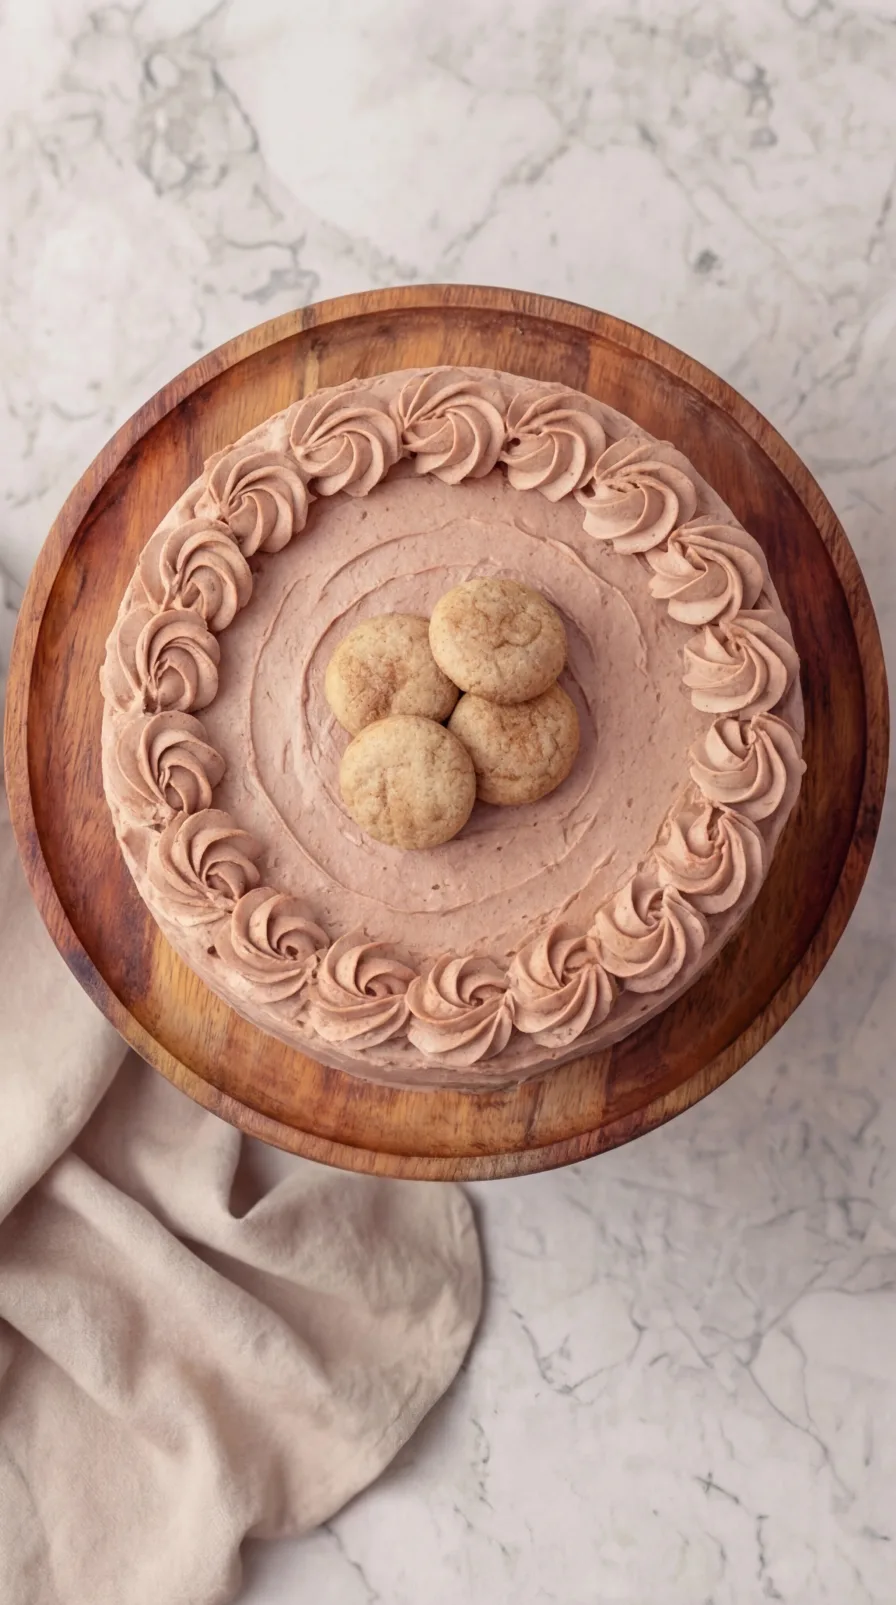

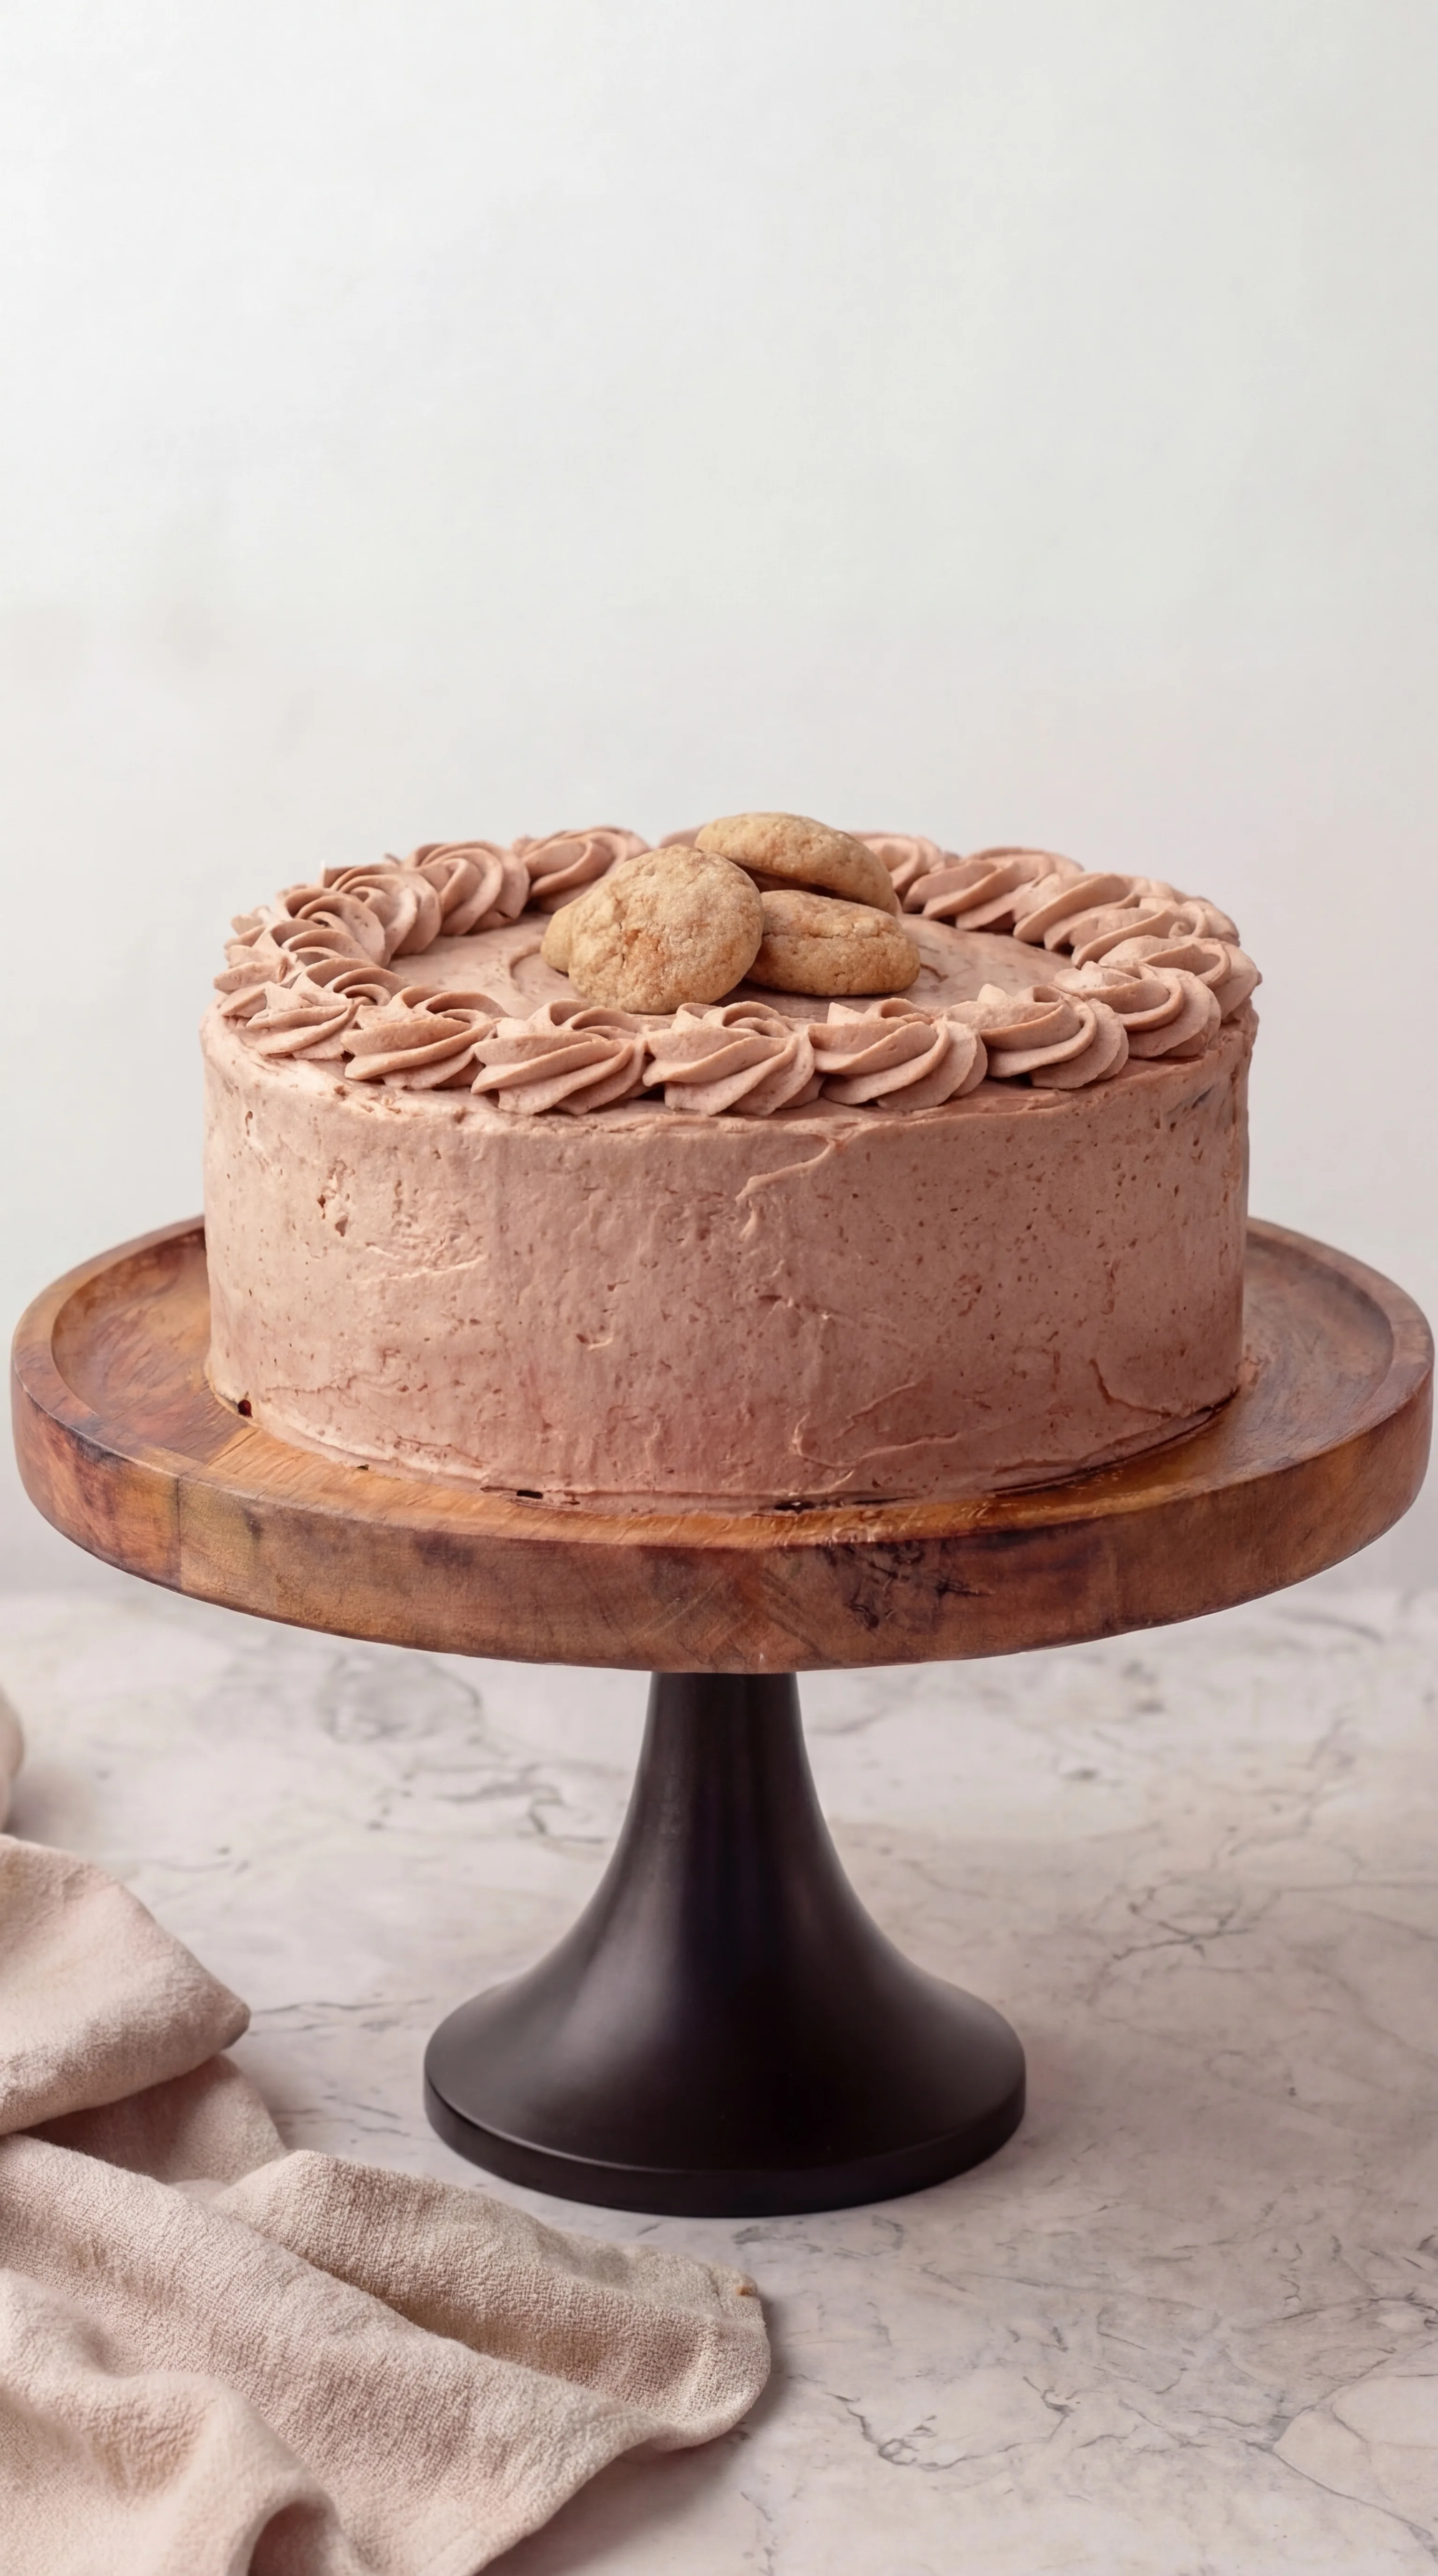
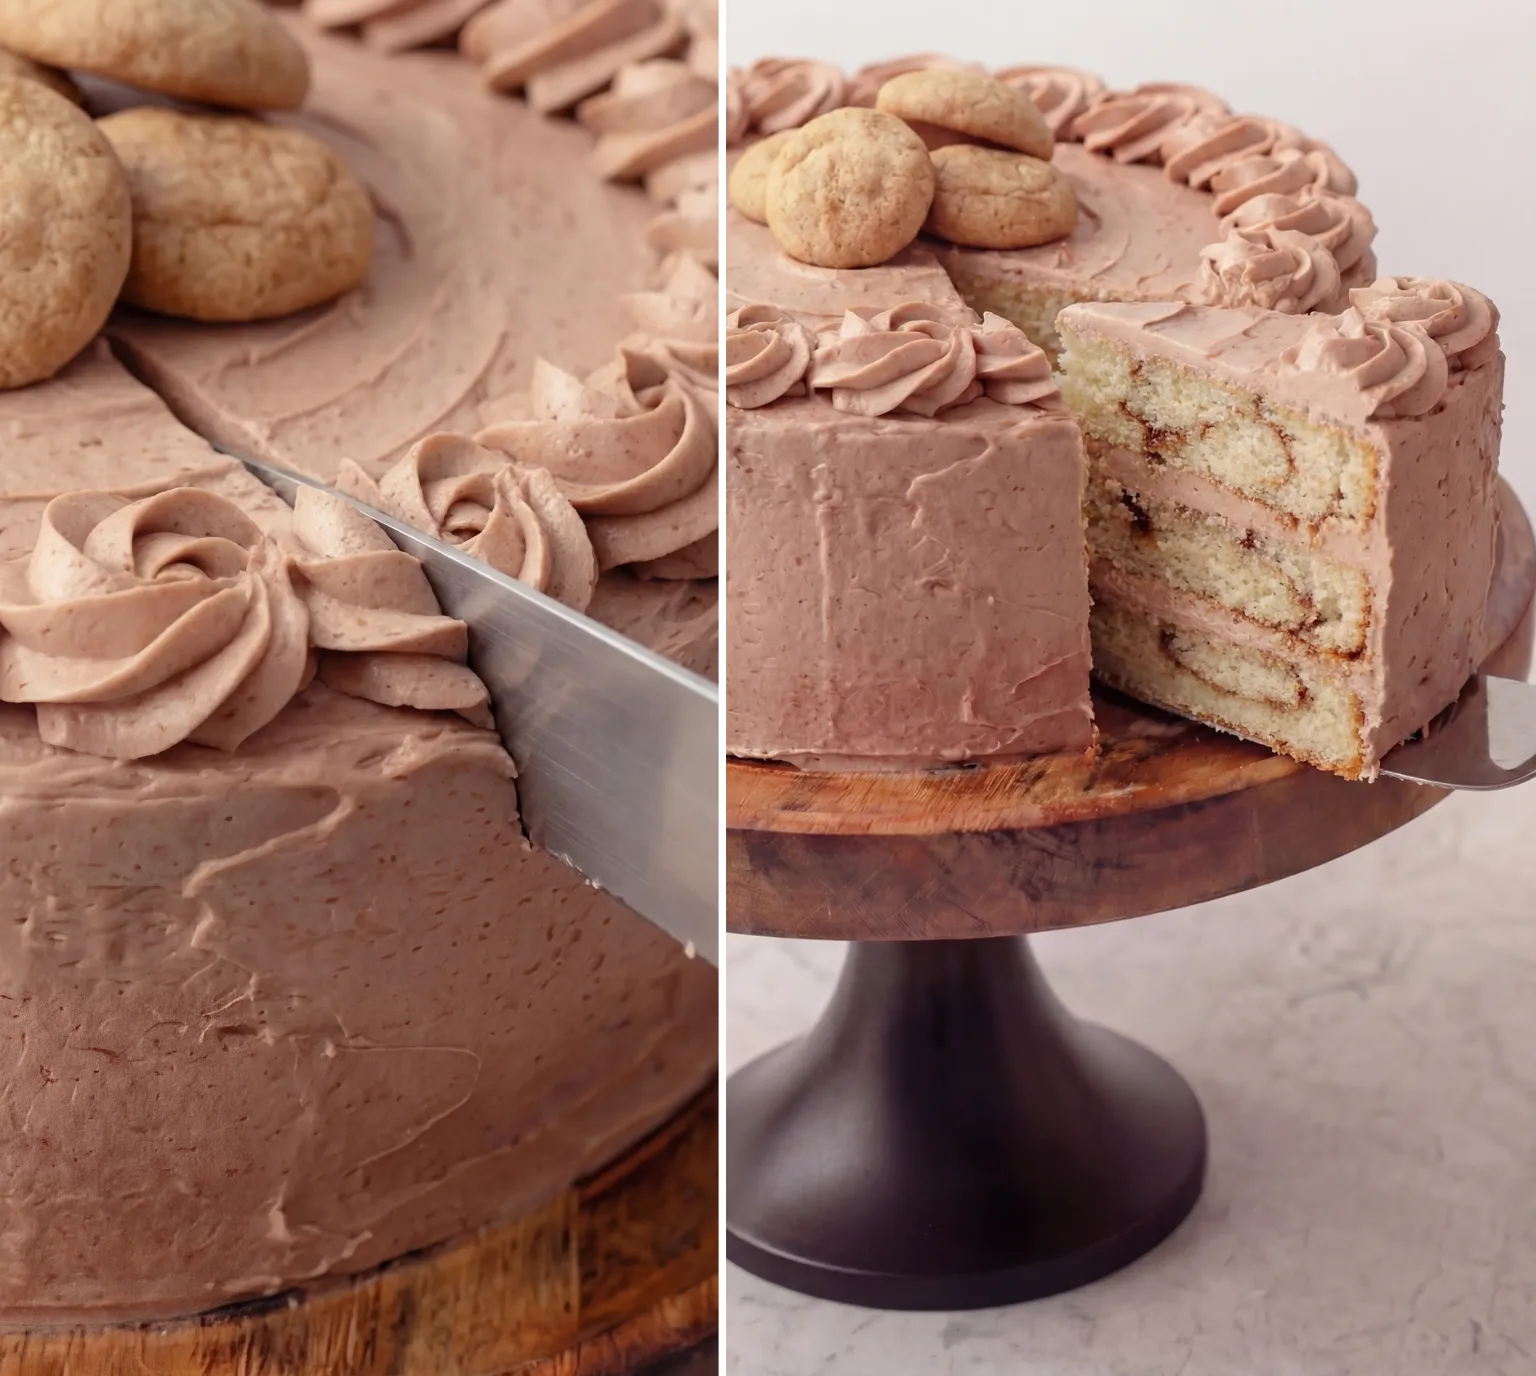
Snickerdoodle cake with butter, cinnamon, brown sugar, buttermilk, and cream cheese frosting. Soft layers, cozy spice, and caramel swirls in every bite.
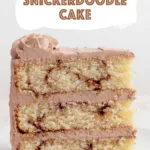
The second this cake goes into the oven, the kitchen starts smelling like cinnamon sugar and warm butter. You know that smell that makes you wander back in just to check on things, even though you checked two minutes ago? That one. This snickerdoodle cake has soft, fluffy layers, a ribbon of cinnamon sugar tucked inside, and a creamy frosting that leans just a little tangy.
Then there’s the caramel drip, which is honestly hard to resist “just testing” with a spoon. No judgment here.

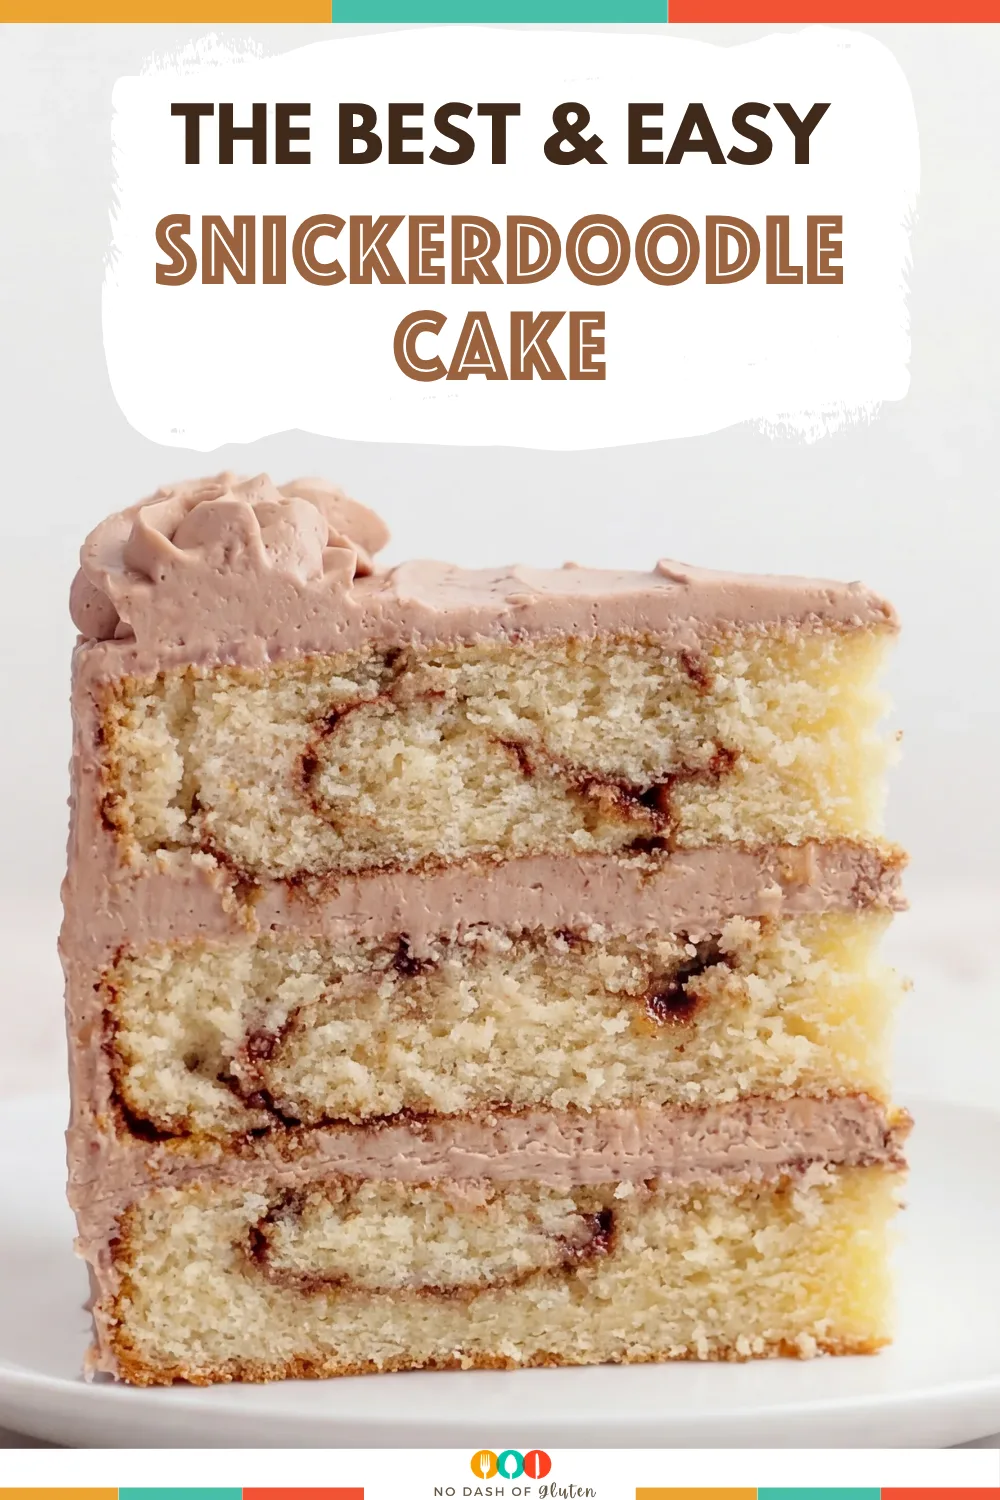
This recipe is basically the cake version of a snickerdoodle cookie, only softer, taller, and much more dramatic in the best way. The crumb stays tender thanks to buttermilk and oil, while the cinnamon sugar layer adds that sweet, slightly crackly middle. Also, the cream cheese frosting keeps everything from getting too sugary. It’s cozy enough for a weekend bake, but it also looks right at home on a party table. If you like cinnamon desserts, this one lands somewhere between cake and bakery-window temptation.
Why You’ll Love this Snickerdoodle Cake
Some cakes are all about looks. This one actually delivers when you cut into it, which I deeply appreciate.
- That cinnamon sugar layer: It melts right into the middle of each cake layer, so you get that classic snickerdoodle vibe in every slice.
- The crumb stays soft: Buttermilk, butter, and a little oil work together here, so the cake feels plush and tender instead of dry or crumbly.
- Cream cheese frosting keeps it balanced: It’s sweet, yes, but the slight tang keeps the whole thing from tipping into tooth-aching territory.
- The caramel drip is worth it: Brown sugar, butter, and cream cook into a silky topping that settles over the cake like glossy cinnamon candy.
- It’s celebration-friendly without being fussy: You can pipe rosettes if you want, or just swoop the frosting on with a spatula and call it a day.
- If you love cozy bakes, this hits the spot: Fans of blackberry cinnamon rolls or even a warm coffee cake situation will probably be very happy here.

Ingredient Notes
A layer cake has a few moving parts, but none of them are especially tricky. It’s mostly butter, sugar, cinnamon, and patience. A very fair trade, if you ask me.
- Light brown sugar: You’ll use this in the cinnamon swirl and the caramel. It brings a deeper, almost toasty sweetness that white sugar just can’t fake.
- Ground cinnamon: This is the soul of the snickerdoodle cake. Use fresh cinnamon if you can, because stale cinnamon tastes weirdly dusty and a little sad.
- Unsalted butter: Softened butter helps the cake batter whip up fluffy, while more butter goes into the caramel and frosting. It should give slightly when pressed, not slump like it’s taking a nap.
- Granulated sugar: This keeps the cake light and tender. Creaming it well with the butter matters, so don’t rush that part.
- Eggs: Room temperature eggs mix in more smoothly and help the batter stay even. If you forget, a quick warm water bath works.
- Cake flour: This gives the layers that fine, delicate crumb. If you enjoy soft-crumb cakes like Spanish sponge cake, you’ll recognize that tender texture.
- Buttermilk: It adds tang and keeps the crumb moist. No buttermilk? You can make a quick substitute with milk and a little acid.
- Vegetable oil: Just a small amount, but it really helps the cake stay soft even after chilling.
- Heavy cream: This turns the caramel smooth and spoonable instead of thick and gritty.
- Cream cheese: Full-fat is the move here. It makes the frosting rich, creamy, and just tangy enough to play nicely with all that cinnamon.
- Powdered sugar: Add it gradually so the frosting stays smooth and you don’t create a sugar cloud over your entire kitchen.
Ingredient Swaps for Gluten-Free or Dairy-Free Baking
If you’d like to make this snickerdoodle cake gluten-free or dairy-free (or both!), here are a few easy switches to keep everything delicious and inclusive:
- Gluten-Free Flour: Swap the cake flour for your favorite gluten-free all-purpose blend, such as Bob’s Red Mill 1-to-1 or King Arthur Measure for Measure. These blends are designed to mimic the texture of traditional flour, so you don’t have to worry about complicated conversions.
- Cream of Tartar Substitute: No cream of tartar in your pantry? You can replace both the cream of tartar and baking soda with an equal amount (1 teaspoon) of baking powder without fussing over proportions.
- Butter Alternatives: If dairy isn’t on the menu, feel free to substitute the unsalted butter with a plant-based (vegan) butter. Just be sure to use the stick variety, which behaves much more like real butter in cakes. Salted butter can also pinch-hit for unsalted if that’s what you have; there’s no need to adjust anything else.
- Milk Options: Whole milk brings richness, but you can swap in 2% or skim if that’s what’s in your fridge. Any plant-based milk (think oat, almond, soy, or coconut) will also work. Just know that the flavor of the milk might sneak in, oat and coconut, for example, are especially noticeable, so pick one you’re happy to taste in the finished cake.
With these changes, you can count on a bake that’s still plush, spiced, and worthy of a party (or a Tuesday).
Can You Make Snickerdoodle Cake Without Cream of Tartar?
Absolutely, you don’t have to hunt down cream of tartar to pull off this cake. If you don’t have it on hand, swap the ½ teaspoon cream of tartar and ¼ teaspoon baking soda for 1 teaspoon of baking powder. The result? Still soft, still fluffy, though the crumb will be just a touch less lofty and a little less tangy than the classic.
A quick rundown:
- Texture: You’ll keep a nice tender crumb; cake flour and buttermilk do most of the heavy lifting here.
- Rise: The cake might not reach quite the same height, but it won’t fall flat.
- Flavor: You’ll miss a hint of that signature tang, but most folks won’t mind (especially after the caramel drip makes its entrance).
In short: if you want the simplest bake, let your trusty baking powder do the job. The cake will still deliver cozy cinnamon goodness, no specialty ingredients required.
What About Cream of Tartar?
Let’s talk about the other ingredient that sets classic snickerdoodle recipes apart: cream of tartar.
What it does:
Cream of tartar is a tangy powder that pops up in the spice aisle, usually found hanging out near the baking soda. In snickerdoodle cookies (and by extension, this cake), it brings an unmistakable gentle tang and helps create that soft, tender crumb. It’s actually a by-product of winemaking, fancy, right? But here, its magic is mostly in the background: it reacts with baking soda to help the cake rise and keeps the texture especially plush.
Can you skip it?
If you don’t have cream of tartar, don’t panic! You can swap the ½ teaspoon cream of tartar plus ¼ teaspoon baking soda for 1 teaspoon baking powder instead. The cake will still come out soft and fluffy, just with a little less tang and a slightly less dramatic rise. It’s a trade that works in a pinch, though purists might miss that classic snickerdoodle edge.
So whether you’re team “classic tang” or simply want your cake to turn out well with what’s already in your pantry, you’ve got options.
How To Make This snickerdoodle cake
Take it one bowl at a time, and this snickerdoodle cake feels very manageable. The process is straightforward, even if the finished cake looks like you got a little fancy.
- Mix the cinnamon sugar: Stir the brown sugar and cinnamon together in a small bowl, then set it aside. This little mixture is what gives the cake that familiar snickerdoodle center, and it smells amazing already.
- Prep the pans and oven: Heat the oven to 350°F, then grease and flour three 8×2-inch round cake pans. Don’t skimp here, because no one wants to peel cake out of a stubborn pan.
Pan Options and Bake Times
If you don’t have three matching round cake pans, don’t worry, this snickerdoodle cake is nothing if not flexible.
Want To Save This Recipe?
- 9-inch square pan: Go ahead and pour the batter into a 9-inch square pan. Since the cake will spread a bit more, start checking for doneness around the 40-minute mark (it usually finishes about 5–10 minutes ahead of the rounds). Expect a cake that’s just a touch shorter, but still full of cinnamon-sugar goodness.
- 8-inch or 9-inch round pan: An 8-inch round is the closest to the recipe as written, so your bake time stays the same. Using a 9-inch round? Check in early, about 40–45 minutes in, since the cake will be a bit thinner and won’t need quite as long in the oven.
- 9 x 13-inch rectangular pan: Want to keep things simple? This works beautifully, too, for a sheet-cake situation. Bake for 22–25 minutes; the cake will be thinner, but every bite delivers that plush texture and snickerdoodle swirl.
No matter which pan you pick, keep an eye on things near the end. All ovens have their quirks, and if your cake springs back when pressed and a tester comes out clean, you’re golden.
- Whisk the dry ingredients: In a medium bowl, whisk together the cake flour, baking powder, baking soda, and salt. This keeps the leavening evenly distributed, which means better rise and fewer weird dense spots.
- Mix the wet ingredients: In another bowl, combine the buttermilk, vegetable oil, and vanilla extract. It won’t look thrilling, but it makes the batter come together smoothly later.
- Cream butter and sugar: Beat the softened butter on medium until smooth, then gradually add the granulated sugar. Keep mixing for 3 to 5 minutes until it looks lighter and fluffier. After that, add the eggs one at a time, mixing well after each one.
- Alternate wet and dry: With the mixer on low, add the flour mixture and buttermilk mixture in batches, beginning and ending with the dry ingredients. That helps keep the batter smooth without overworking it.
- Layer the batter: Divide one cup of batter into each pan. Sprinkle the cinnamon sugar mixture evenly over the top, then cover with the remaining batter. It feels a little sneaky, like hiding the best part in the middle.
- Bake and cool: Bake for 25 to 30 minutes, until a toothpick comes out clean or with a few tender crumbs. Let the cakes cool in the pans for 10 minutes, then turn them out onto racks to cool completely.
Make the caramel and frosting
- Cook the caramel: Melt the butter in a medium saucepan over medium heat. Add the brown sugar, heavy cream, vanilla, salt, and corn syrup. Stir continuously until it comes to a boil, then lower the heat, cover, and simmer for 5 to 6 minutes. Watch it closely so it doesn’t bubble up like it owns the place. Let it cool slightly, or chill it a bit if you need to speed things up.
- Beat the frosting: In a mixing bowl, beat the butter until soft. Add the cream cheese in small pieces and beat until fully smooth. Then mix in the vanilla, powdered sugar, salt, and cinnamon. Start low, unless you enjoy wearing powdered sugar. Once combined, beat on medium until fluffy.
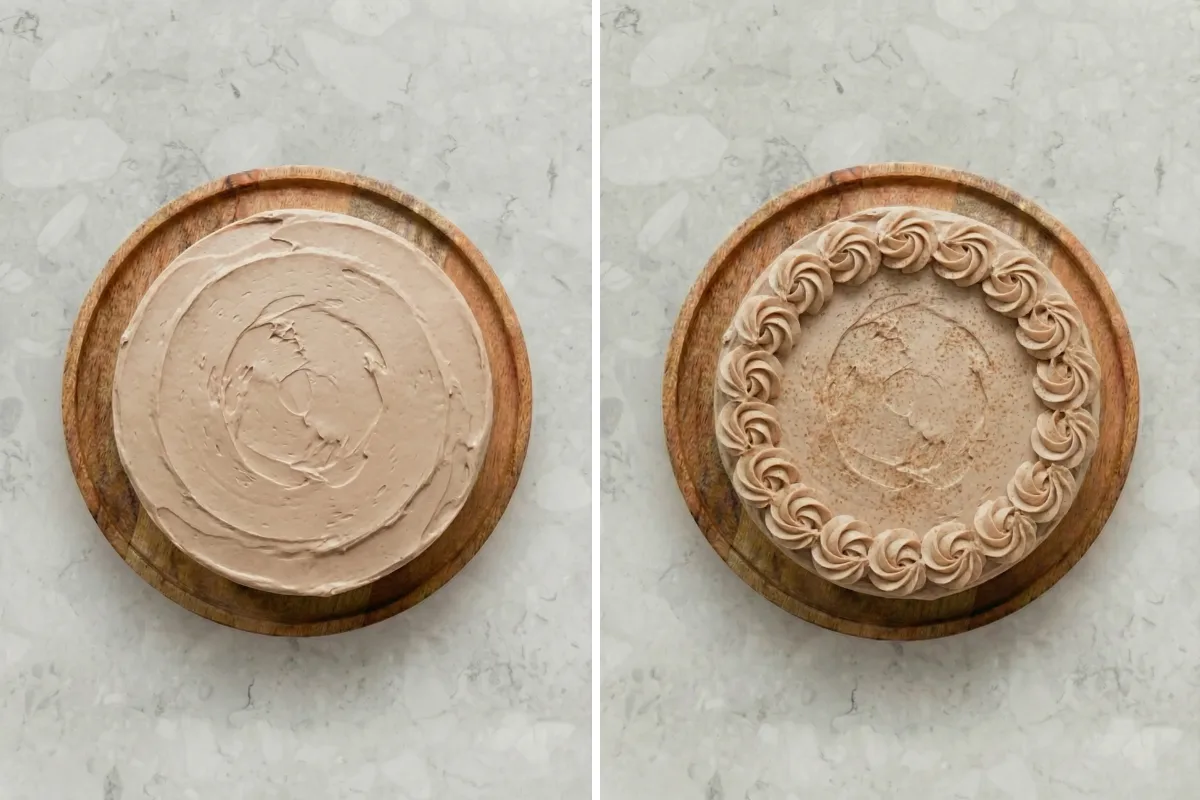
- Crumb coat the cake: Frost the cake with a thin layer of cinnamon cream cheese frosting, then chill it in the freezer for 15 minutes. This catches all the loose crumbs and makes the final coat much neater.
- Finish and decorate: Add a thicker layer of frosting and smooth it out. If you want the caramel drip, chill the frosted cake another 10 to 15 minutes first, then spoon or drizzle the cooled caramel around the top edge. Pipe rosettes on top with a 1M tip if you like, and add a small border at the bottom to finish it off.
Storage Options
This snickerdoodle cake stores surprisingly well, which is nice, because layer cakes are a commitment and I’d hate for all that cinnamon-swirled effort to go wonky overnight. Since the frosting is cream cheese-based, keep the cake in the fridge. I like to store it in a cake carrier or loosely cover it, so it doesn’t dry out or absorb that mysterious fridge smell that seems to appear no matter how clean things are. It’ll keep well for about 4 to 5 days.
For the best texture, let a slice sit at room temperature for 20 to 30 minutes before eating. Cold cake is fine, sure, but the frosting softens beautifully as it warms, and the cinnamon comes forward more. The caramel loosens a bit, too, which makes each bite feel less straight-from-the-fridge and more bakery case at 11 a.m.
But can you freeze it? Yes, absolutely. You can freeze the unfrosted cake layers tightly wrapped for up to 2 months, which is honestly the easiest route. Then thaw them in the fridge overnight before frosting. If the whole snickerdoodle cake is already assembled, freeze slices or the full cake until firm, then wrap well and store for about 1 month. Thaw in the fridge, then let it sit out a bit before serving.
If you’re in a cinnamon-dessert phase lately, a batch of cinnamon caramels on the side would not be a terrible idea either.
Variations and Substitutions
Once you’ve made it once, it’s pretty tempting to tinker. This cake is flexible, as long as you keep the basic structure intact.
- Buttermilk substitute: If you’re out of buttermilk, stir 1 tablespoon of lemon juice or vinegar into regular milk and let it sit for about 5 minutes. It won’t be identical, but it works well enough for a soft snickerdoodle cake.
- Cake flour swap: You can use an all-purpose flour substitute if needed, though the crumb will be a little less delicate. Still good, just slightly less cloud-like.
- Skip the caramel drip: The cake is still lovely without it. In fact, if you want more of a classic cinnamon-sugar vibe, leave the caramel off and dust the top lightly with cinnamon.
- Extra cinnamon: If you like a warmer spice profile, add a little more cinnamon to the frosting or swirl. Not too much, though, or it can edge into candle territory.
- Salted butter option: You can use salted butter in the caramel if that’s what you have, just reduce or omit the added salt so things don’t get oddly salty.
- Simple sheet cake version: If layer cakes feel like a lot today, bake the batter in a 9×13 pan and adjust the baking time. You’ll still get the soft cinnamon crumb, just with fewer dishes staring at you later.
What to Serve with Snickerdoodle Cake
A cake like this doesn’t need much help, but a few sidekicks can make the whole dessert moment feel extra cozy.
- A hot cup of coffee is the obvious first pick, and for good reason. The slight bitterness balances the sweet frosting and caramel, while the cinnamon in the cake suddenly tastes even toastier. If you’re serving this after dinner, coffee keeps things simple and lets the cake do its thing.
- Cold milk works too, especially if you want to lean into the cookie inspiration. There’s something about that creamy, plain chill next to a cinnamon-heavy dessert that just makes sense. It cuts through the richness and keeps each bite from feeling too heavy.
- Fresh fruit can be a smart move if you want a lighter contrast. Sliced strawberries or tart raspberries bring a little brightness to all that brown sugar and cream cheese. It’s not fussy, but it does make the plate look a bit prettier.
- If you’re building a dessert table, serve small slices of snickerdoodle cake beside bite-sized sweets. Something like salted caramel fudge truffles would fit right in, especially with the caramel notes already in the cake.

Frequently Asked Questions
Can I make snickerdoodle cake ahead of time?
Yes, and it actually works very well that way. You can bake the cake layers a day or two ahead, wrap them tightly once cooled, and keep them in the fridge. You can also make the caramel in advance and chill it until you need it. Then, when you’re ready, just frost and assemble. If I’m trying to make dessert feel less chaotic, this is exactly how I do it.
Why is my snickerdoodle cake dry?
Usually, it comes down to one of three things: too much flour, overmixing, or overbaking. Spoon and level the cake flour instead of scooping straight from the bag, and mix only until everything is combined. Also, start checking the layers a little early. A few moist crumbs on the toothpick are much better than a totally dry center. That extra minute in the oven can be sneaky.
Can I make this as a 9×13 cake instead of a layer cake?
Absolutely. If you want the flavor of snickerdoodle cake without the whole stacking situation, a 9×13 pan is a great option. Spread part of the batter in the pan, add the cinnamon sugar layer, then top with the rest of the batter and bake until done. You can frost it right in the pan, which is less fancy but extremely convenient.
Does cream cheese frosting need to be refrigerated?
It does, especially on a fully frosted cake like this one. Because the frosting contains cream cheese, it’s safest to store the cake in the fridge when you’re not serving it. That said, you don’t need to eat it cold. Letting a slice sit out for 20 to 30 minutes makes the texture softer, the cinnamon smell stronger, and the whole thing much nicer to dig into.

Keep the Flavor Coming – Try These:
Snickerdoodle Cake
Ingredients
Cinnamon Sugar Layer
- 2/3 cup light brown sugar packed
- 2 tsp ground cinnamon
Cake
- 3 cups cake flour
- 2 tsp baking powder
- 1/2 tsp baking soda
- 1/2 tsp salt
- 1 cup unsalted butter softened
- 2 tbsp vegetable oil
- 1 3/4 cups granulated sugar
- 4 large eggs room temperature
- 1 tbsp vanilla extract
- 1 1/4 cups buttermilk room temperature
Caramel Drip
- 5 tbsp unsalted butter
- 1/2 cup light brown sugar packed
- 1/3 cup heavy cream
- 1 tsp vanilla extract
- 1/4 tsp salt
- 1 tbsp light corn syrup optional (for shine)
Cream Cheese Frosting
- 3/4 cup unsalted butter softened
- 16 oz cream cheese full fat, softened
- 1 tbsp vanilla extract
- 1/2 tsp salt
- 1 1/2 tsp ground cinnamon
- 6 cups powdered sugar sifted, plus more to taste
Equipment
- 3 8x2-inch round cake pans
- Mixing bowls
- Electric mixer
- Saucepan
- Spatula
- Wire racks
Instructions
- Make the cinnamon sugar: Stir the brown sugar and cinnamon together in a small bowl. Set aside.
- Prep the pans: Preheat oven to 350°F (175°C). Grease and flour three 8x2 inch round cake pans.
- Whisk dry ingredients: In a medium bowl, whisk together cake flour, baking powder, baking soda, and salt.
- Combine wet ingredients: In another bowl, mix buttermilk, vegetable oil, and vanilla extract.
- Cream butter and sugar: In a large bowl, beat softened butter until smooth. Gradually add granulated sugar and beat on medium for 3-5 minutes until light and fluffy. Add eggs one at a time, mixing well after each addition.
- Alternate wet and dry: With the mixer on low, add the flour mixture and buttermilk mixture in batches, starting and ending with dry ingredients. Mix just until combined.
- Layer the batter: Divide a cup of batter into each cake pan. Sprinkle cinnamon sugar mixture evenly over, then cover with remaining batter and gently smooth.
- Bake & cool: Bake 25-30 minutes until a toothpick comes out clean or with moist crumbs. Cool in pans 10 minutes, then turn out and cool completely on wire racks.
- Make the caramel: In a medium saucepan over medium heat, melt butter. Add brown sugar, cream, vanilla, salt, and corn syrup; whisk. Bring to a boil, reduce heat, cover, and simmer for 5-6 minutes, stirring frequently. Remove from heat and let cool.
- Make frosting: Beat softened butter until smooth. Add cream cheese in pieces, beating until smooth. Mix in vanilla, salt, cinnamon, and gradually add powdered sugar. Beat until fluffy.
- Assemble: Place one cake layer on a plate and add frosting. Repeat layering with the other layers. Apply a thin crumb coat and freeze for 15 minutes.
- Finish & decorate: Frost the chilled cake with the remaining cream cheese frosting. Chill again if using caramel drip, then drizzle cooled caramel over the edges and optionally pipe frosting rosettes to decorate.
Notes
While you can freeze this cake, note that the cinnamon-sugar topping may lose a bit of its signature crunch upon thawing. If freezing, wrap unfrosted cake layers tightly and store for up to 2 months, or freeze the fully assembled cake for up to 1 month. Thaw overnight in the fridge, then let the cake come to room temperature before serving for the best texture and flavor. To freeze, tightly wrap unfrosted layers for up to 2 months or assembled cake for 1 month. Technically, you can freeze the finished snickerdoodle cake, but it’s not my top recommendation. The cinnamon-sugar topping develops a crisp, crackly texture after baking, but freezing and thawing will make it lose that signature crunch and turn a bit soggy. If you do freeze, consider freezing just the unfrosted cake layers for best results, then add the frosting and finishing touches after thawing. You can make your own buttermilk using milk and lemon juice or vinegar.
Skip the caramel drip for a classic cinnamon-sugar finish.
Nutrition
I’m Bitty, owner of nodashofgluten.com, where I share simple, delicious recipes for all tastes, including gluten-free. Check out my “About Me” page for more info!

2 Responses
What do you mean “grease and flour the pans” on step 1?
What do you use to grease them and how much flour do I put in there before the cake batter?
I am not a baker. But I will be trying this recipe soon. Do you happen to have a video showing the process?? That would be so helpful.
Thank you
Hi Miranda!
Thanks for your comment! Greasing and flouring the pans means you should lightly coat the inside of your cake pans with butter (or oil) and then dust them with flour to help prevent the cake from sticking. You only need a small amount—just enough to lightly cover the bottom and sides of the pans. After adding the butter, sprinkle a little flour inside and tap the pan to make sure it’s evenly coated. Then, you can add the cake batter.
I hope this helps, and good luck with your baking! Feel free to reach out if you have any other questions.
Happy baking,
Bitty