
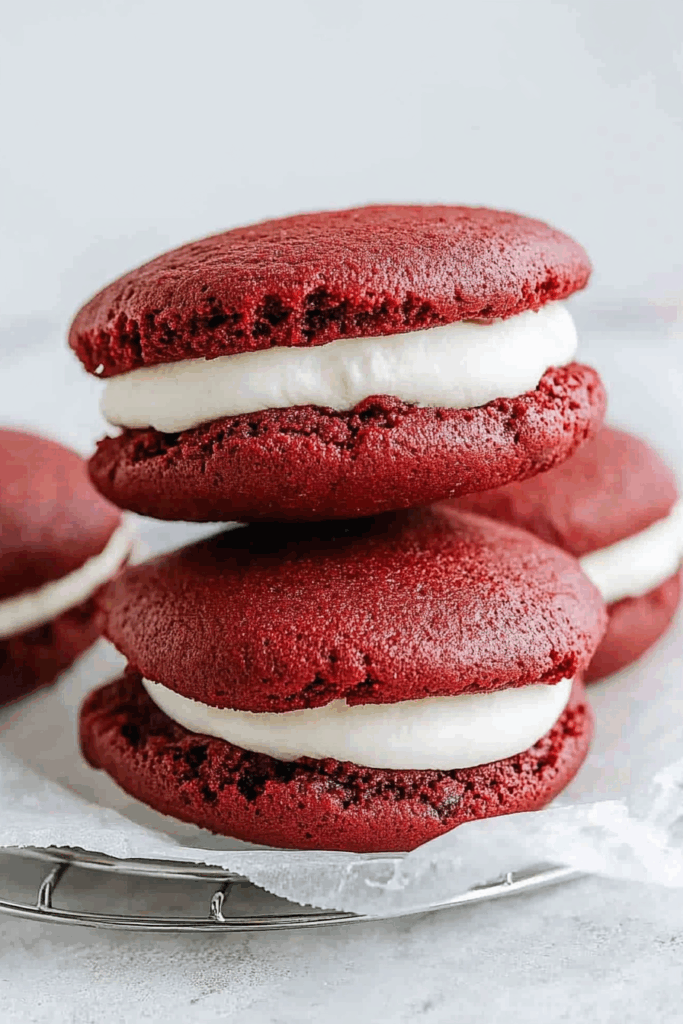
Red velvet whoopie pies made with cocoa, buttermilk, brown sugar, and filled with sweet cream cheese—soft, chewy, and totally worth it.
So here’s how it went. A few years ago, in a tiny apartment kitchen that barely fit two humans and a stand mixer, I decided I needed—no, deserved—a treat. But not just any treat. Something extra. Like, “rom-com baking montage” level extra.


Red velvet came to mind because, well, it’s dramatic. The color! The soft cake texture! That subtle cocoa flavor that tricks your brain into thinking you’re eating chocolate, but like… in a flirty, whispery way? You get me.
I made them for a friend who was having a rough week. I didn’t really plan on them turning out that well—honestly, I didn’t even have matching baking sheets—but when I handed her that first bite, her eyes legit lit up like it was Christmas morning. And I thought, Okay. Maybe I just did something here. Ever since, these little red velvet sandwich cookies have been my go-to when I want to show up for someone. Or myself. Or just feel fancy on a random Thursday. You don’t need a reason, right?
Why You’ll Love This Red Velvet Whoopie Pies Recipe?
Where do I start? The cookies are like little red velvet pillows—soft, cakey but with a gentle chew that makes them way more satisfying than a cupcake. And that filling. Don’t even get me started. It’s this smooth, tangy-sweet cream cheese situation that honestly deserves its own fan club.
But what really gets me? They look bakery-level cute without making you sweat in the kitchen. I mean, they’re not “I-just-won-Bake-Off” perfect. They’re more “I-baked-these-in-my-cozy-socks-while-watching-Friends-reruns” kind of perfect. You know?

Ingredient Notes:
Alright, let’s break this down. Because when you glance at the ingredient list, you might think, “That’s… a lot.” But stick with me. Most of it’s stuff you already have. And the rest? Worth it.
-
Flour – Just good ol’ all-purpose. If your grandma used it for cookies, so can we.
-
Cocoa Powder – Just a bit. Enough to say “Hey, I’m red velvet” without shouting.
-
Brown Sugar – I go for brown instead of white because it adds moisture and a little molasses-y warmth. It just feels right, y’know?
-
Butter – Softened, not melted. Trust me on this one. Been there. Ended up with cookie puddles.
-
Buttermilk – It’s not optional, I promise. It gives that signature tang and softness. And yes, you can DIY it with lemon juice if you’re in a pinch.
-
Red Food Coloring – I won’t lie. Two tablespoons looks like a crime scene. But it’s what gives you that bold, velvety red we’re after.
-
Cream Cheese – Tangy, creamy, slightly rebellious. The hero of the filling.
-
Powdered Sugar – For that dreamy cloud of sweetness that makes the filling spread like frosting in a rom-com baking scene.
-
Vanilla – For flavor balance and a little nostalgic warmth. I throw it into everything, honestly.
True story: One time I tried subbing yogurt for the cream cheese because it’s what I had… and yeah. Don’t do that. Learn from my chaotic fridge decisions.

How To Make Red Velvet Whoopie Pies?
Okay, this isn’t rocket science. But if you’re anything like me, a little guidance goes a long way. So here’s what you’re doing, step-by-step, no sugarcoating (pun intended).
Step 1: Preheat the oven and breathe
375°F. Parchment paper on your trays. You’re already halfway to bakery vibes.
Step 2: Dry stuff in a bowl
Whisk together the flour, cocoa, baking soda, and salt. This is your cookie base. Think of it like your dry playlist: not exciting, but essential.
Step 3: Creamy stuff gets creamed
In a bigger bowl, beat the butter for like 30 seconds—just to get it moving. Add the brown sugar and beat till it’s light and fluffy-ish. Then mix in the egg and vanilla. It’ll start to look glossy and smell like home.
Step 4: Alternate and mix
Now add the dry mix and the buttermilk, one after the other, a bit at a time. Don’t dump it all in at once unless you want flour in your eyebrows. Mix till just combined.
Step 5: Go red
Add in that food coloring and stir until it’s all one vibrant color. A little dramatic? Sure. But red velvet has never been subtle.
Step 6: Scoop and space
Drop heaping tablespoons onto your trays. Leave space between each—these babies puff up like they’ve got places to be.
Step 7: Bake and cool
9 to 11 minutes. They’ll be soft but set. Let them cool on the tray. No touchy while warm. They’re fragile and honestly… same.
Step 8: Fill the dream
Whip up that filling: cream cheese + powdered sugar + vanilla. Beat till smooth. If it looks like frosting and tastes like magic, you did it right.
Want To Save This Recipe?
Step 9: Sandwich time
Pipe (or spoon) that filling onto the flat side of one cookie, then press another on top. Not too hard—this isn’t a wrestling match.
Step 10: Eat one while standing over the sink
Because let’s be real, that’s how most homemade cookies get eaten.

Storage Options:
Okay, miracle of miracles, you didn’t inhale them all on Day 1? Props. Store them in an airtight container in the fridge for up to 4 days. If you’re stacking, use parchment between layers so they don’t get… clingy.
You can freeze them, but do it before filling. The cookies freeze beautifully, and you can fill them fresh later like a total baking boss.
Variations and Substitutions:
You know I’m all about flexible recipes. So if you’re out of something (or just feeling rebellious), try these:
-
No food dye? Skip it. Call them cocoa whoopie pies. Still adorable.
-
Gluten-free? Use a 1:1 GF flour blend. Just make sure it has xanthan gum. Trust me, I tried without once… chewy in a weird way.
-
Want a twist? Add mini white chocolate chips to the dough. Or lemon zest to the filling. Or a touch of cinnamon if you’re feeling fall-ish.
-
Vegan? Swap in plant-based butter, dairy-free cream cheese, and a flax egg. Not exactly the same, but still yum.

What to Serve with Red Velvet Whoopie Pies?
Listen, I’ve eaten these with everything from rosé to root beer. Here’s what I’d suggest:
-
Hot coffee – Bitterness balances the sweetness. Plus, coffee + red velvet = yes.
-
Cold milk – The classic dunk. Always good.
-
Fancy dessert board – Whoopie pies, berries, dark chocolate… just don’t forget the napkins.
-
Sparkling wine – If you’re celebrating something. Even if it’s just Tuesday.
Frequently Asked Questions:
Can I make these a day ahead?
Totally. Actually, they taste even better the next day once the flavors cozy up together.
My cookies turned out flat and weird. What happened?
Ugh, been there. Could be overmixing, too-soft butter, or measuring slip-ups (hey, it happens). Try chilling the dough next time for extra insurance.
Can I make them mini?
Yes! Just use a smaller scoop and reduce the baking time a bit. They’ll be bite-sized and even more dangerous.

That’s the whole delicious deal. If you try these Red Velvet Whoopie Pies, let me know how it goes. Or if you had a hilarious kitchen mishap, I definitely want to hear about that too. These are the kinds of recipes that feel like little celebrations—even when everything else is kinda meh.
Save it, share it, bake it again. I’ll be over here licking the mixer bowl.
Keep the Flavor Coming – Try These:

Red Velvet Whoopie Pies
Ingredients
For the Whoopie Pies:
- 2 cups all-purpose flour
- 2 tablespoons unsweetened cocoa powder
- 1/2 teaspoon baking soda
- 1/4 teaspoon salt
- 1/2 cup unsalted butter softened
- 1 cup packed brown sugar
- 1 large egg
- 1 teaspoon pure vanilla extract
- 1/2 cup buttermilk
- 2 tablespoons red food coloring
For the Cream Cheese Filling:
- 8 ounces cream cheese softened
- 3 cups powdered sugar
- 4 teaspoons vanilla extract
Instructions
Preheat the oven and prepare baking sheets:
- Preheat the oven to 375°F (190°C). Line two large baking sheets with parchment paper and set aside.
Combine dry ingredients:
- In a medium-sized mixing bowl, whisk together the flour, cocoa powder, baking soda, and salt until evenly combined. Set aside.
Cream the butter and sugar:
- In a large mixing bowl, using a hand or stand mixer on medium speed, beat the softened butter for approximately 30 seconds until smooth. Add the brown sugar and continue beating until the mixture is light and fluffy, about 2–3 minutes.
Add egg and vanilla:
- Incorporate the egg and vanilla extract into the creamed mixture, beating until fully combined and smooth.
Alternate dry ingredients and buttermilk:
- Reduce the mixer speed to low. Add the dry flour mixture and buttermilk in alternating portions, beginning and ending with the dry ingredients. Mix until just combined, being careful not to overmix.
Add red food coloring:
- Stir in the red food coloring until the batter is uniformly red and smooth.
Portion the batter onto baking sheets:
- Using a tablespoon or cookie scoop, drop heaping portions of batter onto the prepared baking sheets, spacing them approximately 1 inch apart to allow for spreading.
Bake the whoopie pies:
- Place the trays in the preheated oven and bake for 9 to 11 minutes, or until the tops are set and the edges appear firm. Remove from the oven and allow the cookies to cool completely on the baking sheets placed on wire racks.
Prepare the filling:
- In the bowl of a stand mixer fitted with the paddle attachment (or using a handheld mixer), beat the softened cream cheese with the powdered sugar until the mixture is smooth and fluffy. Add the vanilla extract and beat again until fully incorporated.
Assemble the whoopie pies:
- Transfer the cream cheese filling to a piping bag or resealable plastic bag with the corner snipped. Pipe a generous amount of filling onto the flat side of half the cookies. Gently press a second cookie on top to form a sandwich. Repeat with remaining cookies.
Notes
I’m Bitty, owner of nodashofgluten.com, where I share simple, delicious recipes for all tastes, including gluten-free. Check out my “About Me” page for more info!

