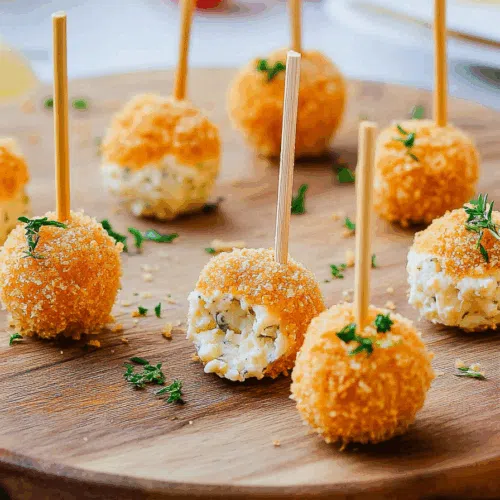
Cheddar, parmesan, flour, eggs, and baking powder—these crispy golden mini cheese balls are gooey, snackable, and 100% addicting.
Okay, confession time. The first time I made these Mini Cheese Balls, it was because I was trying to impress someone. (Spoiler: it worked.) We were hosting this super low-key movie night—nothing fancy, just popcorn, fuzzy blankets, and people I love. But I had this itch to serve something a little extra.


I didn’t want to fuss with dough or timers or anything that required a mixer. So I grabbed the odds and ends from the fridge, mashed them together with my fingers, and boom—tiny cheese balls were born. No plan, no Pinterest inspo, just pure cheesy impulse. And they were so good, my best friend called me the next day asking for “those crackly cheese bites.”
Now they’re a staple. When in doubt, cheese ball it out.
Why You’ll Love This Mini Cheese Balls Recipe?
Ever notice how it’s always the smallest snacks that disappear first? These Mini Cheese Balls are:
-
Crispy and golden on the outside.
-
Melty and cheesy inside—think mac-and-cheese vibes but bite-sized.
-
Ridiculously easy. Like, mix-roll-fry easy.
-
Crowd-approved. Kids love ’em, adults hoard ’em, and picky eaters? Yeah, even they cave.
They’re the kind of snack that makes you say, “I’ll just have one,” and then… fifteen later, you’re standing over the counter, shameless and satisfied.

Ingredient Notes:
Let’s break it down like you’re in my kitchen, apron optional:
-
Shredded Cheddar (or any blend): I like sharp cheddar for the flavor punch, but if you’ve got a melty mix like Mexican blend or mozzarella hanging around, go wild.
-
Parmesan Cheese: Don’t skip this. It adds that salty, umami kick that makes everything taste fancier.
-
Eggs: These are your glue. No eggs, no cheese balls—just a sad cheesy mess.
-
Flour: Just a little to help the balls hold their shape. We’re not baking bread here.
-
Baking Powder: A pinch goes a long way. Gives them a bit of puff.
-
Sunflower Oil: Or any neutral oil for frying. You want high smoke point, not olive oil drama.

How To Make Mini Cheese Balls?
Step 1: Mix and mash
Toss everything—cheddar, parmesan, eggs, flour, and baking powder—into a big ol’ bowl. Stir, mash, whatever works. The goal is a thick, slightly sticky mix that holds together. Like playdough, but edible and cheese-filled.
Step 2: Roll ‘em up
Scoop out roughly ¾ tablespoon per ball. You don’t need to be precise unless you’re trying to impress your mother-in-law. Just aim for consistency so they cook evenly.
Step 3: Fry time
Heat your oil until a little piece of mixture sizzles on contact. Drop in the cheese balls carefully—don’t overcrowd. Fry until they’re beautifully golden, flipping once or twice if needed. It’s like watching cheesy popcorn pop. Mesmerizing.
Step 4: Drain and devour
Pull them out with a slotted spoon and rest them on paper towels. Resist the urge to pop one into your mouth right away unless you enjoy lava tongue.

Storage Options:
If you have leftovers (lol), here’s what to do:
Want To Save This Recipe?
-
Fridge: Store in an airtight container. Reheat in the oven or air fryer for best crispiness. Microwave only if you’re desperate.
-
Freezer: Totally doable! Freeze before frying, on a tray first so they don’t stick. Then bag them up. Fry straight from frozen—easy.
Variations and Substitutions:
-
Spice ‘em up: Add a little chili powder, cayenne, or smoked paprika to the mix.
-
Go herby: Toss in some chopped parsley, basil, or dill.
-
Switch the cheese: Mozzarella, Gouda, pepper jack… it’s your call.
-
Gluten-free: Use GF flour. Works like a charm.

What to Serve with Mini Cheese Balls?
Pair these golden bites with:
-
Garlic aioli or ranch if you’re feeling Midwest.
-
Marinara if you’re pretending they’re arancini.
-
Spicy ketchup (trust me).
-
A glass of cold white wine, sparkling cider, or your favorite beer.
They also sit pretty next to sliders or sandwiches on a game day spread. Instant upgrade.
Frequently Asked Questions:
Can I bake these instead of frying?
You can, but they won’t be quite as crispy. 400°F for 15–18 minutes. Flip halfway.
Can I prep them in advance?
Yep. Shape and store in the fridge (covered) for a day or freeze them for later.
Do they keep well?
They do—but they’re best fresh. That golden crust softens after a day, but a quick reheat brings the magic back.

I swear, these Mini Cheese Balls might be the easiest way to win friends and influence people. Or at least to get everyone to ask, “Wait, who made these?” They’re low effort, high reward, and just quirky enough to be memorable.
Make them once, and you’ll find yourself doing it again. And again. And again. Not that I speak from experience or anything… (I totally do.)
So what do you think—are you team cheese ball yet?
Let me know in the comments or tag me when you make them. Can’t wait to hear how they turned out!
Keep the Flavor Coming – Try These:
Mini Cheese Balls
Ingredients
- 2 ½ c 300 grams finely shredded cheddar cheese or a blend of shredded cheeses
- ¾ c 100 grams grated parmesan cheese
- 2 eggs
- 4 tablespoons white flour
- 1 teaspoon baking powder
- Sunflower oil for frying
Instructions
- Combine the following ingredients, in a bowl; 2 ½ cups of cheese ¾ cup of grated parmesan cheese, 2 eggs, 4 tablespoons of flour and 1 teaspoon of baking powder. Mix everything thoroughly until it forms a mixture.
- Next take ¾ tablespoon of the mixture and shape it into small balls. Make sure they are all the same size for even cooking.
- Heat sunflower oil in a fryer or a deep pan. Fry the cheese balls in the oil until they become brown. Make sure they are mostly submerged in the oil during frying.
- Once fried, remove the cheese balls from the oil. Place them on paper towels to drain off any oil.
- Now you can enjoy these Mini Cheese Balls as a snack or appetizer, for any occasion!
Notes
I’m Bitty, owner of nodashofgluten.com, where I share simple, delicious recipes for all tastes, including gluten-free. Check out my “About Me” page for more info!