
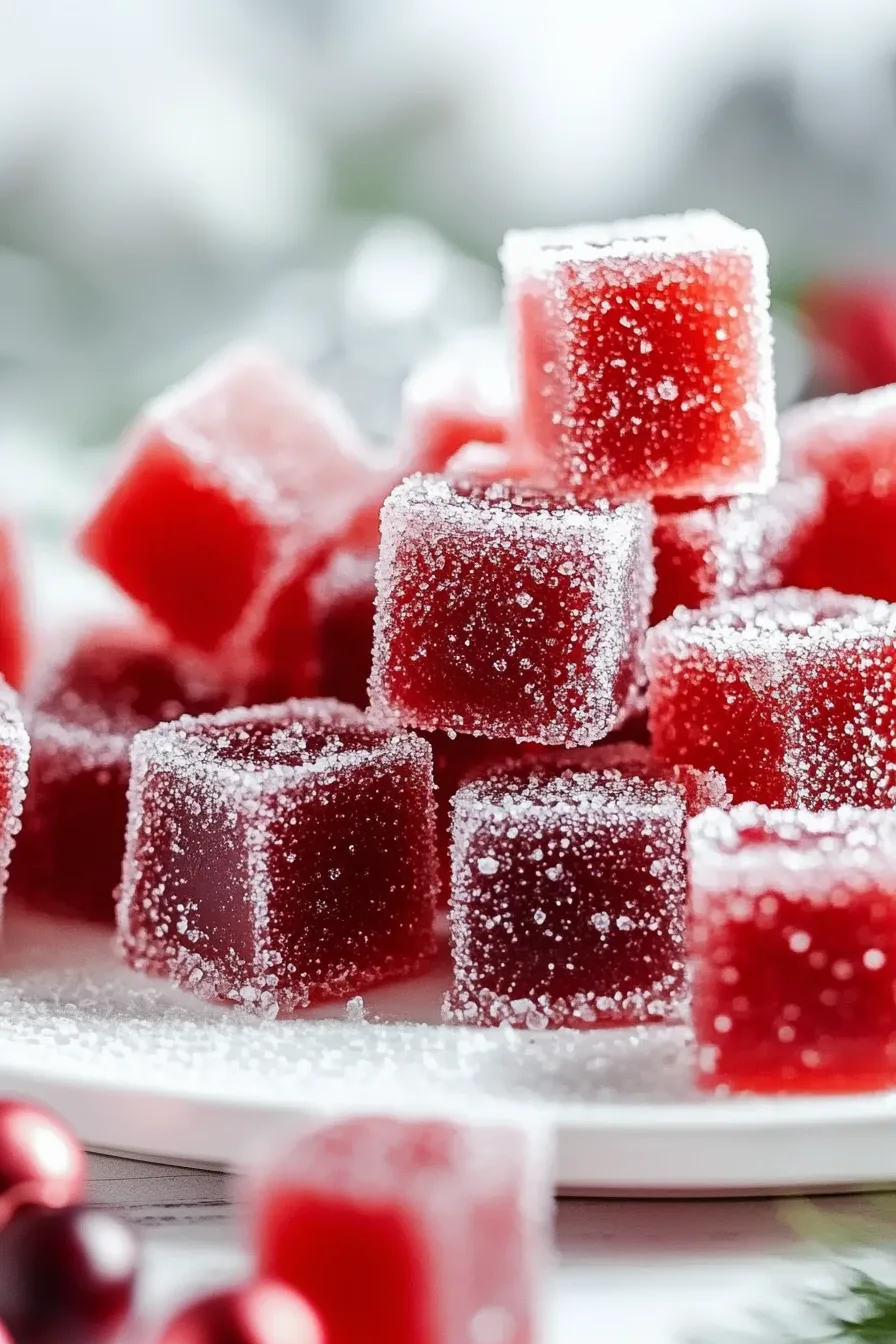
Festive Cranberry Jelly Candies made with cranberry juice, sugar, and gelatin—a bright, sweet-tart treat perfect for holiday gifting.
If you’ve ever had a food just yank you right back into a moment you didn’t even know you stored in your mental attic… yeah, that’s what happened to me the first time I made these Festive Cranberry Jelly Candies. It was one of those December afternoons when the light outside looks like it has given up. I remember standing there, stirring this glossy cranberry mixture, and suddenly feeling like I was eight years old again, peeling those sticky cellophane wrappers off the cheap jelly candies my grandma always kept in a glass dish on her sideboard.


Did they taste amazing? Honestly, not really. But there was something comforting about them, like the way TV static used to feel at night before channels went digital. These homemade cranberry jelly candies are way better (I mean, way better), but they still hit that same nostalgic nerve — that warm, I-should-probably-call-my-mom kind of feeling.
And maybe that’s why I love making them now. They feel like a tiny ritual in a season where everything else is loud and rushed. You whisk, you simmer, you wait… and somewhere in that quiet process, life slows down enough to let old memories wander through. Funny how food does that, right?
Why You’ll Love This Festive Cranberry Jelly Candies Recipe?
I don’t want to oversell them… but I also do, because Festive Cranberry Jelly Candies really are one of those small recipes that somehow make you feel weirdly accomplished. They look like something from an old-fashioned candy shop — shiny, jewel-like squares dusted in sugar — yet they’re made from almost nothing: cranberry juice, sugar, gelatin.
What I love most is that they’re not super sugary like a lot of holiday treats. They’ve got this bright, tart sparkle that wakes up your tastebuds in the middle of all the heavy December indulgence. And because they’re homemade, they’re instantly giftable. Give someone a little bag of these ruby candies and watch their face do that surprised “Wait, you made these?” thing.
Are they a tiny bit fiddly? Sure. But that’s part of the charm. Life gets too convenient sometimes — it’s nice to make something slow and beautiful just for the sake of it.

Ingredient Notes:
I don’t know about you, but I always feel more confident when I know why an ingredient matters. So here’s the friendly version of a breakdown:
-
Cold Cranberry Juice
This is what wakes the gelatin up (it’s called blooming, which makes me picture tiny gelatin flowers — very wrong, but kind of cute). Don’t panic if it looks lumpy; it settles later. -
Boiling Cranberry Juice
This melts the gelatin and pulls everything together. And please, do yourself a favor and use real, 100% cranberry juice. The sweetened cocktail versions taste… well, too much like a mall smoothie. -
Powdered Gelatin
The backbone. Without it, your candies would just be cranberry soup pretending to be festive. -
Granulated Sugar
Some for sweetness, some for that frosted coating. When the candies dry, the sugar starts forming crystals and honestly — they look like tiny winter constellations.

How To Make Festive Cranberry Jelly Candies?
Let’s walk through it. Not rushed. Not complicated. Just two people in the kitchen, probably wearing socks that don’t match.
Step 1: Prep Your Tin
Line an 8×8 pan with parchment and grease it. Yes, grease over the parchment. Think of it as insurance. One year I skipped the grease and ended up scraping gummies out with a spatula like some desperate archaeologist.
Step 2: Bloom the Gelatin
Whisk your cold cranberry juice and gelatin together. It’ll look like purple applesauce. That’s perfect — gelatin isn’t cute at this stage.
Step 3: Add the Hot Juice + Sugar
Pour in the boiling cranberry juice and sugar. Everything melts and turns glossy, like ruby glass. This part always feels a little magical to me.
Step 4: Simmer Into Candy
Bring it to a boil, then drop the heat and let it simmer for 20–25 minutes. You’re aiming for 107°C (225°F). If you’re like me before I owned a thermometer, just… guess. Mine turned out fine (ish), but a thermometer makes it way less mysterious.
Step 5: Skim the Bubbles
Little foam bubbles will form on top. Skim them off. It’s weirdly satisfying.
Step 6: Let It Set
Pour into your prepped pan and chill in the fridge for 4 hours or overnight. Overnight is easier — plus it gives you a reason to make tea and admire your handiwork later.
Step 7: Cut + Sugar Coat
Want To Save This Recipe?
Flip the firm jelly slab out onto a sugar-dusted board. Cut into squares, coat in more sugar, and feel your inner Victorian candy maker awaken.
Step 8: Dry Time
Let the candies sit for a day or two to crystallize. This slow-drying step takes patience, but wow… the end result is worth it. They sparkle like frosted glass.
Storage Options:
Store these beauties in an airtight container at room temperature once dried. They keep for about two weeks — unless someone in your house discovers them, in which case they keep for approximately eight minutes.
If your kitchen is humid (hello, tropical climates), pop them in the fridge to keep the sugar from getting sticky.
Variations and Substitutions:
You can totally make these your own. In fact, I encourage it.
-
Swap the Juice
Cherry, pomegranate, blackberry — they all create gorgeous color + flavor shifts. -
Make Them Vegan
Agar-agar instead of gelatin. Just be aware agar sets firmer, like “don’t mess with me” firm. -
Add Citrus
A little orange zest is like a tiny holiday wink. -
Change the Sugar Coating
Use superfine sugar, coarse crystals, or even a little citric acid if you want sour-candy vibes.
What to Serve with Festive Cranberry Jelly Candies?
I didn’t expect these to become the star of my holiday table… yet here we are.
-
With hot chocolate — the sweet creaminess + tart candy? Oh my.
-
On a dessert platter — they make everything else look prettier, which feels unfair but delightful.
-
On a cheese board — trust me on this one.
-
With sparkling drinks — the bubbles + the bright cranberry? Chef’s kiss.
Frequently Asked Questions:
Can I freeze them?
Ehh… I wouldn’t. They thaw oddly and get sad and squishy.
Why didn’t mine set?
Usually because of cranberry cocktail instead of real juice, or not cooking long enough. (Been there.)
Do I need a thermometer?
You don’t need one, but like seatbelts and chapstick, it makes life easier.

If you end up making these Festive Cranberry Jelly Candies, I hope they bring you the same strange mix of nostalgia, joy, and “oh wow, I made these by hand” pride that they give me.
Seriously — let me know how they turn out. I love hearing your kitchen stories, especially the messy, imperfect ones.
Keep the Flavor Coming – Try These:


Festive Cranberry Jelly Candies
Ingredients
Candy Base
- 1 cup cold cranberry juice 100% juice recommended
- 1 cup boiling cranberry juice
- 3 tablespoons powdered gelatin
- 2 cups granulated sugar plus additional sugar for coating
Instructions
Prepare the Pan
- Line an 8×8-inch square pan with parchment paper and lightly grease the surface to ensure the candy releases cleanly once set.
Combine the Cold Juice and Gelatin
- In a large saucepan, whisk the cold cranberry juice and powdered gelatin together until fully blended. Allow the mixture to sit briefly so the gelatin hydrates.
Add the Boiling Juice and Sugar
- Carefully pour the boiling cranberry juice into the gelatin mixture. Add the granulated sugar and stir until all components are evenly combined.
Cook the Candy Mixture
- Set the saucepan over medium heat and bring the mixture to a gentle boil. Reduce the heat and allow it to simmer for 20–25 minutes, or until it reaches 107°C (225°F), stirring occasionally to prevent scorching.
Remove Surface Bubbles
- Using a fine mesh skimmer or wire strainer, skim off any foam or bubbles that collect on the surface to ensure a smooth final candy.
Pour and Chill
- Carefully transfer the hot mixture into the prepared pan. Refrigerate for a minimum of 4 hours, or until fully set with a firm, jelly-like texture.
Cut and Coat the Candies
- When set, turn the slab onto a board dusted generously with granulated sugar. Coat the surface with additional sugar, then cut the slab into evenly sized squares.
Dry and Crystallize
- Arrange the cut candies on a parchment-lined tray and allow them to air dry at room temperature for 1–2 days, or until a crystallized sugar coating forms.
Notes
I’m Bitty, owner of nodashofgluten.com, where I share simple, delicious recipes for all tastes, including gluten-free. Check out my “About Me” page for more info!

