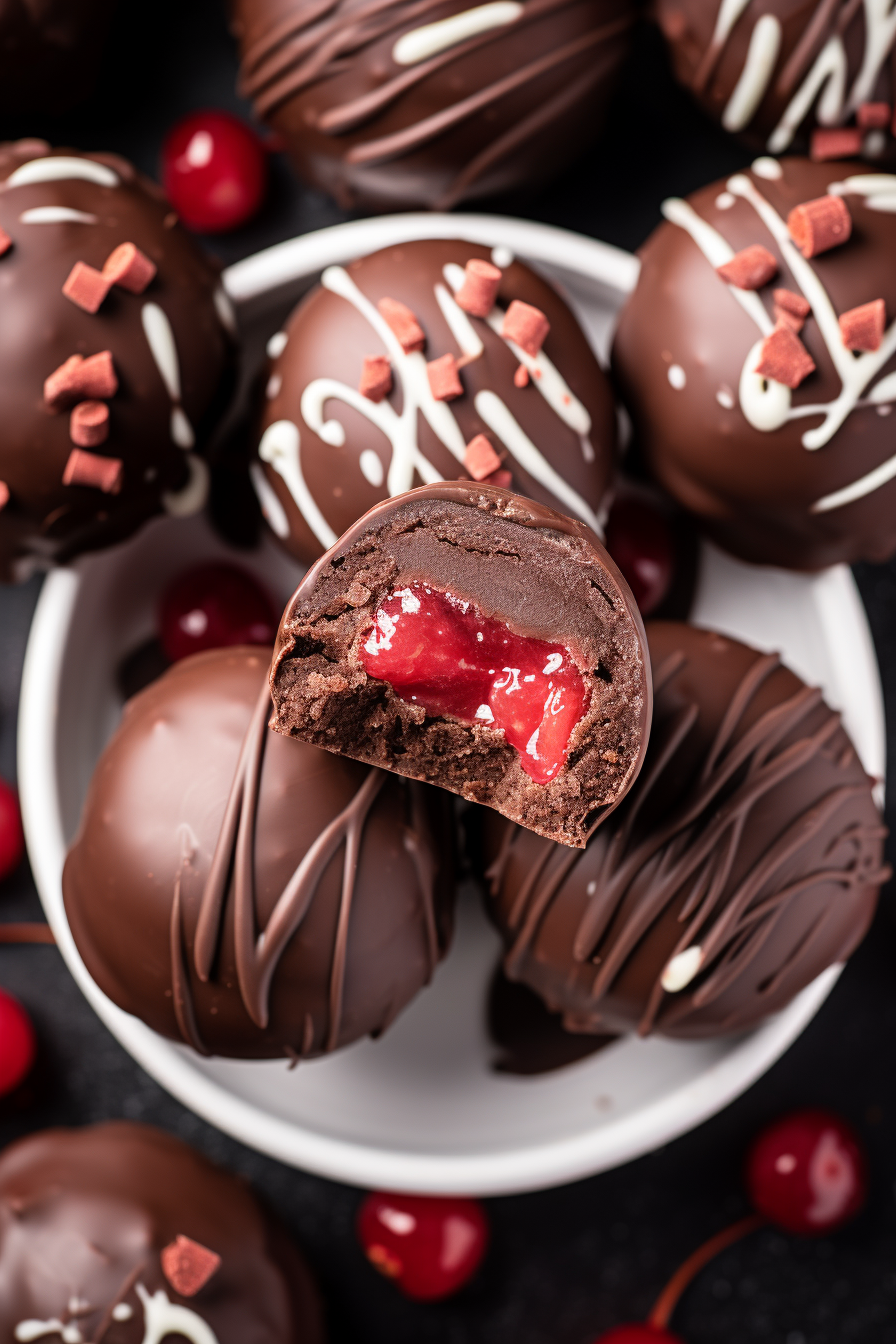
Chocolate Covered Cherry Brownie Bombs – Immerse yourself in the indulgence of Chocolate Covered Cherry Brownie Bombs. A treat that perfectly blends chocolate, sweet cherries, and gooey brownie goodness. This recipe will walk you through creating these bites featuring a brownie mix, luscious chocolate frosting, and the star ingredient. Maraschino cherries. Get ready, for a dessert that will steal the spotlight at any gathering!
The first time I whipped up these Chocolate Covered Cherry Brownie Bombs it was, on a rainy afternoon that called for a touch of culinary magic. My kitchen transformed into a sanctuary where the enticing aroma of chocolate mingled with the sweetness of cherries. The result? Pure bliss. As my husband took his bite his eyes widened with delight. My little one giggled while enjoying every bit with their chocolate-covered fingers. It was a success; we had discovered our family favorite.
What makes these Chocolate Covered Cherry Brownie Bombs truly special?
These Chocolate Covered Cherry Brownie Bombs represent dessert innovation at its finest by combining the convenience of using boxed brownie mix and canned frosting with the surprise of a maraschino cherry hidden at their core. The combination of chewy brownie and creamy whipped chocolate encased in a crispy layer of almond bark creates a symphony of textures. It’s an easy. Wonderfully refined delight that turns basic ingredients into an exceptional dessert experience, ideal, for those times when you long for a homemade sweet treat but don’t want to spend the entire day in the kitchen. Whether it’s an event or just an ordinary weekday these brownie bombs are guaranteed to amaze and fulfill the desires of any chocolate lover.
What You Need To Make This Chocolate-Covered Cherry Brownie Bombs Recipe?
Fudge Brownie Mix: We’re not just using any brownie mix; we opt for a chewy fudge variety that promises a rich, moist texture, giving each bomb its brownie-soul. While I lean towards Duncan Hines for its reliably indulgent results, feel free to use your go-to brand that whispers sweet nothings to your chocoholic heart.
Vegetable Oil: This is our brownie’s secret to a moist and tender crumb. It wraps around the chocolatey grains and carries the richness throughout the bomb, ensuring every bite is as luscious as the last.
Eggs: Think of eggs as the glue of our concoction. They bind the ingredients, giving structure to the brownies, so they can boldly embrace the cherries without falling apart at the mere thought of them.
Whipped Chocolate Frosting: Here, we are not just adding sweetness; we’re introducing a cloud-like texture. This frosting blends into the crumbled brownies, creating a velvety matrix that’s a delight both to scoop and to savor.
Maraschino Cherries: These are not your average cherries. They bring a pop of color and a burst of sweet-tart flavor that is the heart of our chocolate shell. Ensure they’re patted dry to maintain the integrity of our brownie exterior.
Chocolate Almond Bark: This isn’t just chocolate; it’s the cloak of elegance for our bombs. It melts into a pool of glossy perfection, ready to enrobe our brownies and cherries in a smooth chocolate embrace that snaps satisfyingly under the lightest pressure from your teeth.
Steps To Make Chocolate-Covered Cherry Brownie Bombs:
Step 1: Start by firing up your oven to 350°F and show some love to a 9×13-inch baking dish with a generous coating of baker’s spray.
Step 2: Take a medium-sized mixing bowl and lovingly combine the brownie mix, oil, water, and eggs. Stir with affection but don’t go overboard – a gentle mix does the trick. Transfer this chocolatey love into your prepared dish and let it bake as per the box’s heart’s desire. Once done, let it cool, showing some patience as it sets.
Step 3: Now, let’s get messy! Crumble half of your brownies into a large bowl, dolloping half of that fluffy frosting right on top. Repeat with the rest and then get in there with a spoon. Mix until you’ve got a consistent brownie-frosting blend that sticks together like best friends.
Step 4: Prep a baking sheet with parchment paper. This will be your canvas.
Step 5: With a 1½ tablespoon scoop, start scooping your brownie blend. Roll each scoop into a ball, press a thumbprint into the center, and nestle a cherry right in there. Encase the cherry with the brownie, rolling it back into a secret-filled ball. Place these on your parchment paper canvas. Once done, give them a chill in the fridge for about an hour – they need their beauty rest.
Step 6: When you’re nearly ready to unveil these treats, start melting your almond bark in a microwave-safe bowl. Heat in 1-minute intervals, stirring between each until it’s smooth like velvet.
Step 7: Coat each brownie ball with this melted luxury, using a spoon to drape it over and a fork to let the excess drip off. Lay them back on the parchment to set. A final chill in the fridge, and voilà, you’re ready to serve!
Tip:
For a truly seamless Chocolate Covered Cherry Brownie Bomb, the maraschino cherry drying process is pivotal. Before these cherries can be tucked into their brownie blankets, they must be thoroughly dried. Excess moisture from the cherries can seep into the brownie mixture, creating an unwanted soggy texture and potentially causing the chocolate coating to seize.
Here’s the pro move: after draining your cherries, spread them out on a clean kitchen towel and gently pat them dry. Then, take it a step further—let them air dry on a wire rack for about 10-15 minutes to ensure all the moisture has evaporated. This extra step is the secret to maintaining the perfect harmony of textures in your brownie bombs, ensuring that every bite is as divine as intended. With this technique, you’ll avoid the common pitfall of moisture migration and take your Chocolate Covered Cherry Brownie Bombs from homemade to bakery-level brilliance.
Frequently Asked Questions:
Can I use fresh cherries instead of maraschino cherries?
Absolutely you can use fresh cherries instead of maraschino cherries. However, keep in mind that using cherries will require some preparation. You’ll need to remove the pits and possibly slice them into pieces to fit nicely inside the brownie bombs. It’s worth noting that the flavor and texture of cherries differ from cherries, which might subtly impact the final taste.
How do I store these brownie bombs, and how long will they last?
To keep your Chocolate Covered Cherry Brownie Bombs at their best store them in an airtight container in the refrigerator. They should stay delicious for a week. If you wish to extend their shelf life you can freeze them for up to a month. Just remember to thaw them in the fridge before indulging.
My chocolate almond bark is too thick after melting; how can I thin it out for coating?
If your melted almond bark has become too thick you can easily thin it out by adding a teaspoon of coconut oil or vegetable shortening. Stir it well until you achieve a consistency that’s suitable, for dipping. Avoid using water or milk as they may cause the chocolate to seize and become even thicker.

Chocolate Covered Cherry Brownie Bombs
- Total Time: 2 HRS 15 MINS
- Yield: 24 1x
Description
Experience the combination of textures and flavors with these irresistible Chocolate Covered Cherry Brownie Bombs. Indulge, in the richness of brownies complemented by the delectable sweetness of maraschino cherries all wrapped in a delicate shell of crisp melt-in-your-mouth chocolate almond bark. Each bite will transport you to a world of decadence and surprise leaving you satisfied. These brownie bombs are perfect, for those who appreciate the blend of cherry and chocolate showcasing how ordinary ingredients can be transformed into extraordinary treats.
Ingredients
18.3 oz box of chewy fudge brownie mix (your preferred brand)
½ c of vegetable oil
¼ c of water
2 large eggs, room temperature
12 oz can of whipped chocolate frosting (your preferred brand)
10 oz jar of maraschino cherries, drained, stems removed, and patted dry
18 oz of chocolate almond bark
Instructions
Preheat your oven to 350°F. Grease a 9×13 inch baking dish, with stick baking spray.
In a bowl combine the brownie mix, ½ cup of vegetable oil, ¼ cup of water and 2 eggs until they are just mixed together. Pour the batter into the dish.
Follow the instructions on the box. Bake the brownies accordingly. Once they are baked allow them to cool completely.
Take half of the brownies. Crumble them into a bowl. Spread half of the can of frosting on top. Repeat this process with the remaining brownies and frosting, mixing well until you have a consistent mixture of brownies and frosting.
Prepare a baking sheet by lining it with parchment paper. Scoop out portions of the brownie mixture using a 1.5-tablespoon scoop and flatten them slightly. Create an indentation in the center to place a cherry. Wrap each cherry with some of the brownie mixture shaping it back into a ball shape and place them on the baking sheet. Refrigerate for an hour.
Break apart almond bark into pieces. Melt it in a microwave bowl using intervals of one minute while stirring in between until smooth.
Dip each brownie ball into melted almond bark to coat it evenly. Use a fork to lift it out, tap off any chocolate and then place it back on parchment paper.
Refrigerate until the chocolate coating sets, before serving these chilled brownie bombs.
Notes
For all the gluten-sensitive sweet tooths out there, transforming these Chocolate Covered Cherry Brownie Bombs into a gluten-free delight is a piece of cake—or should I say, a piece of brownie! Begin with a gluten-free brownie mix renowned for its rich, fudgy texture that could fool any wheat-laden counterpart. Swap in your favorite gluten-free chocolate frosting, ensuring it’s whipped to perfection for that dreamy texture. When it comes to the almond bark, most are naturally gluten-free, but always double-check the packaging to be safe. And let’s not forget those maraschino cherries—naturally gluten-free gems that add that pop of surprise.
- Prep Time: 20 MINS
- Cook Time: 25 MINS

My name is Natasha and I am the owner of nodashofgluten.com, a blog dedicated to all kinds of recipes. On my website, you can find classic dishes, vegetarian delights, creative snacks, Gluten-free recipes, and desserts – all proving that cooking isn’t as hard as it seems! With easy-to-follow instructions and tips on how to make your meals even better, I strive to help everyone become master chefs in their own kitchen. Come join me at nodashofgluten.com for some delicious fun!








Leave a Reply