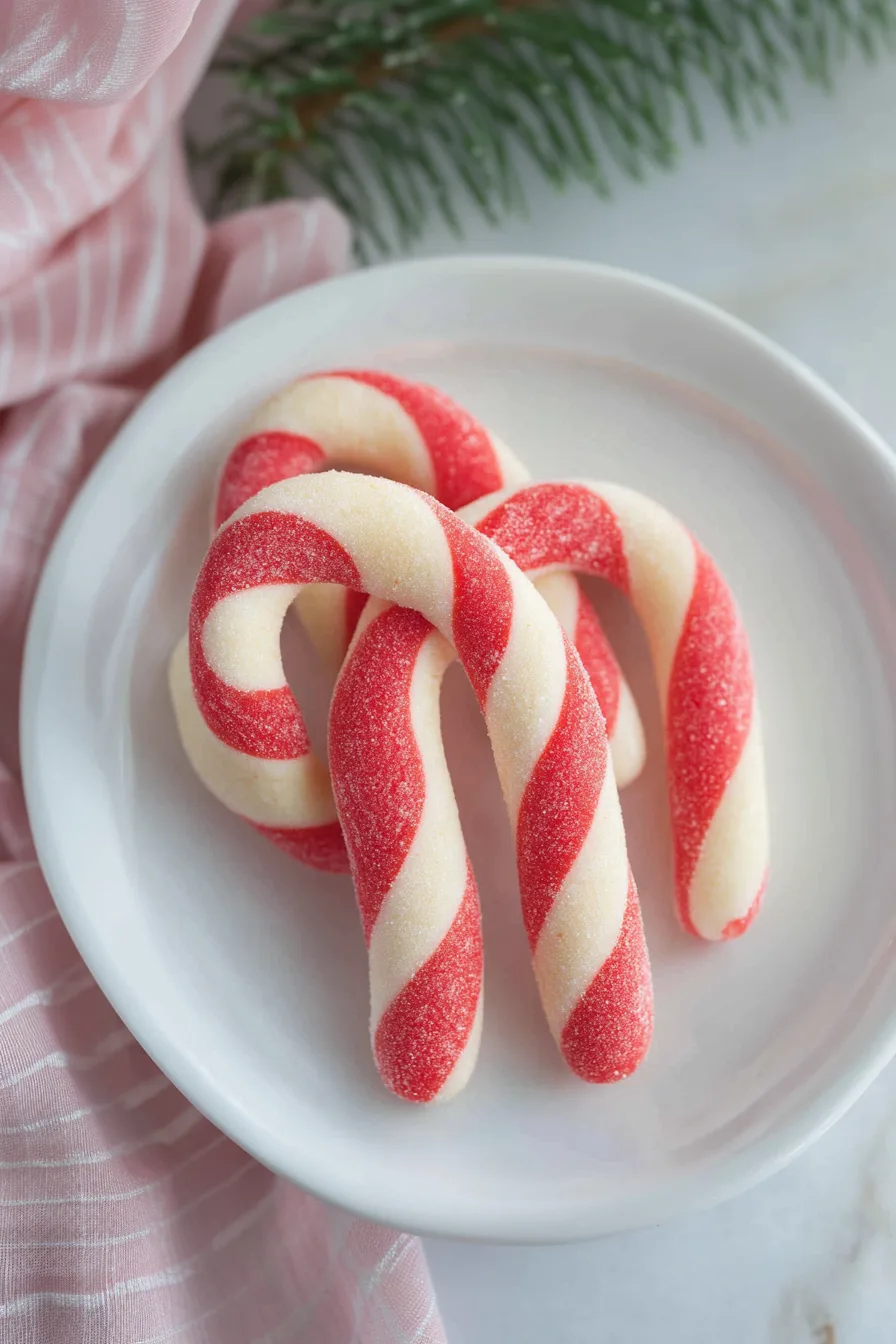
Candy Cane Cookies Recipe made with butter, sugar, flour, peppermint, and food coloring—festive holiday cookies that taste like Christmas.


I’ll be honest, the first time I tried a Candy Cane Cookies Recipe, it was… chaotic. My kitchen looked like a preschool art project gone wrong. Red dough smears on the counter, flour footprints across the floor (how does that even happen?), and my “perfectly twisted” cookies ended up looking more like red snakes that had lost the will to live. But here’s the funny part—nobody cared. My son grabbed one while it was still warm, crumbs falling all over the place, and he grinned with sugar on his face and said, “It tastes like Christmas.” And in that moment, I thought, yep… this is why we bake. Not for Instagram, but for those messy, sweet little moments that make the chaos worth it.
Why You’ll Love This Candy Cane Cookies Recipe?
These cookies aren’t just pretty, though they’ll definitely steal the show on any holiday platter. They’re buttery, soft, and just melt in your mouth. Think of shortbread with a peppermint kick—though if you’re like me and peppermint sometimes feels a little too much, almond extract works like a charm. It gives them this cozy, nostalgic flavor that reminds me of old-fashioned bakeries where the cases are filled with cookies that don’t all look the same, and that’s kind of the point.
And can we talk about the fun factor? Making these is basically a throwback to childhood craft time. Rolling little ropes, twisting them together, bending them into candy cane hooks—it’s part baking, part arts-and-crafts session. Yes, they might crack, yes, they might spread, but they always get eaten.

Ingredient Notes:
Every ingredient here has a job, even the simple ones.
-
Butter: Room temperature makes everything smoother. And honestly, more butter = better cookie.
-
Powdered sugar: Not regular sugar, because this gives you that tender, almost shortbread texture.
-
Egg: Just one, but it ties everything together.
-
Vanilla extract: Balances the mint so it’s not overwhelming. Nobody wants toothpaste cookies.
-
Peppermint or almond extract: Peppermint is festive, almond is nostalgic—like those cookies you’d find in old-school holiday tins.
-
Flour: Simple all-purpose. No need to overthink this one.
-
Salt: A pinch makes the sweet pop. It’s that little background note you miss if it’s not there.
-
Red food coloring: The drama! Without it, they’re still good, but they look more like candy canes on vacation.

How To Make Candy Cane Cookies?
Step 1: Cream the butter and sugar.
Beat the butter and powdered sugar until it’s light and fluffy, like frosting. This step feels fancy but it’s what makes the cookies so soft.
Step 2: Add flavor.
Mix in the egg, vanilla, and peppermint (or almond). Scrape the bowl because sneaky butter always sticks to the bottom.
Step 3: Mix in the flour.
Add the flour and salt. Go easy here—stop once the flour disappears. Overmixing makes tough cookies, and nobody wants that.
Step 4: Divide and color.
Split the dough in half. Leave one plain, tint the other with red food coloring. Knead it in until you’re happy with the color. Wrap both and chill for an hour, because chilled dough = less spreading.
Step 5: Roll and twist.
Pinch off walnut-sized pieces, roll them into ropes, and twist a red and white rope together. Hook the top like a candy cane. Don’t worry if they’re lopsided—it adds character.
Step 6: Chill again.
Yes, another chill. Fifteen minutes is enough. This extra step keeps your candy canes looking like candy canes instead of candy puddles.
Step 7: Bake.
Bake at 375°F for about 10–12 minutes, just until the edges start turning golden. Cool on the tray for a few minutes, then move to a rack. Try not to eat three before they’ve cooled completely (I’ve failed at this multiple times).
Storage Options:
Candy Cane Cookies are best the day you make them—soft, buttery, and pepperminty fresh. But don’t worry, they keep well. Store in an airtight container for up to a week. If you’re a planner (or just want emergency cookies, which I respect), you can freeze the shaped, unbaked dough on a tray, then stash them in a freezer bag. Bake straight from frozen, just add a couple of minutes. Instant holiday cheer on demand.
Want To Save This Recipe?
Variations and Substitutions:
This Candy Cane Cookies Recipe is pretty forgiving, and honestly, you can have fun playing with it.
-
Flavor swap: Almond extract instead of peppermint makes them taste like old-school Italian bakery cookies.
-
Decoration: Roll them in crushed candy canes after baking, or sprinkle with sanding sugar before. Both make them sparkle.
-
Colors: Red and white is classic, but I’ve seen green and white (hello, Grinch cookies) and even rainbow. Kids love this.
-
Gluten-free: Swap the flour with a 1:1 gluten-free blend. The texture changes a bit, but the cookies still disappear just as fast.
What to Serve with Candy Cane Cookies?
These cookies can hold their own, but pair them up and they really shine:
-
Hot cocoa with way too many marshmallows.
-
Coffee or tea for a grown-up pairing.
-
On a holiday platter next to gingerbread or thumbprints—they bring the pop of color.
-
Wrapped in cellophane bags with ribbon. Honestly, who wouldn’t want these as a gift?
Frequently Asked Questions:
Can I make the dough ahead of time?
Definitely. Chill for up to three days or freeze for a couple months. Just thaw in the fridge before rolling.
My cookies spread too much. What happened?
They probably weren’t chilled enough. Cold dough is key. Or maybe the oven wasn’t fully preheated—yep, that matters too.
Do I really need the food coloring?
Nope, but then you don’t get the candy cane look. They’ll still taste great, though, and you can always add crushed candy or sprinkles instead.

And that’s the Candy Cane Cookies Recipe—messy, cheerful, and just a little nostalgic. They’re the kind of cookies you make not because they’ll be perfect, but because they’ll be remembered.
So tell me—are you on team peppermint, or do you sneak in almond extract like me when nobody’s looking?
Keep the Flavor Coming – Try These:

Candy Cane Cookies Recipe
Ingredients
- 2 sticks 8 ounces unsalted butter softened
- 1 cup powdered sugar
- 1 large egg
- 1 teaspoon vanilla extract
- 1 teaspoon peppermint extract or ½ teaspoon almond extract
- 3 cups all-purpose flour
- 1 teaspoon kosher salt
- ½ to ¾ teaspoon red food coloring
Instructions
Cream the butter and sugar.
- Place the softened butter and powdered sugar in the bowl of a stand mixer fitted with the paddle attachment (or use a large bowl with a hand mixer). Beat on medium speed until the mixture is fluffy and resembles frosting. Scrape down the sides of the bowl.
Incorporate the egg and extracts.
- Add the egg, vanilla extract, and peppermint (or almond) extract. Beat until fully combined, scraping the sides of the bowl as needed.
Add the dry ingredients.
- Reduce the mixer speed to low. Gradually add the all-purpose flour and kosher salt. Mix just until no streaks of flour remain. Use a spatula to fold in any remaining dry bits.
Divide and color the dough.
- Divide the dough in half. Remove one half and set aside. To the remaining half, add red food coloring and knead or mix until evenly tinted. Adjust the coloring as needed for a vibrant red. Shape both portions of dough into 1-inch thick discs, wrap in plastic wrap, and refrigerate for at least 1 hour (up to 3 days).
Shape the cookies.
- When ready to bake, preheat the oven to 375°F (190°C). Line two baking sheets with parchment paper or silicone mats. Pinch off walnut-sized portions (approximately 2 tablespoons) of each dough color. Roll each into a rope about 6 inches long. Place one red rope and one plain rope side by side, press together at the top, and twist to form a spiral. Curve the top into a candy cane shape. Arrange on the prepared baking sheets. If the dough becomes difficult to handle, return it to the refrigerator to chill briefly.
Chill before baking.
- Place the shaped cookies on the baking sheets in the refrigerator for 15 minutes to help them hold their shape.
Bake.
- Bake for 10–12 minutes, until the edges are lightly golden. Allow the cookies to cool on the baking sheets for 10 minutes, then transfer to a wire rack to cool completely.
Notes
I’m Bitty, owner of nodashofgluten.com, where I share simple, delicious recipes for all tastes, including gluten-free. Check out my “About Me” page for more info!