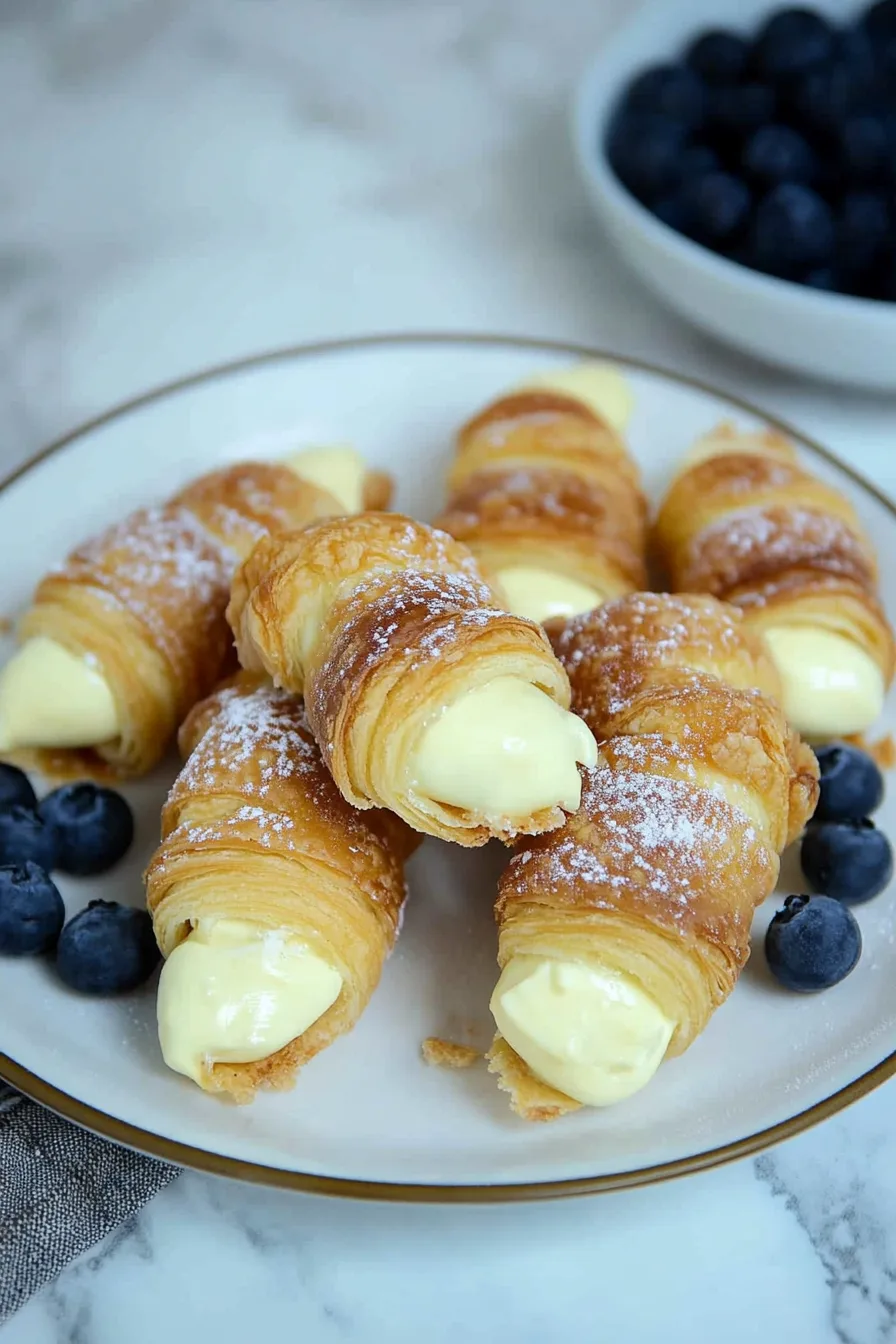
Flaky puff pastry, creamy custard, vanilla, and sugar come together in these Buttery Crisp Italian Cream filled Cannoncini—a bakery treat right from your own oven.


Okay, let me take you back. A few years ago, I was wandering through Florence on a chilly morning—half awake, clutching an espresso like my life depended on it—when I spotted these little golden cones in a bakery window. They were dusted with powdered sugar, sitting there like they knew they were irresistible. I walked in “just to look,” but you know how that goes. The baker insisted I try one, and when I bit into that flaky pastry and the cream inside hit me? Game over.
It’s one of those memories that sticks with you, right? Like when a smell suddenly brings you back to your grandmother’s kitchen or a song transports you straight to high school. Every time I make these Buttery Crisp Italian Cream filled Cannoncini, I’m right back in that tiny Italian café, trying not to get powdered sugar all over my black sweater. Spoiler: I failed.
Why You’ll Love This Buttery Crisp Italian Cream filled Cannoncini Recipe?
Here’s the thing—these aren’t just pastries. They’re little pockets of joy. You get that buttery crunch from the puff pastry, the silky smooth custard inside, and the whole thing feels like something you’d only get from a fancy bakery… except you made them yourself. And honestly, there’s something fun about piping cream into cones and pretending you’re on a cooking show, even if the kitchen looks like a powdered sugar snowstorm by the end.

Ingredient Notes:
Before you dive in, let’s talk ingredients. Nothing too wild here, but each one does its job:
-
Milk – Whole milk makes the cream richer. If you only have 2%, don’t stress, it’ll still work.
-
Egg yolks – These are the secret to that custard-y magic. They give it that silky, lush texture.
-
Sugar – Not just for sweetness, but it helps caramelize the pastry edges.
-
Flour – Thickens up the cream so it doesn’t drip out the second you bite in.
-
Vanilla – Brings everything together. If you’ve got real vanilla bean, go ahead and flex.
-
Puff pastry – Store-bought is your friend here. I’m not hand-rolling pastry at 7 a.m., and I doubt you are either.
-
Confectioner’s sugar – The final “snowfall” that makes them look as good as they taste.

How To Make Buttery Crisp Italian Cream filled Cannoncini?
- Start with the cream.
Heat the milk until it’s hot (not boiling—you don’t want scrambled eggs). In another pan, whisk yolks, sugar, flour, and vanilla until smooth. Slowly whisk in the milk, little by little, until it’s combined. - Thicken it up.
Cook over medium heat, stirring constantly. When it starts to bubble, it’ll thicken into a custard. Scrape the sides and bottom so it doesn’t burn. When it’s where you want it, transfer it to a bowl, press plastic wrap directly on top, and chill for an hour. - Now the pastry cones.
Preheat the oven to 400°F. Sprinkle sugar on the counter, lay down your puff pastry sheet, and sprinkle more sugar on top. Cut into 12 one-inch strips and wrap each around a cone mold, overlapping slightly. - Bake to golden.
Brush with egg wash and bake for 15–20 minutes. When they’re puffed and golden, let them cool for a few minutes, then gently twist them off the molds. - Fill and finish.
Pipe the chilled cream into each cone. Dust with powdered sugar. Step back, admire, then dig in.
Storage Options:
I’ll be honest: these are best eaten the day you make them. That crisp pastry and creamy filling are at their peak right away. If you want to get ahead, bake the cones a day in advance and keep them in an airtight container. Then fill with cream right before serving. Once filled, they’ll keep in the fridge for 2 days, but the pastry does get softer. Still good, just different.
Variations and Substitutions:
Want to play around? You totally should.
-
Chocolate custard – Add cocoa or melted chocolate to the filling.
-
Citrus twist – Lemon or orange zest gives it a fresh kick.
-
Nut topping – Pistachios, almonds, or hazelnuts sprinkled on top.
-
DIY molds – No cone molds? Wrap foil around sugar cones or even the handle of a wooden spoon. Improvised, but it works.
Want To Save This Recipe?

What to Serve with Buttery Crisp Italian Cream filled Cannoncini?
These little cones don’t need much, but here are some fun pairings:
-
Espresso or cappuccino – Classic Italian move.
-
Fresh fruit – Strawberries or raspberries cut the richness.
-
Prosecco – Because pastry + bubbles = happiness.
-
Gelato – A scoop on the side? Over the top, but in the best way.
Frequently Asked Questions:
Do I really need the molds?
Technically, yes—but you can fake it with DIY foil molds. No one will know.
Can I make the custard ahead of time?
Yep, it lasts up to 2 days in the fridge. Just whisk it before piping.
Why did my pastry stick?
Been there. Grease the molds lightly and let the pastry cool before trying to remove it.

So, what do you think—are you already picturing yourself dusting these with powdered sugar and serving them with coffee? Because I am. They’re flaky, creamy, and a little bit messy, but that’s half the fun. And hey, if you get sugar all over your sweater too, welcome to the club. Can’t wait to hear what you think when you try them!
Keep the Flavor Coming – Try These:


Buttery Crisp Italian Cream filled Cannoncini
Ingredients
Custard Filling:
- 8 ounces milk
- 3 egg yolks
- ½ cup sugar
- 1 teaspoon vanilla extract
- 3 tablespoons flour
Cannoncini:
- 1 8-ounce sheet puff pastry
- ¼ cup granulated sugar
- 1 egg beaten
- Confectioner’s sugar for garnish
Instructions
Prepare the Custard Filling
- In a small saucepan, warm the milk until hot but not boiling. In a separate medium saucepan, whisk together the egg yolks, sugar, flour, and vanilla extract until smooth.
Combine and Cook
- Gradually add the hot milk to the egg mixture, whisking constantly to prevent lumps. Place the saucepan over medium heat and stir continuously until the custard reaches a gentle boil and begins to thicken. Scrape the bottom and sides frequently to avoid scorching.
Cool the Custard
- Once thickened to the desired consistency, remove from heat and transfer the cream to a bowl. Cover with plastic wrap pressed directly onto the surface to prevent a skin from forming. Refrigerate for at least 1 hour before use.
Prepare the Pastry
- Preheat the oven to 400°F (200°C). Lightly dust a clean surface with granulated sugar, then place the puff pastry sheet on top. Sprinkle more sugar over the pastry and cut into twelve 1-inch strips.
Shape the Cones
- Wrap each strip of pastry around a cone-shaped mold, slightly overlapping the edges. Place the prepared cones on a parchment-lined baking sheet. Brush with beaten egg.
Bake
- Bake the cones for 15–20 minutes, or until golden brown and crisp. Allow them to cool for several minutes before carefully removing them from the molds.
Assemble
- Transfer the chilled custard into a piping bag and fill each cooled pastry cone. Dust with confectioner’s sugar before serving.
Notes
I’m Bitty, owner of nodashofgluten.com, where I share simple, delicious recipes for all tastes, including gluten-free. Check out my “About Me” page for more info!