Description
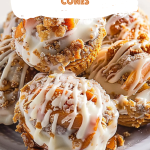
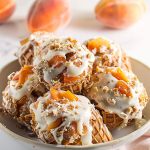
Imagine whipping up a dessert. That feels like a warm hug. On a sunny day. That’s exactly what Peachy Cheesecake Dream Cones are all about. Here. The rustic charm of peach cobbler. Merges with the silky smoothness of cheesecake. All cradled in a crunchy. Gluten-free waffle cone. That whispers secrets of indulgence. With every bite. It’s a creation born from love. A testament. To the joy of mixing. Baking. And sharing. This isn’t just food. It’s a story of moments. Spent under the summer sky. Laughter around the table. And the magic. That happens when we make something truly special. For the ones we love. Each cone. Is a promise of sweetness. A celebration of life’s simple pleasures. Wrapped up in the delightful anticipation of that first bite.
Ingredients
For the cones:
16 oz cream filled cookies, vanilla or chocolate, even wafer cookies
12 waffle type cones
3 tablespoon whipped cream
For the Peach Cobbler:
48 oz sliced peaches with juice
1 box cake mix, yellow or white, french vanilla or butter pecan
1 c butter, salted
1 ½ teaspoon cinnamon
For the cheesecake filling:
1 c heavy whipped cream
1 c confectioner’s sugar
1 teaspoon vanilla extract
16 oz cream cheese, softened
½ teaspoon lemon juice
Instructions
Preheat Oven: Set your oven to 350°F to get it warm and ready.
Prepare Cones: Melt chocolate in the microwave (30-second intervals should do it). Dip cones in chocolate to coat the tops, bottoms, or both. Optionally, drizzle chocolate inside the cones too.
Cookie Crumbs: Pulse your choice of cookies in a processor until they turn into fine crumbs. Use these crumbs to decorate the chocolate-coated cones by dipping or sprinkling.
Assemble Peach Cobbler: In a 9×13 baking dish, layer the sliced peaches (with their juice). Then, evenly sprinkle the dry cake mix over the peaches. Melt the butter and drizzle it all over the cake mix.
Bake: Place the dish in the oven and bake for 45 to 55 minutes.
Make Cheesecake Filling: While the cobbler bakes, whip the heavy cream in a bowl until it forms stiff peaks. In a separate bowl, mix cream cheese, confectioner’s sugar, vanilla extract, and lemon juice until smooth. Fold the whipped cream into this mixture gently.
Fill Cones: Once both the cobbler and cheesecake filling are ready, start filling the cones with alternating layers of cheesecake and peach cobbler.
Garnish and Serve: Finish by drizzling the tops with a bit more chocolate and a sprinkle of cookie crumbs. Enjoy your delicious Peachy Cheesecake Dream Cones!
Notes
To make our Peachy Cheesecake Dream Cones gluten-free. Just swap a few ingredients:
Cookies & Cones: Use gluten-free cookies for the crumbs. And find gluten-free waffle cones. At your grocery store.
Cake Mix: Pick a gluten-free cake mix. Many brands offer delicious options. That work perfectly. For our peach cobbler layer.
These simple switches. Make the recipe accessible for everyone. Without skimping on flavor. Or fun. Enjoy creating this inclusive treat. That ensures no one misses out on the deliciousness!
- Prep Time: 15 minutes
- Cook Time: 55 minutes