


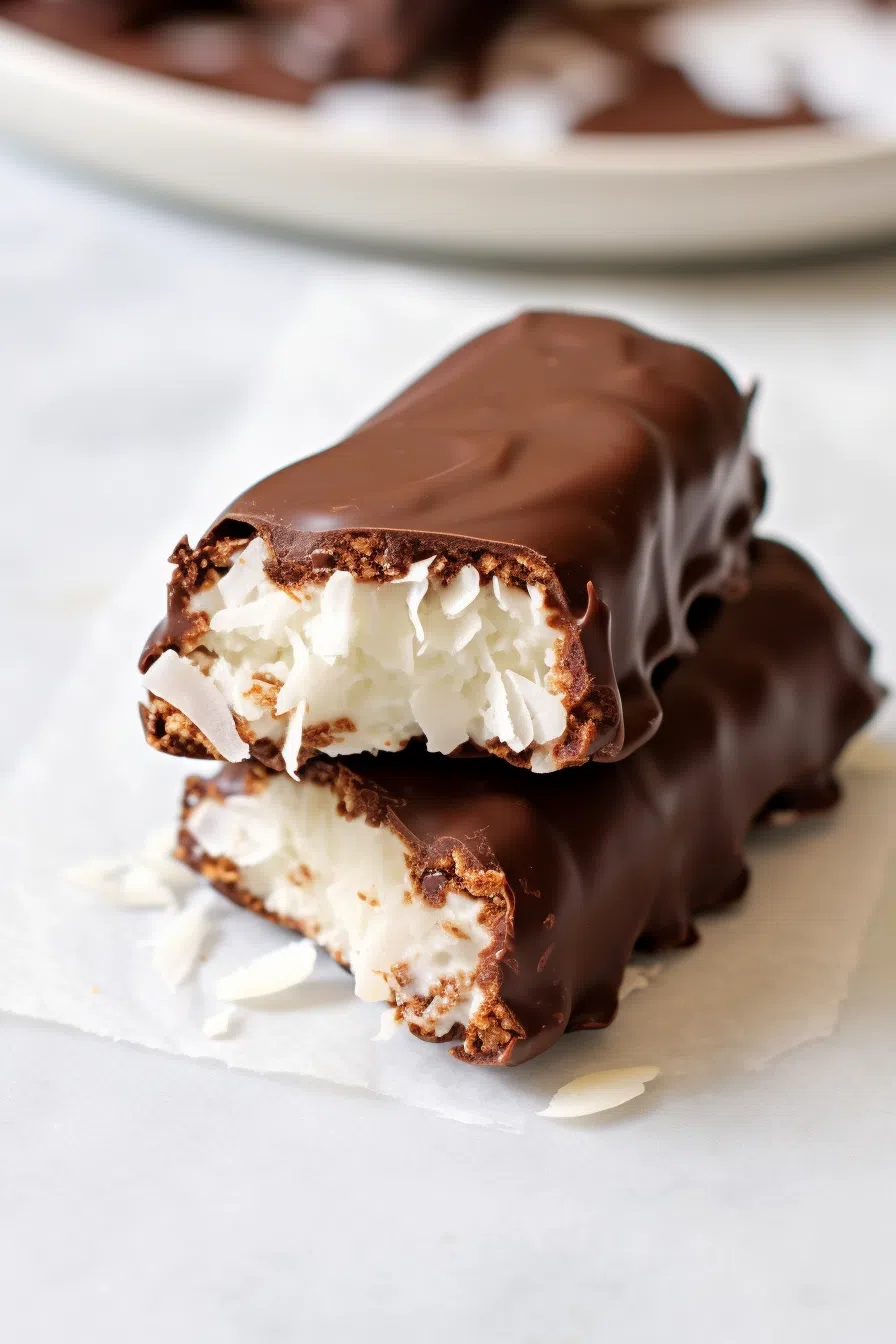
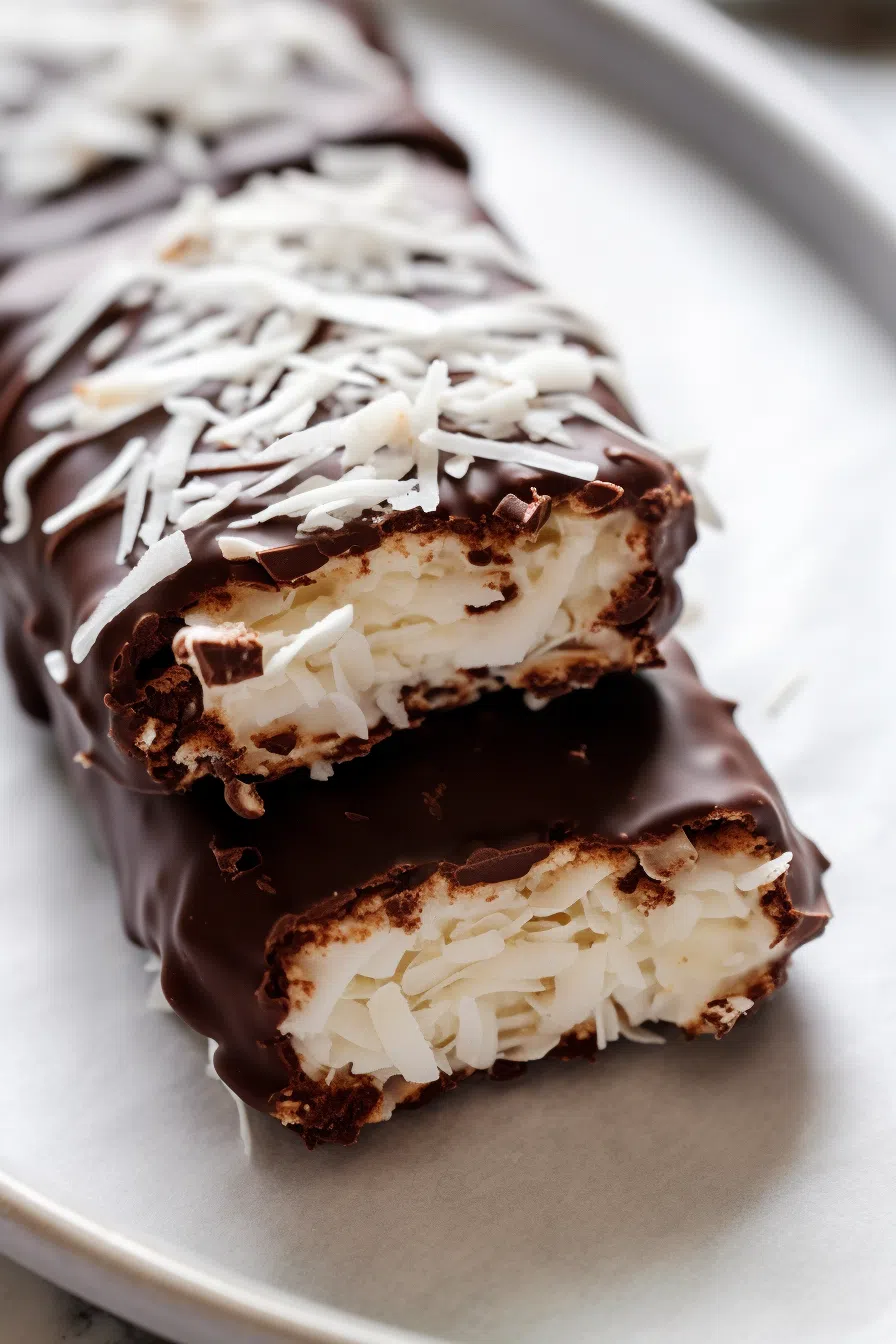
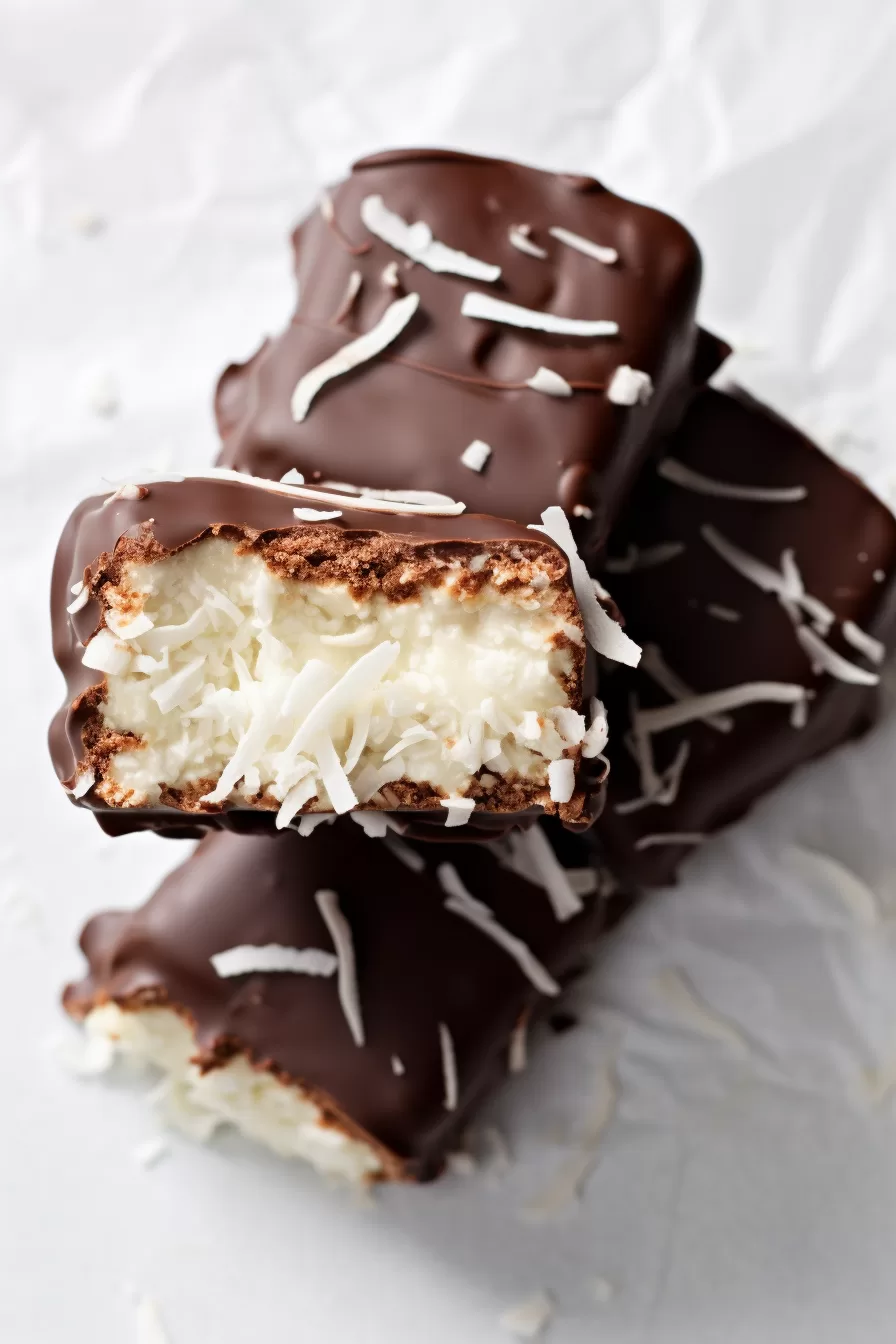
Craving chocolate and coconut? Make your own Mounds Bar Recipe with shredded coconut, sweetened condensed milk, and dark chocolate—so easy, so good.
You know that one candy that you never traded as a kid? For me, it was Mounds Bars. Halloween night would roll around, and while everyone else was happily swapping their coconut-filled goodies for peanut butter cups, I was winning the game—piling up every last Mounds Bar I could get my hands on. It was pure, chocolate-covered coconut bliss.


Then one day, I had a moment. A crisis, actually. I bit into a store-bought Mounds Bar, and something was… off. Was it always this waxy? This… meh? Had my taste buds evolved, or had the recipe changed? Either way, I was not about to live in a world where Mounds Bars disappointed me.
So, I did what any coconut-obsessed, slightly dramatic person would do—I made my own. And let me tell you, game-changer. The coconut is fresher, the chocolate is richer, and the whole thing just feels more indulgent. Plus, it’s ridiculously easy. Three ingredients. No oven. And the satisfaction of saying, “Yeah, I made these” when someone inevitably asks.
Why You’ll Love This Mounds Bar Recipe?
- Only three ingredients. Seriously, why are store-bought ones filled with stuff I can’t pronounce?
- No baking, no fuss. Just mix, shape, freeze, and dip. Done.
- Richer, deeper flavor. Because you get to choose the chocolate—and we both know good chocolate makes all the difference.
- Customizable. Love Almond Joys? Slap an almond on top. Want white chocolate? Go wild.
- Way too easy to eat. Just a warning—you will eat more than one. Probably in a row.

Ingredient Notes:
Let’s be real—when a recipe only has three ingredients, each one counts.
- Unsweetened Shredded Coconut – You want the unsweetened kind because the condensed milk is sweet enough. If you love an extra smooth texture, give it a quick blitz in the food processor.
- Sweetened Condensed Milk – This stuff is magic. It binds the coconut together and makes everything perfectly chewy. Not sure which brand to grab? This condensed milk taste test from Serious Eats breaks down the best ones.
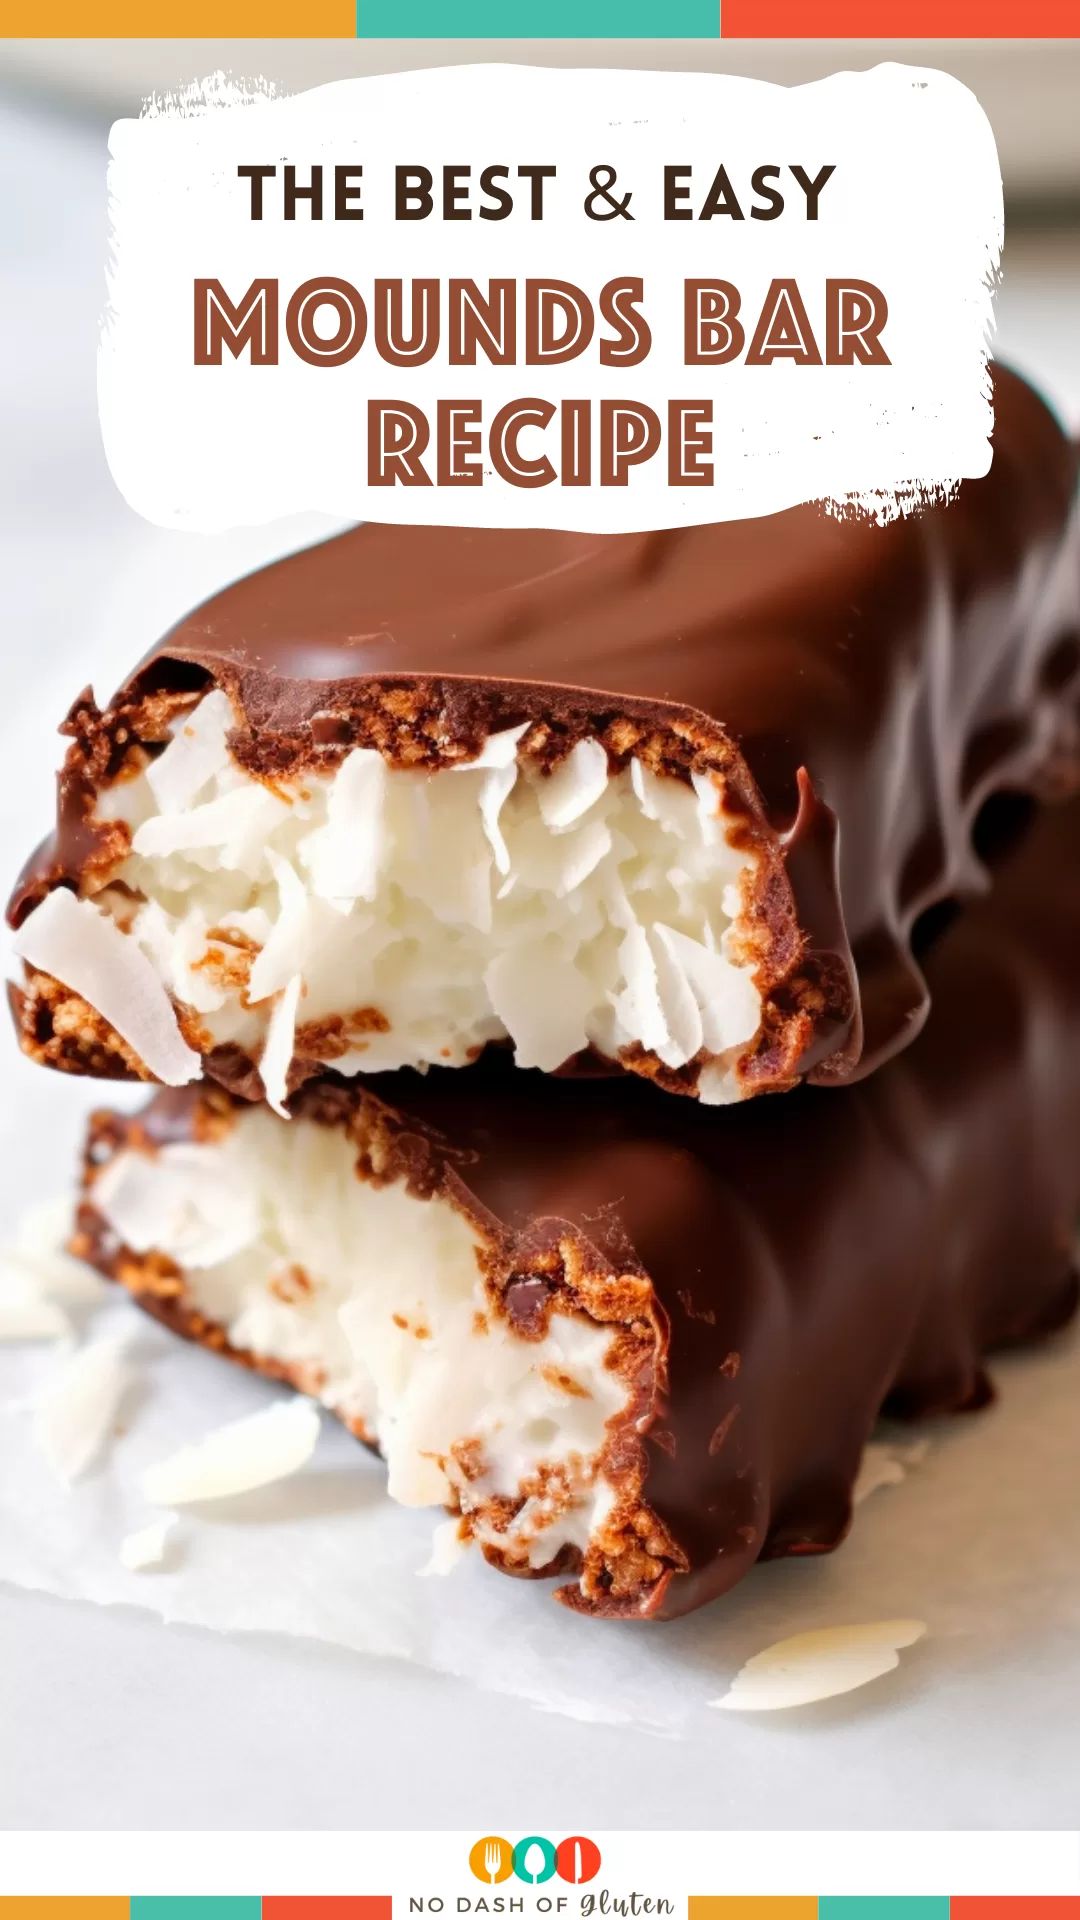
- Dark Chocolate – The slightly bitter, rich contrast is what makes a Mounds Bar. I recommend 60-70% dark chocolate, but hey, if you prefer semi-sweet or milk chocolate, go for it.
Pro Tip: If you’re an Almond Joy fan, just press a whole almond on top before dipping in chocolate. Boom—instant Almond Joy without the extra effort.
How To Make Mounds Bar Recipe?
Making these is so easy, it almost feels like cheating.
Step 1: Mix the Coconut & Sweetened Condensed Milk
Dump your shredded coconut into a bowl, pour in that thick, dreamy condensed milk, and stir until everything is coated. It should be sticky and clumpy, kind of like snow when it’s perfect for making snowballs.
Step 2: Shape & Freeze
Here’s where it gets a little messy. With damp hands (trust me on this one), roll the mixture into 12 small logs and place them on a parchment-lined baking sheet. Pop them in the freezer for 20 minutes—this makes them way easier to dip later.
Step 3: Melt the Chocolate (Without the Meltdown)
Microwave 10 oz of chocolate in 30-second bursts, stirring between each round. Once melted, stir in the remaining 5 oz—this trick makes your chocolate super glossy and professional-looking. (Not that we’re professionals, but hey, we can pretend.)
No microwave? Melt chocolate in a heatproof bowl over a pot of simmering water—old-school double-boiler style.
Step 4: Dip & Coat
Now for the fun part! Take each chilled coconut log and dunk it into the melted chocolate, making sure it’s completely covered. Use a fork to lift it out, let the excess drip off, then place it back on the parchment.
No Chocolate Puddles, Please
Want that perfect, bakery-worthy finish? Once you’ve dipped a coconut log in chocolate, let the extra drip away by gently tapping the fork on the side of your bowl. You can even give the fork a little shimmy to help any stubborn chocolate fall off. This keeps your bars neat—no runaway chocolate puddles underneath. Place them back on the parchment, and they’ll set up with crisp, clean edges every time.
Pro tip for hassle-free cleanup: always line your baking sheet with parchment paper. Trust me, you’ll thank yourself later. That sticky coconut-chocolate combo won’t stand a chance—just peel off the paper and toss it. Bonus: it keeps your bars from sticking, so you get perfect treats and a spotless pan.
Want To Save This Recipe?
Step 5: Let Them Set & Devour
If you have patience (unlike me), let them set at room temperature. If you don’t, pop them in the fridge for 10-15 minutes. Then? Eat. Immediately.

Storage Options:
Here’s the thing—you could store these, but odds are, they’ll be gone before you even need to worry about it.
- Room Temp: Store in an airtight container for 5 days.
- Fridge: Lasts up to 2 weeks—but let them sit out for a few minutes before eating.
- Freezer: Freeze for up to 3 months, then thaw when the craving hits.
If you do manage to stash a batch away, the freezer is your friend. Keep your homemade mounds in a freezer-safe container; trust me, they’re fantastic cold. When the mood strikes, take them out and let them thaw on the counter or in the fridge for a few minutes before enjoying.
Variations and Substitutions:
Want to mix things up? Try these twists:
- Almond Joy Copycat: Just press an almond on top before dipping. Done.
- White Chocolate Mounds: Swap dark chocolate for white chocolate. It’s a totally different vibe, but still amazing.
- Extra Coconut Kick: Add ½ tsp coconut extract to the mix for an even stronger coconut flavor.
- Dairy-Free/Vegan: Use coconut condensed milk and dairy-free chocolate—boom, problem solved.

What to Serve with Mounds Bar?
Sure, they’re perfect on their own, but if you wanna go full extra, pair them with:
- Hot Coffee or Espresso – That bitter contrast with the sweet coconut? Chef’s kiss.
- Red Wine – A glass of Cabernet Sauvignon with dark chocolate? Yes, please.
- Coconut Ice Cream – Because if you love coconut, why not go all in?
Frequently Asked Questions:
Can I use sweetened coconut instead?
You can, but heads up—it’ll make the bars super sweet. If that’s your thing, go for it.
My chocolate keeps getting thick and clumpy. Help!
This usually happens if it gets too hot. Try microwaving in shorter bursts and stirring constantly.
Can I make these nut-free?
Absolutely! Just double-check your chocolate to make sure it’s nut-free if allergies are a concern.

So, there you have it—homemade Mounds Bars that taste better than anything you’ll find in a wrapper. They’re chewy, chocolatey, ridiculously easy, and honestly? They make you feel kind of like a candy-making genius.
Have you tried making these? Did you accidentally eat six in a row? No judgment here. Tell me how they turned out in the comments!
Keep the Flavor Coming – Try These:


Homemade Mounds Bars (Easy 3-Ingredient Copycat)
Ingredients
- 3 c unsweetened shredded coconut
- 14 oz. can sweetened condensed milk
- 15 oz. dark chocolate or semi-sweet chocolate
Equipment
- Mixing bowl
- Parchment-lined baking sheet
- Microwave-safe bowl
- Fork (for dipping)
- Spatula or spoon
- Freezer-safe container (for leftovers)
Instructions
- In a bowl, mix shredded coconut and condensed milk till it's one dreamy blend.
- Using damp hands, mold them into 12 logs and lay them on parchment paper. Pop them into the freezer for a quick 20-minute chill session.
- In your microwave-safe bowl, melt 10 oz. of chocolate, zapping on high for 30 seconds, followed by those quick 15-second bursts until it's lusciously smooth. Then, stir in the remaining 5 oz. till it's all silky and smooth.
- Grab each chilled coconut log, dip it into the chocolate pool ensuring it’s well-coated, tap off any excess, and return to the parchment to set. Voila! Homemade perfection.
Notes
Nutrition
Still Craving Chocolate?
You’re clearly a dessert enthusiast after my own heart, so why stop at one treat? Here are a few more chocolatey temptations you won’t want to miss:
- Hot Chocolate Bombs – For those chilly nights when only a mug of molten chocolate will do.
- Chocolate Covered Peanut Butter Balls – The perfect sweet-and-salty bite.
- Chocolate Brownie Cookies – When you can’t decide between a brownie and a cookie (why not both?).
- Easter Chocolate Bark – Because chocolate + candy = pure joy, no matter the season.
- The Best Chocolate Fudge – Silky, rich, and guaranteed to satisfy any cocoa craving.
- One Bowl Brownies – For when your sweet tooth is screaming but your sink is full.
So go on—mix, melt, and munch your way through these chocolate delights. Your taste buds (and everyone you share with… if you do share) will thank you.
I’m Bitty, owner of nodashofgluten.com, where I share simple, delicious recipes for all tastes, including gluten-free. Check out my “About Me” page for more info!

One Response
I haven’t made this yet but will make 2 batches! One will be as the recipe is written but the other will be dairy free, using sweetened condensed coconut milk and vegan chocolate chips. I may also attempt a 3rd batch of “dark chocolate almond joy bars” by just placing an almond or 2 on the logs!
Thank you so much for this recipe.