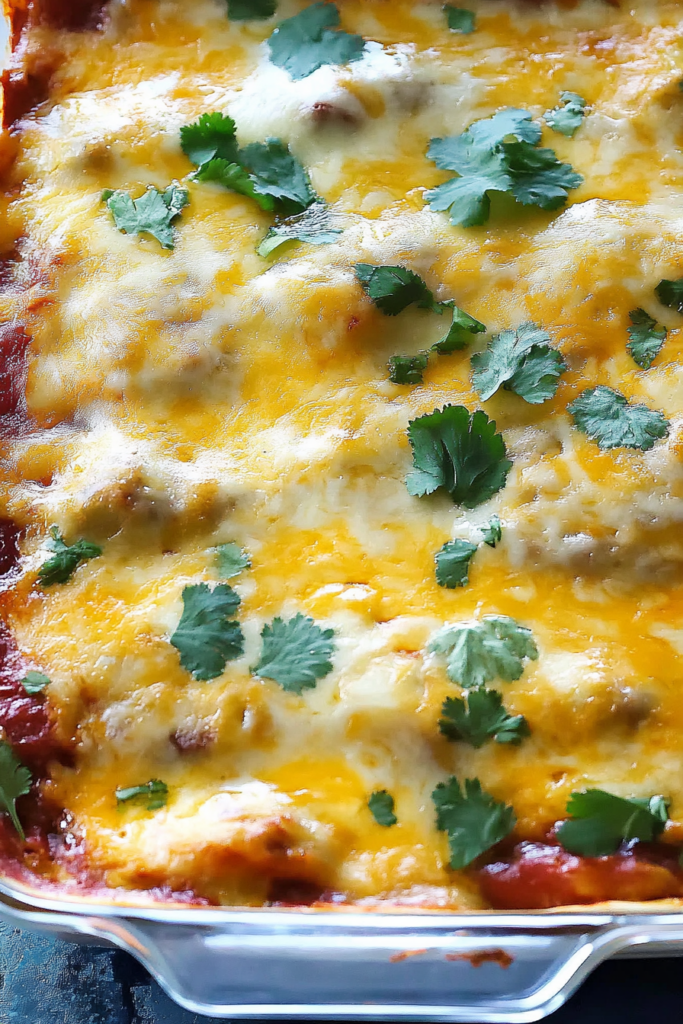
Roasted green chiles, melty Monterey Jack and Cheddar, fluffy eggs, and tangy tomato sauce—all layered into this easy, cheesy Chile Relleno Casserole for a no-fuss, flavor-packed meal.
You know how some recipes are born out of pure laziness but end up being way better than you expected? Yeah… that’s this Chile Relleno Casserole.
So, flashback to a few years ago—I was craving chile rellenos, like, bad. But the thought of roasting, stuffing, battering, and deep-frying? Ugh. I wasn’t about to turn my kitchen into a grease-splattered war zone. Plus, my smoke detector? Way too sensitive. One wrong move, and the entire neighborhood’s on high alert.


But I couldn’t shake the craving. So, I thought, “What if I just… skip the frying?” Enter the casserole idea—same bold, cheesy flavors, but baked in a dish. It was love at first bite.
And now? It’s become a family staple. I made it once for a Sunday potluck, and my cousin—who still claims he doesn’t like casseroles (liar)—ended up scraping the dish clean. Honestly, it was a proud moment.
Why You’ll Love This Chile Relleno Casserole Recipe?
Let’s be real: casseroles can be hit or miss. But this one? It hits. Every time. Here’s why:
- All the chile relleno flavors, none of the deep frying. No oil splatters, no babysitting a hot pan.
- It’s cheesy, hearty, and has just the right kick. Creamy Monterey Jack, sharp Cheddar, and that tangy tomato sauce—it’s a vibe.
- Feeds a crowd (or just yourself for days). It’s one of those “tastes even better the next day” kind of meals.
- Customizable AF. Want it spicier? Add jalapeños. Need protein? Throw in some chorizo.
- Easy cleanup. Because no one loves scrubbing pots after dinner.
It’s the kind of meal that makes you look like you really tried… even if you didn’t.

Ingredient Notes:
This casserole is simple, but every ingredient brings its A-game. Let’s break it down:
- Whole Green Chiles (2 x 7 oz cans): Mild, flavorful, and ready to layer. Canned chiles work great here, but if you’re feeling fancy, roast fresh poblanos.
- Monterey Jack Cheese (8 oz, shredded): Melts beautifully and adds that creamy factor.
- Cheddar or Longhorn Cheese (8 oz, shredded): Sharp and bold—it balances out the creamy Jack.
- Large Eggs (2): The glue that holds this whole cheesy masterpiece together.
- Evaporated Milk (5 oz can): Adds creaminess and helps create that fluffy, soufflé-like texture.
- All-Purpose Flour (2 tbsp): Thickens the egg mixture just enough.
- Milk (½ cup, optional): Makes the egg layer even softer if you’re into that.
- Tomato Sauce (8 oz can): A tangy, slightly sweet layer that ties everything together.
- Cooking Spray: Because sticking casseroles = sadness.
Pro Tip: Love heat? Go for hot green chiles or sneak in some diced jalapeños. Want more depth? Roast your own chiles. It’s a little extra work, but the flavor payoff? Chef’s kiss.

How To Make Chile Relleno Casserole?
This isn’t one of those “read the recipe six times and still be confused” kinds of dishes. It’s straight-up simple. Here’s how:
Step 1: Preheat & Prep
Set your oven to 350°F (175°C). Grab a 9×13-inch baking dish and coat it with cooking spray. Because nothing ruins the mood like stuck-on cheese.
Step 2: Layer Those Chiles & Cheese
Drain your green chiles and pat them dry. Spread half across the bottom of the dish. Sprinkle half the Monterey Jack and half the Cheddar over the top. Repeat: more chiles, more cheese. Layers are life.
Step 3: Make the Egg Mixture
In a bowl, whisk together the eggs, evaporated milk, flour, and (if you’re going for creamy) that extra ½ cup of milk. It should be smooth—no lumps allowed.
Pour the egg mixture over the chiles and cheese, letting it seep into all the corners. That’s where the flavor magic happens.
Step 4: Bake It
Slide the dish into the oven and bake for 25 minutes. The egg layer should look mostly set—kind of like a quiche—but not fully firm.
Want To Save This Recipe?
Step 5: Tomato Sauce Time
Pull the dish out, pour the tomato sauce evenly over the top, and then pop it back in the oven for another 15 minutes.
Step 6: Broil for Bubbly Perfection
Sprinkle the remaining cheese on top and broil for 2-3 minutes. Watch it like a hawk—melty, bubbly cheese turns to burnt sadness fast.
Step 7: Cool, Slice & Serve
Let the casserole cool for about 10 minutes—trust me, it’ll slice way cleaner. Serve it as-is, or go all out with sour cream, chopped cilantro, or a squeeze of lime.

Storage Options:
This casserole is a meal-prep dream.
- Fridge: Keeps well for up to 4 days. Cover it tight so it doesn’t dry out.
- Freezer: Yep, freezes great. Slice into portions, wrap them individually, and freeze for up to 3 months.
- Reheat: Microwave for speed, or reheat in the oven at 350°F for 15 minutes if you want that cheesy top to crisp up again.
Pro Tip: If freezing, skip the broil step before freezing. Do it after reheating so the cheese is fresh and bubbly.
Variations and Substitutions:
This recipe’s like a blank canvas—here’s how to make it your own:
- Add Meat: Ground beef, shredded chicken, or spicy chorizo all work like a charm.
- Make It Spicier: Toss in jalapeños or use hot green chiles.
- Veggie Boost: Throw in sautéed mushrooms, onions, or spinach.
- Cheese Swap: Try Pepper Jack for a kick or Cotija for a salty crumble.
- Low-Carb Hack: Swap the flour for almond flour or coconut flour.

What to Serve with Chile Relleno Casserole?
It’s a whole meal on its own, but here’s what takes it over the top:
- Mexican Rice: Classic. Soaks up all that cheesy goodness.
- Refried Beans or Black Beans: Adds a hearty side and balances out the heat.
- Pico de Gallo or Salsa: Bright, fresh, and adds a tangy kick.
- Avocado Slices or Guac: Creamy coolness balances the spice.
- Tortilla Chips: For scooping, obviously.
Frequently Asked Questions:
Can I use fresh chiles instead of canned?
Absolutely. Roast, peel, and de-seed fresh poblanos for a deeper flavor. It’s more effort, but so worth it.
Is this casserole super spicy?
Not really. It’s got a mild kick from the chiles, but it’s family-friendly. Want more heat? Jalapeños or hot chiles will do the trick.
Can I freeze leftovers?
Heck yes. Cool completely, slice, wrap, and freeze. Reheat in the oven for best results.

So, what do you think? Is this Chile Relleno Casserole calling your name yet? It’s easy, hearty, cheesy, and gives you all the classic flavors without all the mess. And if you end up eating it straight from the pan with a fork… hey, no judgment here. Happy cooking!
Keep the Flavor Coming – Try These:


Chile Relleno Casserole
Ingredients
- Cooking spray
- 2 7 oz cans whole green chile peppers, drained
- 8 oz Monterey Jack cheese shredded
- 8 oz Longhorn or Cheddar cheese shredded
- 2 large eggs
- 1 5 oz can evaporated milk
- 2 tbsp all-purpose flour
- ½ c milk Optional
- 1 8 oz can tomato sauce
Instructions
- To begin preheat your oven to 350°F (175°C). Take a baking dish measuring 9x13 inches. Ensure that it is evenly coated with cooking spray.
- Next arrange a layer of peppers, in the bottom of the dish after draining them. Sprinkle half of both the Monterey Jack and Cheddar cheeses over the chiles. Add another layer of peppers on top of the cheese.
- In a bowl beat the eggs. Mix in milk and flour until you achieve a smooth consistency. If needed you can stir in up to ½ cup of milk to make it creamier. Pour this mixture evenly over the chiles and cheese in the baking dish.
- Place the dish in the oven. Allow it to bake for 25 minutes.
- Once 25 minutes have elapsed, remove the casserole from the oven and evenly pour tomato sauce over its surface. Return it to the oven for 15 minutes.
- Switch on your broiler setting. Sprinkle the remaining cheese on top of the casserole and broil, for 2 to 3 minutes or until you witness melting and slight bubbling of cheese.
- Retrieve the dish from your oven and let it cool for a few minutes. Now your Chile Relleno Casserole is ready to be served!
Notes
I’m Bitty, owner of nodashofgluten.com, where I share simple, delicious recipes for all tastes, including gluten-free. Check out my “About Me” page for more info!