

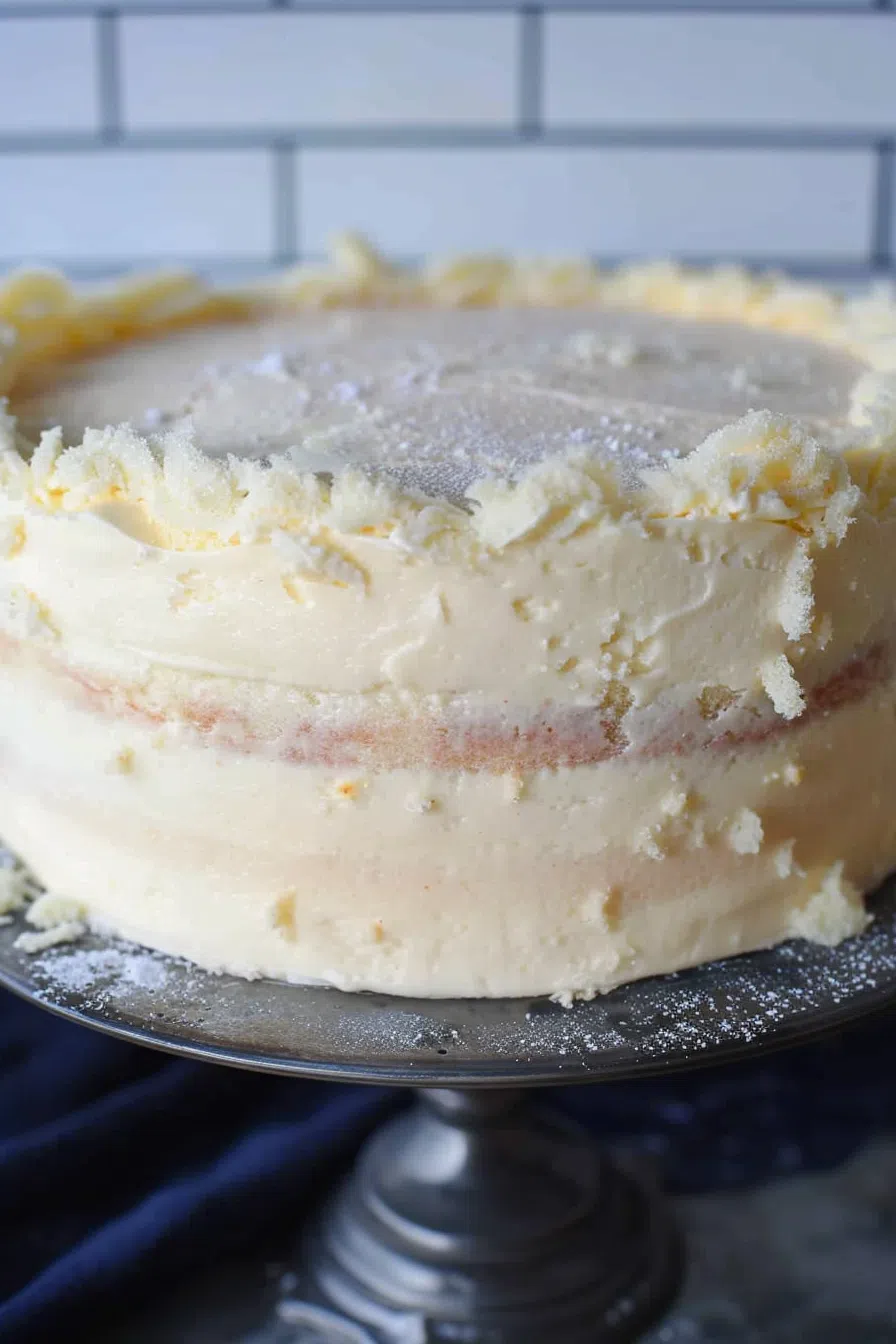
Fluffy White Velvet Cake – If you’re yearning for something extravagant, you’ve got to try this Fluffy White Velvet Cake. Imagine delicate layers of cake made with buttermilk and egg whites, giving you a texture so light, it practically melts in your mouth. And let’s not forget the frosting—creamy and rich with a hint of almond and vanilla. A perfect treat for celebrations or just when you need to indulge!


The first time I assembled this cake, I was a little uneasy. Velvet cakes can be tricky, right? But I remember my husband sneaking a taste of the batter and saying, “This is going to be amazing!” My child even started hovering around the kitchen, waiting to see if they could score a slice before dinner (no shame, right?). And let me tell you, once it was done—golden, fluffy, and topped with that dreamy frosting—everyone went silent. You know that moment when the food is so good, that everyone stops talking? Yep, it was that moment.
What makes this Fluffy White Velvet Cake truly special?
This cake is all about balance. It’s rich but not heavy, sweet but not overwhelming. The buttermilk and egg whites make the cake incredibly light and airy, while the frosting is smooth and packed with flavor, thanks to a hint of vanilla and almond. Plus, it’s the kind of cake you can dress up with sprinkles or berries, or keep it simple—either way, it’s going to impress. Excellent for birthdays, festivities, or just because you desire to treat yourself. Because, honestly, don’t we all deserve a little cake now and then?

What You Need To Make This Fluffy White Velvet Cake Recipe?
Cake Flour: This is key to getting that super light, velvety texture we love in this cake. It’s different from all-purpose flour because it has less protein, so the cake turns out softer. If you’ve only got all-purpose flour on hand, you can make your own cake flour by mixing in a little cornstarch—works in a pinch!
Buttermilk: Oh, buttermilk. It’s the secret to making this cake super moist and adding just a bit of tangy flavor that balances all the sweetness. If you don’t have buttermilk, don’t worry! You can quickly make some by adding a tablespoon of lemon juice or vinegar to a cup of regular milk and letting it sit for a few minutes.
Egg Whites: You might be wondering why just the egg whites? Well, that’s where the fluffiness comes in. Egg whites give the cake structure without weighing it down, keeping things light and airy. Just make sure they’re at room temp—trust me, it makes all the difference.
Unsalted Butter: We’re using a good amount of butter here, so make sure it’s unsalted. This way, we can control the saltiness and keep the cake sweet and smooth. And don’t rush—let it soften at room temperature before mixing. It makes for a smoother batter.
Vanilla and Almond Extract: These two are like the dynamic duo of flavor. Vanilla brings that warm, sweet base we all love, while almond adds a little something extra, like a subtle nutty note that just elevates everything. Don’t skip the almond—it really makes the frosting shine.
Granulated Sugar: We’re using regular white sugar for both the cake and frosting. Simple and classic. It sweetens the cake just enough without being too much, and in the frosting, it melts down into a creamy dream.
Steps To Make Fluffy White Velvet Cake:
For the cake:
First, preheat your oven to 335°F. Go ahead and grease and line two 8-inch cake pans—trust me, it makes your life easier when you’re trying to get the cakes out later!
In a mixing bowl, toss in your dry ingredients—cake flour, sugar, salt, baking powder, and baking soda. Give it a quick mix with an electric mixer to get everything combined.
Now, grab another bowl and whisk together the egg whites, 3/4 cup of buttermilk, 1/4 cup of oil, and vanilla extract. Just get everything nicely mixed up and set it aside for now.
Here’s where things start coming together—take your butter (make sure it’s softened!) and mix it into the dry ingredients. You want it to be kind of crumbly, but don’t worry if it looks a little weird at this stage.
Now, combine the remaining buttermilk with the rest of the oil. Pour this into your flour-butter mixture and mix for a solid 2 minutes. It’s important—this step helps make the cake super fluffy, so don’t rush it.
Slowly start adding that egg white mixture to your batter in three parts, making sure to mix well after each addition. You want it to be nice and smooth by the end.
Divide the batter between your two prepared pans. Pop them into the oven and bake for about 35-40 minutes. You’ll know they’re done when a knife or toothpick inserted in the center comes out clean.
Once the cakes are done, take them out and give the pans a little tap on a cutting board—this helps even out the cakes. Let them cool in the pans for about 10 minutes, then run a knife around the edges and carefully take them out. Stick them in the fridge for at least 30 minutes before frosting. This makes frosting so much easier!
For the frosting and assembly:
Start by whisking together the flour and sugar in a small saucepan. Cook it over medium heat for about 2 minutes—this gets rid of that raw flour taste we don’t want.
Next, add the milk and turn up the heat to medium-high. Let it cook for another 2 minutes or so until it thickens up like pudding. Once it’s thick, take it off the heat and let it cool completely. You don’t want to add it to the butter while it’s warm!
Grab your electric mixer again and beat the butter for about a minute until it’s nice and creamy. Now, add the cooled milk mixture one spoonful at a time, blending in between each spoonful. When it’s all in, toss in the vanilla, almond extract, and a pinch of salt, and whip until the frosting is light and fluffy.
Time to assemble! If your cake layers are a little uneven on top, just trim them with a serrated knife. Place one cake layer on your serving plate, spread a generous layer of frosting on top, then place the second layer on. Spread a thin layer of frosting all over the cake to lock in any crumbs (this is called a crumb coat). Then, use the rest of the frosting to cover the cake completely.
Slice and serve! You can keep it simple, or if you’re feeling fancy, top it with sprinkles, white chocolate shavings, or even some fresh berries. Enjoy!
Tip:
You know what really takes this cake from “good” to “wow”? Tapping the pans right after they come out of the oven. Yep, it might sound odd, but trust me—just give those cake pans a little tap on the counter or a cutting board. Why? It helps smooth out the cake by releasing any sneaky air bubbles trapped during baking. Think of it as a little trick for a perfectly even texture. Oh, and don’t skip the part where you pop the cakes into the fridge for 30 minutes before frosting. This is a total game-changer! It firms up the cake just enough so you don’t end up with crumbs all through your frosting, plus it locks in all that moisture, making each bite soft, tender, and totally dreamy. So, yeah, it’s a bit of extra time, but I promise it’s worth every second.

Frequently Asked Questions:
Can I swap all-purpose flour for cake flour?
Yeah, you totally can! But just know, your cake might be a little less airy. If you’re out of cake flour, here’s a quick fix: for every cup of all-purpose flour, take out 2 tablespoons and replace them with cornstarch. It’s not perfect, but it does the trick when you’re in a pinch.
How should I store the cake once it’s frosted?
The best way is to pop it in an airtight container and store it in the fridge—it’ll stay fresh for up to 4 days. If you want to bake the layers ahead of time, just wrap them tightly in plastic wrap and keep them in the fridge for a day or two. You can even freeze them for up to 3 months if you’re really planning ahead!
Can I make this cake gluten-free?
Definitely! You just need to swap out the cake flour for a gluten-free baking blend that has xanthan gum in it. It’ll still taste great, though the texture might be a tiny bit different. Also, double-check your other ingredients, like baking powder, to make sure they’re gluten-free, too.


Fluffy White Velvet Cake
Ingredients
For the cake:
- 1 3/4 c cake flour
- 1 1/2 c plus 2 tbsp granulated sugar
- 1 tsp salt
- 1 tbsp baking powder
- 1/2 tsp baking soda
- 2 egg whites at room temperature
- 1 1/4 c buttermilk divided (room temp)
- 1/2 c vegetable oil divided
- 1 1/2 tsp vanilla extract
- 12 tbsp 1 1/2 sticks unsalted butter, softened
For the frosting:
- 1 3/4 c granulated sugar
- 2 tbsp all-purpose flour
- 1 c whole milk
- 3 sticks unsalted butter room temperature
- 1 1/2 tsp vanilla extract
- 1/2 tsp almond extract
- 1/4 tsp salt
Instructions
For the cake:
- First things first, preheat your oven to 335˚F. While that’s heating up, grab your electric mixer and combine all the dry ingredients (flour, sugar, salt, baking powder, baking soda) in one bowl. In a separate bowl, whisk together the egg whites, 3/4 cup of buttermilk, 1/4 cup of oil, and vanilla extract.
- Now, using your mixer, start adding the softened butter into the dry flour mixture. Mix until it looks crumbly—it won’t look smooth yet, but don’t worry! Next, mix the remaining buttermilk with the rest of the oil and pour that into the flour mixture. Keep mixing for a good 2 minutes—this will help create a nice, fluffy batter.
- Slowly add the egg white mixture to your batter, but do it in thirds. After each addition, mix everything really well before adding the next bit. This makes sure the batter stays nice and fluffy.
- Pour the batter evenly into two greased and lined 8-inch cake pans. Pop them into the oven and bake for 35-40 minutes, or until a knife or toothpick inserted into the center comes out clean. Here’s a little trick—right when you take the cakes out of the oven, give the pans a quick tap on the counter. This helps even out any bumps. Let the cakes cool in the pans for about 10 minutes, then carefully run a knife around the edges to loosen them up. Move them to a cooling rack, or stick them in the fridge for at least 30 minutes before frosting—it makes frosting them so much easier!
For the frosting and assembly:
- Start by whisking together the sugar and flour in a small saucepan. Cook it over medium heat for about 2 minutes—this helps take the raw taste out of the flour. Now, slowly add the milk and turn the heat up to medium-high. Let it cook for another 2 minutes, stirring constantly, until it thickens to a pudding-like consistency. Once thick, take it off the heat and let it cool completely. You definitely don’t want to mix this in while it’s still warm.
- While that’s cooling, use a clean mixer to whip the softened butter for about a minute. Once the milk mixture is cool, add it in one spoonful at a time, mixing well after each addition. Then, throw in the vanilla, almond extract, and salt. Whip everything together until the frosting is smooth and creamy.
- If the tops of your cakes are a little uneven, now’s the time to trim them so they’re flat. Place one cake on your serving plate, spread a nice layer of frosting on top, then add the second cake. Do a crumb coat first by spreading a thin layer of frosting over the entire cake—this locks in the crumbs and makes for a cleaner finish. After that, use the rest of the frosting to fully cover the top and sides.
- Cut into slices and serve! For a little extra flair, feel free to garnish with sprinkles, white chocolate shavings, or fresh berries. Enjoy!
Notes
I’m Bitty, owner of nodashofgluten.com, where I share simple, delicious recipes for all tastes, including gluten-free. Check out my “About Me” page for more info!