Description
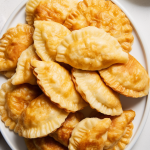
Grandma’s recipe, for Polish Pierogi is a family tradition that combines the deliciousness of mashed potatoes with the tangy flavor of sharp cheddar cheese all wrapped in a soft and golden dough. These mouthwatering dumplings offer a fusion of tastes and textures from the fluffy potato filling to the crispy outside achieved by pan frying. Each bite will transport you back to moments from generations past as this dish represents more than a meal. It embodies treasured memories. Whether enjoyed as a comforting course or a delightful side dish these pierogies have the ability to whisk your taste buds away, to the heart of Poland. Embrace heritage, create lasting memories and relish in the timeless flavors of Grandma’s Pierogi recipe.
Ingredients
2.5 pounds russet potatoes, peeled and diced into large chunks
8 ounces shredded sharp cheddar cheese (preferably freshly grated)
1 small minced onion
½ cup butter, plus more for frying
4 ½ cups all-purpose flour
1 teaspoon salt
½ teaspoon baking powder
1 egg
2 teaspoons olive oil
2 cups warm water
Instructions
To start cook the potatoes until they are easily pierced with a fork. Once done drain them. Transfer to a bowl.
While the potatoes are cooking, melt the butter in a skillet. Sauté the minced onion until it becomes soft which should take 5 to 6 minutes. Pour this buttery onion mixture into the bowl with the potatoes. Add the cheese. Use a potato masher to blend everything until the cheese is completely melted. Season, with salt and pepper according to your taste preferences. Allow the potato mixture to cool down.
While waiting for the potato mixture to cool prepare the dough. In a bowl combine flour, salt and baking powder. In a bowl whisk together an egg and olive oil before adding it to the ingredients. Gradually pour in water one cup, at a time while using your hands to knead the dough. Initially, it may be sticky. After about 2 to 3 minutes of kneading, it will become less so.
Prepare a surface. Use a silpat mat and place one ball of dough onto it. Roll out the dough until it reaches a thickness of ¼ inch. Use a 3-inch circle cookie cutter to cut out rounds of dough and place them on a dish towel.
Take the ball of dough. Repeat the process described earlier to create approximately 24 circles.
To assemble the pierogies gently stretch one dough circle. Place a spoonful of cheesy potato filling in the center. Fold the circle in half creating a taco shape and pinch the edges securely to seal it completely. For security use the back of a spoon to create scalloped edges. Repeat this process for all the dough circles.
Fill a pot, with salted water. Bring it to a boil. Add 6 pierogies at a time into the boiling water. Cook them until they float to the surface, which usually takes 5 minutes. Use a spoon to remove them from the water and place them on a kitchen towel. Cover them with another towel to keep them moist.
The final step is frying the pierogies for added flavor and texture. In a skillet over medium heat melt 2 tablespoons of butter. Place the pierogies in the skillet and cook them for 2 to 3 minutes on one side until they turn brown then flip them over and cook for another 1 to 2 minutes on the other side. If needed add butter while cooking each batch for browning.
Serve your pierogies by drizzling melted butter, over them and accompanying with sour cream or chopped chives as desired.
Notes
To make Grandma’s beloved Polish Pierogi Recipe gluten-free you can use a high-quality blend of flour that is specifically made without gluten instead of all-purpose flour. It’s important to ensure that the baking powder you use is also gluten-free. Luckily the remaining ingredients, like potatoes, cheese and seasonings are already naturally free of gluten. When rolling out the dough that doesn’t contain gluten it’s helpful to add extra flour or use a nonstick surface to prevent sticking since this type of dough tends to be more delicate. By making these adjustments you can still savor the flavors and textures of this timeless dish while accommodating a gluten-free diet.
- Prep Time: 1 hour
- Cook Time: 1 hour